Configuración de tarjeta corporativa (solo edición PRO)
Configure tarjetas de crédito corporativas para habilitar la coincidencia automática de gastos con extractos de tarjetas de crédito.
La configuración de tarjeta corporativa incluye:
- Configuración de acuerdos
- Configuración de tarjeta de crédito
- Definiciones de importación de Excel
Acuerdos
Los acuerdos de tarjetas de crédito se utilizan para definir cómo ExFlow Travel & Expense interactúa con una institución bancaria de tarjetas de crédito específica. Normalmente crea un acuerdo para cada banco de tarjetas de crédito con el que trabaja su organización.
Configurar el acuerdo es el primer paso en el proceso de configuración de tarjetas de crédito. Una vez que el acuerdo está en su lugar, puede configurar tarjetas de crédito corporativas individuales de empleados y asociarlas con el acuerdo apropiado. Esta estructura proporciona la base para procesar y gestionar transacciones de tarjetas de crédito corporativas.
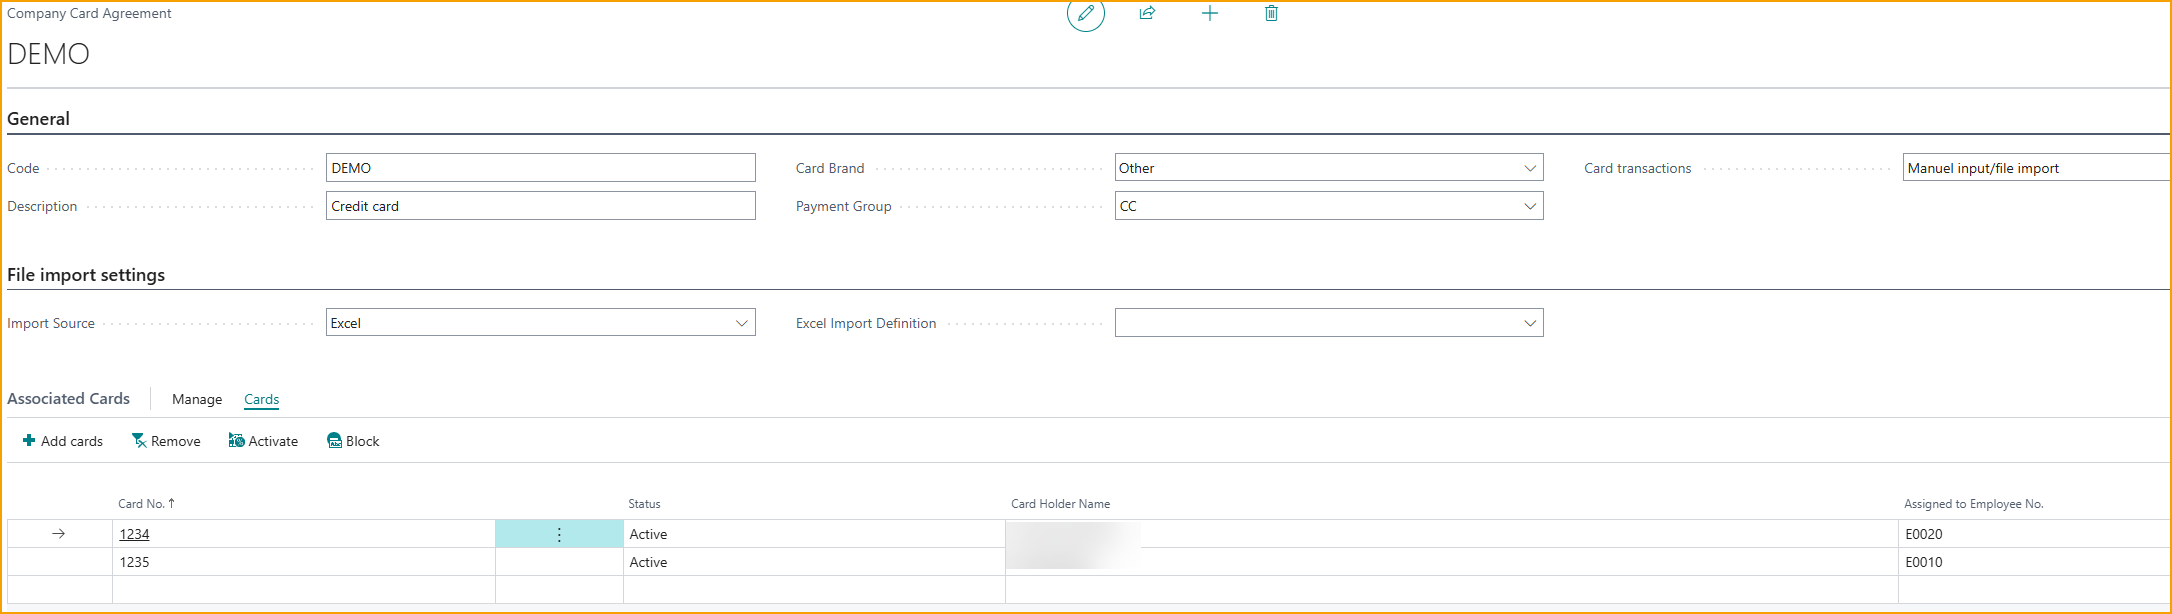
Crear/Gestionar un acuerdo de tarjeta de crédito
- Desde la página Travel & Expense Setup – Overview, en la sección Credit Card, seleccione Agreements
- Seleccione +New para crear un nuevo acuerdo.
- Para gestionar un acuerdo existente, seleccione el acuerdo de la lista y edite el registro.
- Introduzca valores para los siguientes campos:
- General
- Code: Introduzca un identificador corto y significativo.
- Description: Introduzca una descripción.
- Card Brand: Introduzca la marca de la tarjeta de crédito (Visa, Mastercard, etc).
- Balance Type: Seleccione un tipo de saldo que se haya configurado previamente.
- Card Transaction: Seleccione el método para la importación de transacciones de tarjetas de crédito:
- Manual Input/File Import: Seleccione esta opción si la transacción se escribirá manualmente o se importará con un archivo de Excel.
- Bank Statement: Las transacciones de tarjetas de crédito se importan desde el extracto bancario en Business Central.
- Bank Reconciliation: Las transacciones de tarjetas de crédito se importan desde la conciliación bancaria en Business Central.
- Automatic from SEB Card: Las transacciones de tarjetas de crédito se importan desde la integración de tarjetas SEB. (Solo disponible en ciertos países.)
- File Import Settings
- Import Source: Seleccione la fuente de importación. Sus opciones son archivo de Excel o CSV.
- Excel Import Definition: Seleccione la definición de importación de Excel creada previamente, si la fuente de importación es Excel. Consulte las instrucciones de Excel Import Definition para obtener más información.
- Associated Cards
- Esta sección muestra las tarjetas de crédito corporativas que se han vinculado al acuerdo de tarjeta de crédito seleccionado.
- Para asociar tarjetas con un acuerdo, primero debe configurar las tarjetas de crédito corporativas de empleados en la página Company Credit Card Setup.
- Para asociar tarjetas de crédito corporativas con el acuerdo:
- En la sección Associated Cards, seleccione Cards de la barra de acciones, luego elija Add Cards.
- Seleccione una o más tarjetas de crédito corporativas de la lista.
- Para seleccionar múltiples tarjetas de crédito corporativas, haga clic en una línea de tarjeta y presione Shift + Flecha abajo en su teclado.
- Seleccione OK para confirmar.
- Se pueden asociar múltiples tarjetas de crédito corporativas con un solo acuerdo. Para obtener instrucciones detalladas sobre cómo crear tarjetas de crédito corporativas, consulte la sección Company Credit Card Setup.
- General
Configuración de tarjeta de crédito corporativa
La página de configuración de tarjeta de crédito corporativa le permite configurar y gestionar tarjetas de crédito corporativas individuales asignadas a empleados. Esta página muestra todas las tarjetas de crédito corporativas que se han creado, junto con sus empleados y acuerdos asociados.
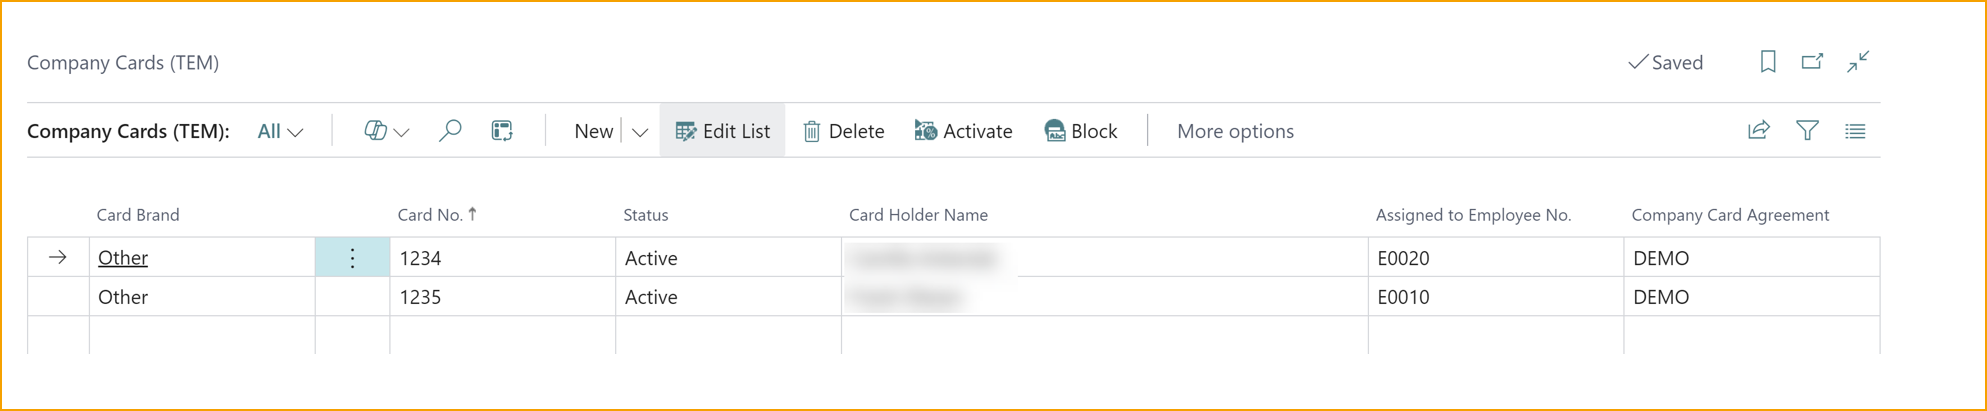
Crear una nueva tarjeta de crédito corporativa
- Desde la página Travel & Expense Setup – Overview, en la sección Credit Card, seleccione Credit Cards.
- Seleccione +New para crear un nuevo acuerdo.
- Card No.: Introduzca el número de tarjeta de crédito.
- Card Holder Name: Introduzca el nombre de la persona que usa la tarjeta.
- Assigned to Employee No.: Seleccione el número de empleado del titular de la tarjeta de la lista.
- Company Card Agreement: Seleccione el acuerdo apropiado para la tarjeta corporativa.
- Card Brand: Se establecerá por defecto una vez que se haya seleccionado el acuerdo de tarjeta corporativa.
- Activate: Después de que se haya registrado una tarjeta de crédito corporativa, debe activarse antes de que pueda usarse. Para establecer el estado de una tarjeta de crédito en Activo, la tarjeta debe asignarse tanto a un acuerdo de tarjeta de crédito como a un empleado.
- Seleccione una Company Credit Card de la lista.
- Haga clic en Activate de la barra de acciones.
Definiciones de importación de Excel
La página de definiciones de importación de Excel le permite definir cómo se mapean e importan los datos de un archivo de Excel de extracto de tarjeta de crédito en ExFlow Travel & Expense. En esta página, configura los mapeos de columnas y las reglas de importación para que el sistema pueda leer y procesar correctamente los datos de gastos de tarjetas de crédito.
Crear una nueva definición de importación de Excel
-
Desde la página Travel & Expense Setup – Overview, en la sección Credit Card, seleccione Excel Import Definition.
-
Seleccione +New para crear un nuevo acuerdo.
-
General
- Code: Defina un código para la definición de importación.
- Description: Introduzca una descripción para la definición de importación.
- Header Line Before Transactions: Habilite este campo si hay una fila de encabezado en el archivo de Excel.
- Caption for First Header Column: Introduzca el título que desea mostrar en el encabezado de la primera columna.
- Date Order: Elija el formato de fecha utilizado en el archivo.
- Payment is Shown as a Negative Amount: Habilite este parámetro si el monto del pago en el archivo es negativo.
- Text to strip from Description: Puede definir texto que deba eliminarse de las descripciones de transacciones durante la importación.
-
Mapear campos a columnas de Excel - Esta sección le permite especificar qué columnas de su archivo de Excel corresponden a los campos en ExFlow Travel & Expense. El mapeo garantiza que el sistema pueda leer e importar correctamente los datos.
Para cada campo enumerado, introduzca la letra de columna de su hoja de cálculo que contiene los datos correspondientes. Esto le indica al sistema dónde encontrar los valores.

Mapear campos a columnas de Excel
- Card Number: Introduzca la letra de columna de su hoja de cálculo que contiene los números de tarjeta de crédito.
- Card Holder: Introduzca la letra de columna de su hoja de cálculo que contiene el titular de la tarjeta.
- Transaction Date: Introduzca la letra de columna de su hoja de cálculo que contiene la fecha de transacción.
- Transaction Amount: Introduzca la letra de columna de su hoja de cálculo que contiene el monto de la transacción.
- Currency: (Opcional) Introduzca la letra de columna de su hoja de cálculo que contiene la moneda.
- Billing Amount: Introduzca la letra de columna de su hoja de cálculo que contiene el monto de facturación.
- Billing Amount (Credit): Las transacciones de tarjetas ahora se pueden importar desde un archivo con soporte para columnas separadas de débito y crédito.
- Description: Introduzca la letra de columna de su hoja de cálculo que contiene la descripción de la transacción.
- Country: (Opcional) Introduzca la letra de columna de su hoja de cálculo que contiene el país.
- MCC: (Opcional) Introduzca la columna para MCC.
- MCC Description: (Opcional) Introduzca la letra de columna de su hoja de cálculo que contiene la descripción MCC.
- Unique Reference: (Opcional) Introduzca la columna para referencia única.
- Invoice No: (Opcional) Introduzca la letra de columna de su hoja de cálculo que contiene el número de factura.
-
Asigne el mapeo de importación de Excel al Company Card Agreement apropiado.