Configuración de Empleados
Esta sección explica cómo configurar empleados para utilizar ExFlow Travel & Expense (TEM). ExFlow Travel & Expense se basa en las fichas de empleados de Business Central, y cada usuario de TEM debe tener una ficha de empleado correspondiente en Business Central.
Esta sección cubre los siguientes escenarios:
- Habilitar Travel & Expense para usuarios sin ficha de empleado: Cómo configurar un usuario de TEM cuando aún no se ha creado una ficha de empleado en Business Central.
- Habilitar Travel & Expense utilizando fichas de empleados existentes de Business Central: Cómo habilitar TEM para usuarios que ya tienen una ficha de empleado en Business Central.
- Configuración adicional del empleado: Después de habilitar un empleado para Travel & Expense (TEM), se requieren pasos de configuración adicionales para completar su configuración.
Habilitar Travel & Expense para usuarios sin ficha de empleado
ExFlow Travel & Expense se basa en las fichas de empleados de Business Central. Si un usuario aún no está configurado como empleado en Business Central, primero debe crear una ficha de empleado. Durante este proceso, también puede habilitar al empleado para Travel & Expense.
- Desde la página Travel & Expense Setup – Overview, seleccione Employees.
- Seleccione + New para crear una nueva ficha de empleado.
- Ingrese toda la información necesaria para configurar al empleado (configuración estándar de Business Central).
- Desde el encabezado de la página, seleccione el menú ExFlow Travel & Expense.
- Seleccione Configure for TEM para iniciar el asistente de configuración de Travel & Expense.
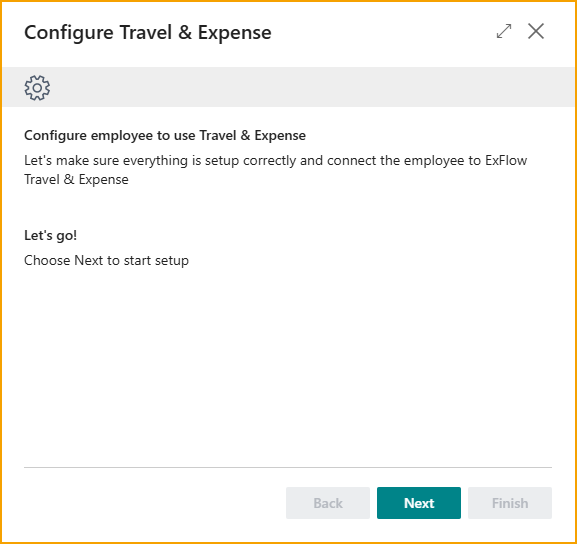
- En el asistente de configuración:
- Seleccione Next para comenzar.
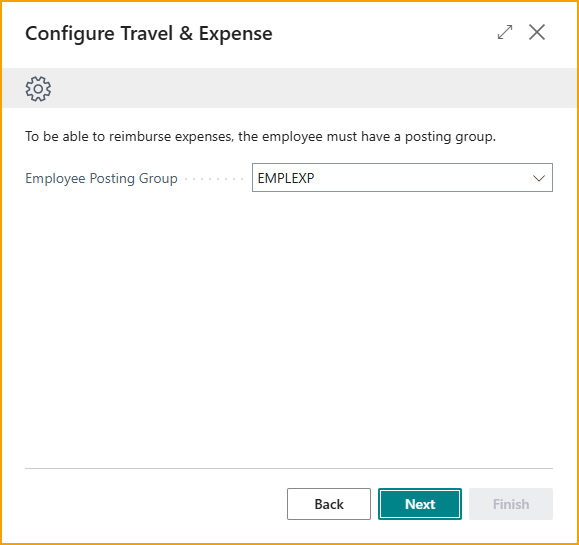
- En la siguiente página del asistente de configuración:
- Employee Posting Group: Seleccione el grupo de registro de empleados para asignar al empleado.
- Employee Profile: Seleccione el perfil de empleado para asignar al empleado.
- Seleccione Next
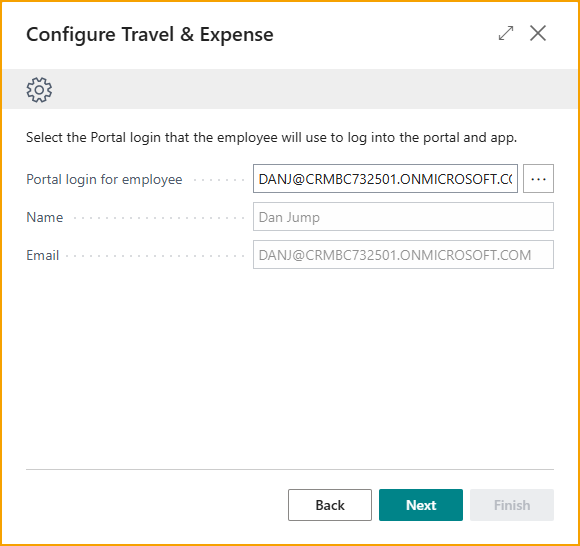
- En la siguiente página del asistente de configuración:
- AppsForDynamics365 Login:
- Si existe un inicio de sesión de AppsForDynamics365 (creado manualmente o por el asistente de configuración inicial de TEM) con la misma dirección de correo electrónico que la ficha de empleado, se completará automáticamente.
- Si existe un inicio de sesión de AppsForDynamics365 pero no se completa automáticamente, selecciónelo desde la búsqueda.
- Si no existe un inicio de sesión de AppsForDynamics365, seleccione los usuarios para los que desea crear uno y haga clic en + New para crear un inicio de sesión de AppsForDynamics365. Consulte la sección AppsForDynamics365 login para más información.
- Seleccione Next
- AppsForDynamics365 Login:
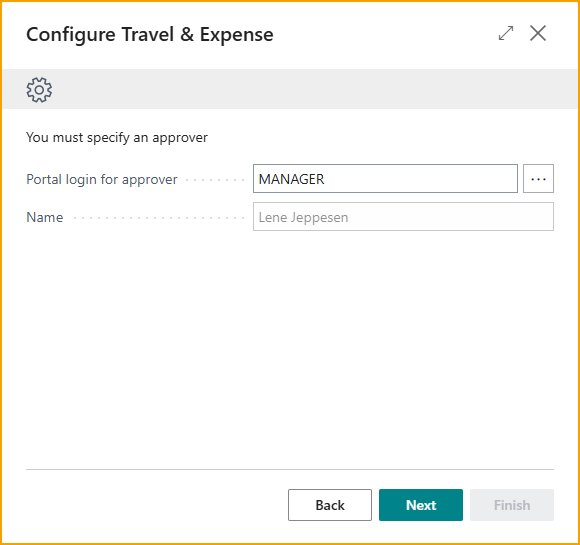
- En la siguiente página del asistente de configuración:
- Portal Login For Approver: Seleccione el aprobador que revisará y aprobará las transacciones de gastos de este empleado.
- Seleccione Next.
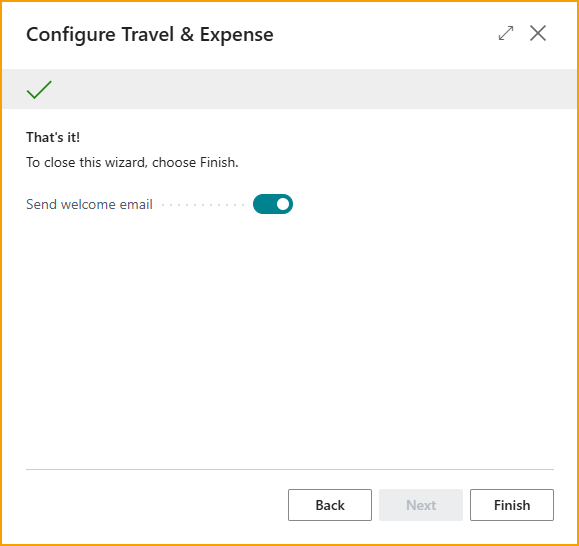
- En la última página del asistente de configuración:
- Send Welcome Email: Habilite esta opción para enviar un correo electrónico de bienvenida al empleado con los detalles de acceso a Travel & Expense.
- Send Welcome Email: Habilite esta opción para enviar un correo electrónico de bienvenida al empleado con los detalles de acceso a Travel & Expense.
- Seleccione Next para comenzar.
- Vaya a la sección Configuración adicional del empleado para completar la configuración del usuario.
Habilitar Travel & Expense para usuarios con una ficha de empleado existente
ExFlow Travel & Expense se basa en las fichas de empleados de Business Central. Siga los pasos a continuación para habilitar Travel & Expense para empleados que ya tienen registros de empleados en Business Central.
- Desde la página Travel & Expense Setup – Overview, seleccione Employees.
- Desde el menú ExFlow Travel & Expense en el encabezado de la página, seleccione Add Multiple.
- Se abrirá la ventana Select Users to Add to TEM.
- Para cada empleado que desee habilitar para Travel & Expense, revise o configure los siguientes campos:
- Email: Se completa automáticamente con la dirección de correo electrónico de la ficha de empleado de Business Central cuando coincide con la cuenta de usuario de Business Central del empleado.
- AppsForDynamics365 login:
- Si ya existe un inicio de sesión de AppsForDynamics365 (creado por el asistente de configuración o manualmente) y el correo electrónico del inicio de sesión coincide con el correo electrónico del empleado, el inicio de sesión se selecciona automáticamente.
- Si existe un inicio de sesión de AppsForDynamics365 pero el correo electrónico no coincide con el del empleado, seleccione el inicio de sesión correcto usando la búsqueda (tres puntos).
- Si no existe un inicio de sesión de AppsForDynamics365 para el empleado, seleccione el registro del empleado y elija Create AppsForDynamics365 Login desde el menú de acciones.
- Approver: Asigne un aprobador para los informes de gastos del empleado.
- Selected: Marque la casilla de verificación para los empleados que desea habilitar para TEM.
- Haga clic en Add TEM to Selected en la barra de acciones.
- Cuando se le solicite, seleccione Yes para confirmar la adición de los usuarios.
- Vaya a Configuración adicional del empleado para completar la configuración del usuario.
Configuración adicional del empleado
Después de habilitar un empleado para Travel & Expense (TEM), se requieren pasos de configuración adicionales para completar su configuración. Es especialmente importante asegurar que los campos relacionados con el reembolso estén correctamente configurados para evitar problemas de pago.
Completar estos campos asegura que el empleado pueda enviar gastos y ser reembolsado correctamente según la configuración de Travel & Expense de su organización.
- Desde la página Travel & Expense Setup – Overview, seleccione Employees.
- Seleccione un empleado de la lista y elija Edit.
- Desplácese hasta la sección ExFlow Travel & Expense y configure los siguientes campos según corresponda:
-
Employee Profile: Asigne un perfil de empleado que haya sido configurado previamente. Los perfiles de empleados controlan las políticas de gastos y el comportamiento del sistema para grupos de empleados. Consulte la sección Employee Profiles para más información.
-
Alt. No. For File Export: Opcional cuando el método de reembolso está configurado como File Export. Ingrese un identificador alternativo del empleado si es necesario para las exportaciones de archivos de reembolso o nómina.
Cuando los reembolsos se procesan a través de una exportación de nómina, el número de empleado en el sistema de nómina a menudo difiere del número de empleado en Business Central. Si se especifica un número alternativo, se utilizará en el archivo de exportación en lugar del número de empleado de Business Central.
-
Vendor No. For Reimbursement: Requerido cuando el método de reembolso está configurado como Vendor. Asigne el número de proveedor que representa al empleado para los pagos de reembolso.
Si este campo no está completado mientras se usa el método de reembolso Vendor, los reembolsos no podrán ser procesados.
-
Portal Login: Muestra el inicio de sesión del portal AppsForDynamics365 del empleado utilizado para acceder a Travel & Expense.
-
Approver: Muestra el aprobador asignado para revisar y aprobar los informes de gastos del empleado.
-
Usar Copilot para crear empleados
También está disponible un Copilot para ayudar con la importación de empleados. Dado que los empleados a menudo aún no están creados en Business Central cuando las organizaciones comienzan a usar la gestión de gastos, y los empleados son necesarios para que la solución funcione, este Copilot simplifica la configuración inicial.
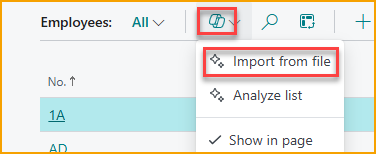
Los usuarios pueden cargar un archivo Excel o CSV, típicamente exportado del sistema de nómina, y Copilot analizará el contenido y preparará los empleados para su creación. Por ejemplo, un archivo CSV como este:
Employee No;Name;Email;Bank reg. No;Bank Account
1;John P. Doe;jd.company.com;1233;87119212
9;Mary Poppins;mp@company.com;8211;721231
resultará en empleados sugeridos como se muestra.
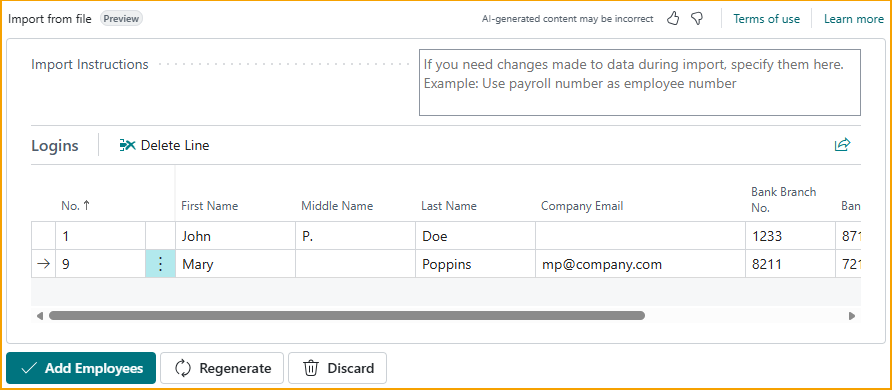
Si los datos no se mapean correctamente, puede ajustar la transformación ingresando una instrucción y seleccionando Regenerate.
Por ejemplo, si desea que el No. de empleado difiera del No. de nómina, puede ingresar una instrucción como:
make the employee no the first two letters of first name and first two of last name
y el sistema generará valores actualizados en consecuencia.

Después de revisar los registros sugeridos, el usuario puede seleccionar Add Employees, y los empleados se crearán automáticamente.