Expense Categories
An Expense Category classifies the type of expense an employee incurs. Categories appear in the TEM web portal and mobile app, and employees must select the category that best describes their purchase.
Expense categories help organize, track, and report expenses consistently, while allowing the system to apply rules such as default accounts, approval policies, spending limits, and posting rules. When combined with a few additional criteria, they enable non-finance users to record expenses accurately and provide finance with the information needed for proper GL posting.
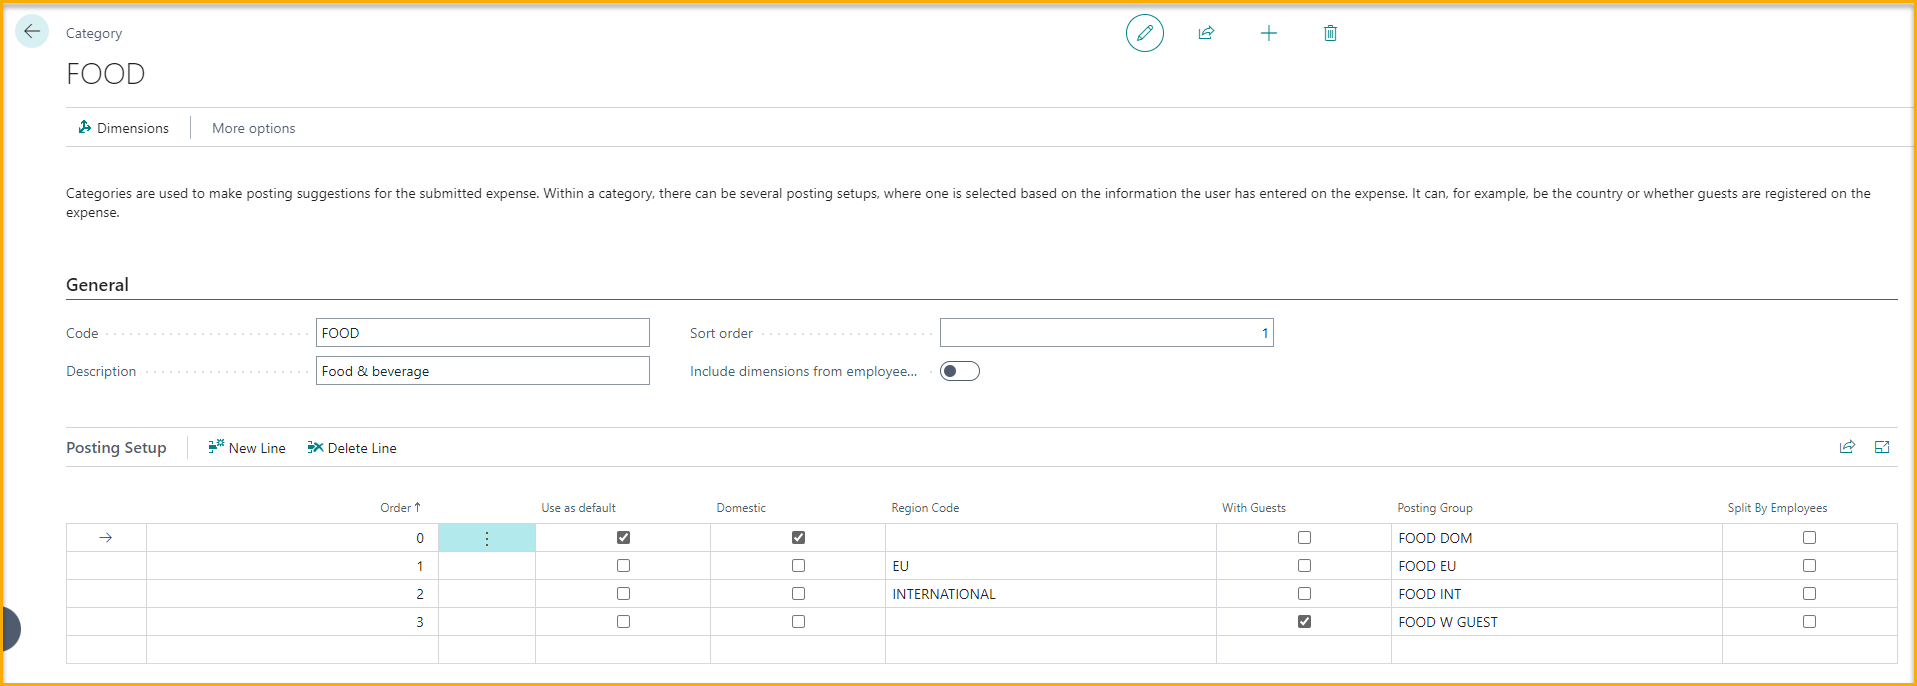
Each expense category can have multiple posting setups, allowing expenses to post to different G/L accounts based on criteria such as:
- Domestic or international expense
- Region code
- Presence of guest information
By guiding users and automating posting suggestions, Expense Categories ensure expenses are recorded correctly without requiring accounting knowledge.
Create/Manage an Expense Category
-
From the Travel & Expense Setup – Overview page, select Expense Categories.
-
Select New to create a new expense category.
-
To Manage an expense category, select the expense category and select Edit from the Manage menu.
-
Enter values for the following fields:
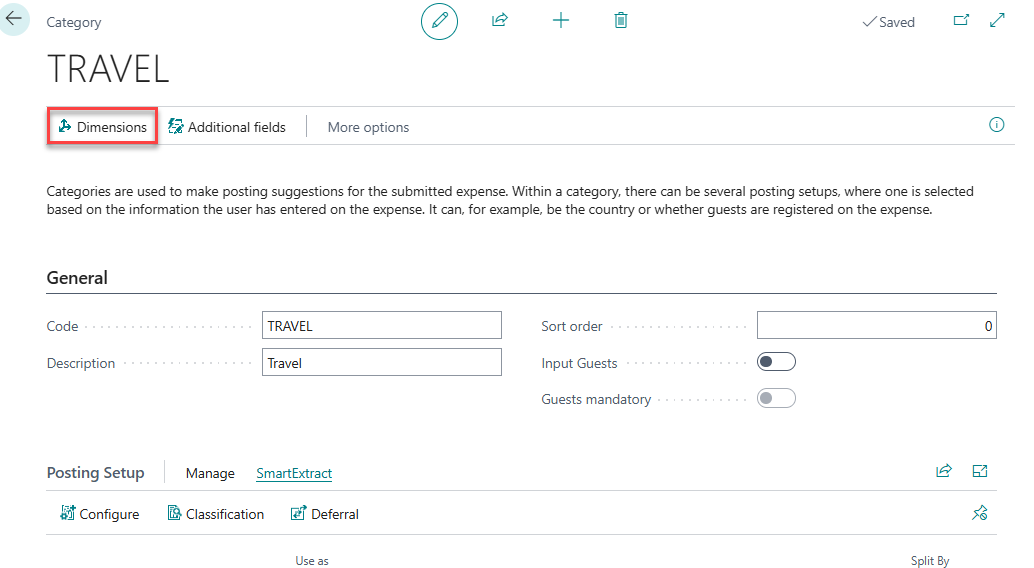
- General
- Code: Enter a short, meaningful identifier for the expense category.
- Description: Enter a clear description for the expense category.
- Sort Order: Defaults to 0, which displays items in alphabetical order. Enter a numeric value to define a custom sort sequence.
- Input Guests: Enable this option to allow users to enter guest information on expense transactions for this category. This is typically used for expenses such as meals or entertainment where guest details are required for reporting or compliance purposes.
- Guests mandatory: Enable this option to require users to enter guest information on expense transactions for this category. When enabled, an expense cannot be submitted unless the required guest details are provided.
- Require Company Name for Guests: Enable this option to require that guests include a company name when applicable, helping ensure compliance with client entertainment scenarios. This requires the SmartExtract “Extract name/company from Guest” feature to be enabled in Setup.
- Project Mandatory: Enable this option to require users to enter project number and project task on expense transactions for this category. When enabled, an expense cannot be submitted unless the project number is selected.
- General
-
Posting Setup
- Select New to create a new posting setup.
- Order: When multiple posting setups exist, the system determines which one to use first by the expense criteria to find the best match, then by Order if none of the setups precisely match the expense registration. If a posting setup precisely match the posting setup critiera the posting setup with the highest priority number will be applied by the system.
- Use as Default: Enable this option to designate the posting setup as the default selection.
- Domestic: This option indicates that the posting setup will only apply to expenses incurred in the employee's home country.
- Region Codes: This option indicates that the posting setup will only apply to expenses incurred in the defined region.
- Has Project: When project information is specified, whether mandatory or optional, it can be used as a parameter to select the appropriate posting setup for the expense.
- With Guests: This option indicated that the posting setup will only apply to expenses where guests have been defined on the transaction.
- Posting Groups: Select the posting group that will be applied to the expense if the posting setup criteria is met.
- Split By Employees: If the setup requires the expense to be split between employees, tick off Split by Employees.
- Employee Profile: If populated on Expense Category, employee profile will also be used as a criteria to select the corresponding Posting Group for an expense.
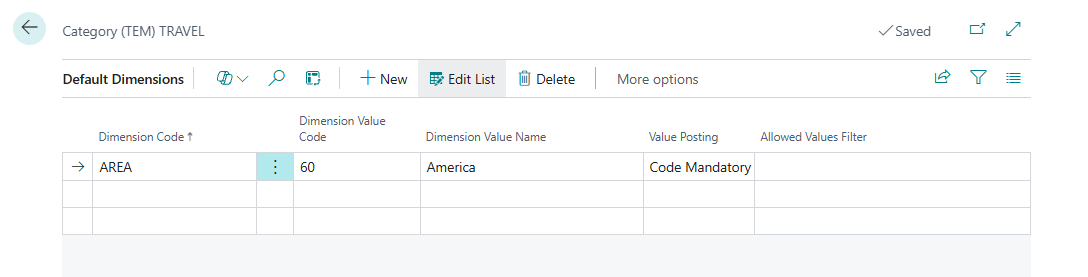
Assign Default Dimensions Values
This page allows you to assign default dimension values that will automatically be applied whenever this expense category is used. Default dimension values are not visible to the employee during expense entry; they are applied automatically when the expense is created.
- On the Expense Category, select the appropriate Posting Rule to configure.
- Select Dimension from the action bar.
- Assign Default Dimensions:
- Dimension Code: Select the Dimension Code to setup a default value for.
- Dimension Valude: Select the Dimension Value to default from the lookup list.
- Value Posting: Select a Value Posting.
- Allowed Values Filter: Assign Allowed Values if applicable.
Enable Additional Fields for Expense Category
This page allows you to enable previously created Additional Field Setups, making the corresponding fields visible when users enter expenses for this category.
- In the Expense Category action bar at the top of the page, select Additional Fields.
- Select the Additional Field Setup you wish to enable and check the Enabled checkbox.
- The expense entry page will now display the additional fields that are enabled when this expense category is used.
SmartExtract
SmartExtract is an AI-powered feature that automates the extraction, classification, and allocation of expense details prior to posting. It helps finance teams ensure accurate application of G/L accounts, deferral schedules, and tax treatment during expense processing.
Key Features:
- Automated Line-Item Extraction: SmartExtract can break down a single receipt into multiple expense lines based on category and tax rules. For example, a hotel invoice may be split into accommodation, breakfast, and parking.
- AI-Based Subcategorization: When expenses are submitted under broad categories (e.g., “Travel”), SmartExtract uses AI to assign them to more specific subcategories such as “Taxi,” “Flight,” or “Hotel,” based on your organization’s expense structure.
- Deferral Handling: Expenses like subscriptions can be deferred through configurable templates, supporting compliance with accounting policies.
- Receipt Intelligence: Manual interpretation of receipts is no longer required. SmartExtract automatically extracts relevant data and applies appropriate categorization and tax treatment.
Best Practices
- Assess where SmartExtract adds value. In most cases, it is most effective when applied to domestic expenses, where receipt formats and tax rules are more predictable. Consider defining specific scenarios or categories where automated extraction will improve accuracy or reduce manual effort.
- Use clear, natural language in Posting Group descriptions. For example, “Food and beverage” is more effective than “Meals, Personnel.”
- Be aware that AI-based extraction may occasionally return incorrect data. A notice will appear on the expense card for any item processed by SmartExtract.
Smart Extract Configuration:
SmartExtract can be configured in two ways: Split or Classify. You can also setup deferral to defer certain types of expenses over a series of time.
SmartExtract Split
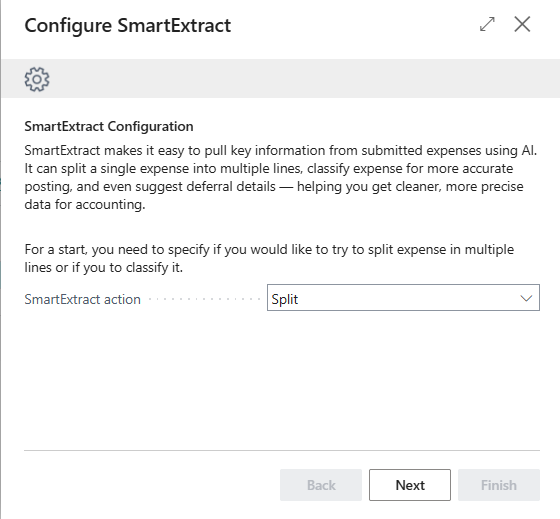
Use the Split option to split an expense transaction into multiple lines, This option is useful when a single receipt contains multiple cost types that must be posted to different posting groups or GL accounts.
When configured, SmartExtract automatically extracts line-level details from the submitted receipt and splits the expense into multiple lines for expenses assigned to this Expense Category.
-
Split Example:
An employee submits a receipt that includes both office supplies and IT equipment, and your organization requires these costs to post to different GL accounts.- Expense Category: SUPPLIES
- Posting Groups:
- OFFICE-SUPPLIES
- IT-EQUIP
When an employee submits an expense using the SUPPLIES category, SmartExtract scans the receipt and identifies the relevant line items. If matching items are found, the expense is automatically split into multiple lines, each assigned the appropriate posting group and amount.
- Configure SmartExtract Split
-
On the Expense Category, select the appropriate Posting Rule to configure.
-
In the Posting Setup section, open the Smart Extract menu and click Configure.
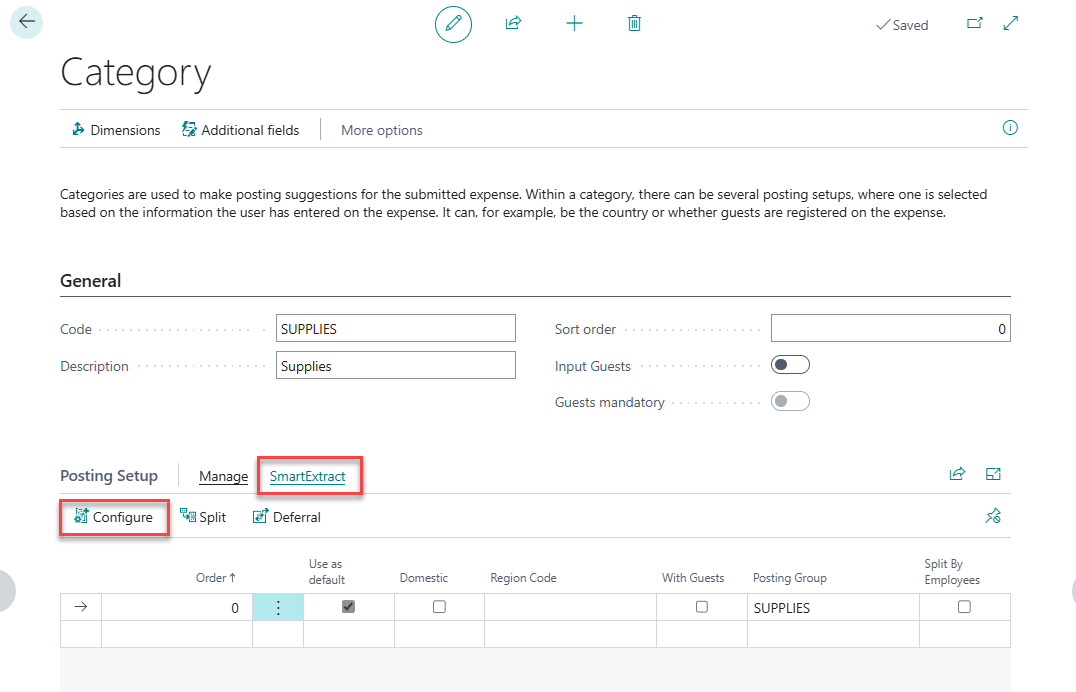
-
SmartExtract Action: Select Split
-
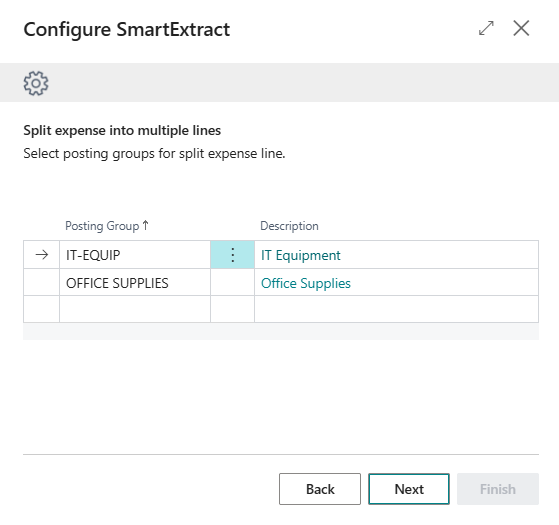
Select the Posting Groups to apply to this Expense Category and Posting Setup.
-
SmartExtract Classify
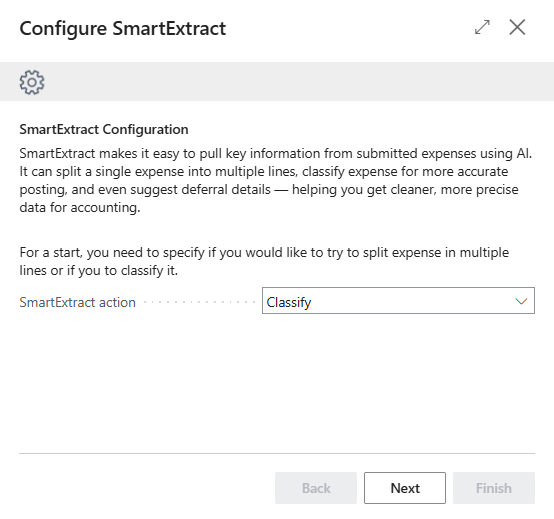
Use the Classify option to split an expense transaction by receipt contents to simplify user-facing categories while maintaining detailed financial records.
This option is useful when you want to reduce the number of Expense Categories users must select from and instead allow SmartExtract to determine the appropriate posting based on receipt data.
When configured, SmartExtract attempts to classify each expense assigned to this Expense Category based on the content of the receipt and assigns the corresponding posting group. If no match is found, the default posting rule is applied.
-
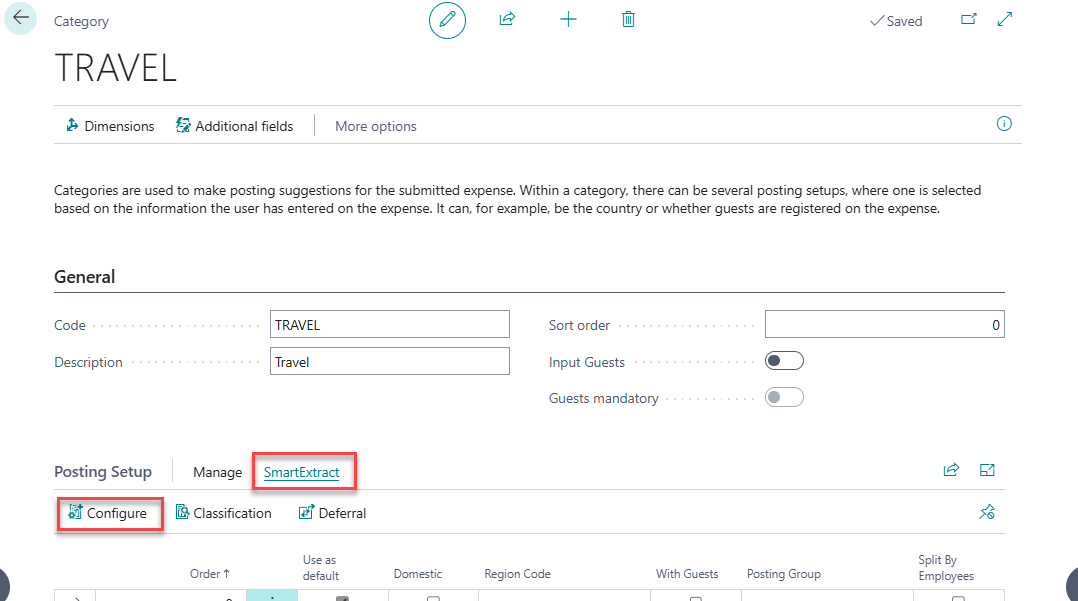
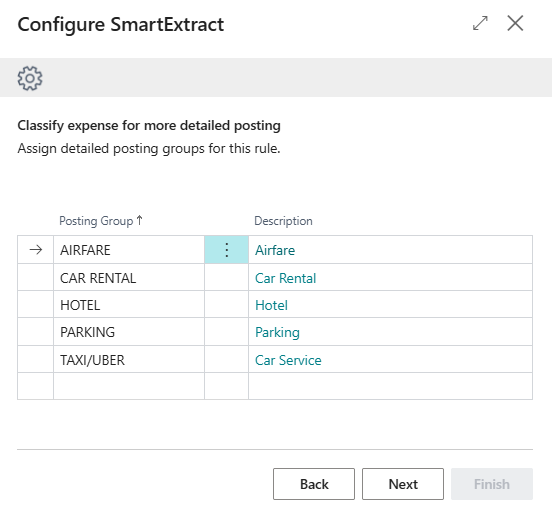
Classify Example: Suppose you want employees to select a single TRAVEL expense category to simplify expense entry for all business travel-related expenses, but you still want the system to post to different G/L accounts based on the type of expense shown on the receipt.
- Create a single Expense Category called TRAVEL and configure SmartExtract to classify expenses into posting groups such as:
- AIRFARE
- CAR RENTAL
- HOTEL
- PARKING
- TAXI/UBER
- When an employee submits an expense with a receipt for an airline ticket, they select the TRAVEL category. SmartExtract analyzes the receipt, detects that it is a flight expense, and assigns it to the Flight posting group.
- If SmartExtract cannot classify an expense, the system applies the default posting rule.
- Create a single Expense Category called TRAVEL and configure SmartExtract to classify expenses into posting groups such as:
-
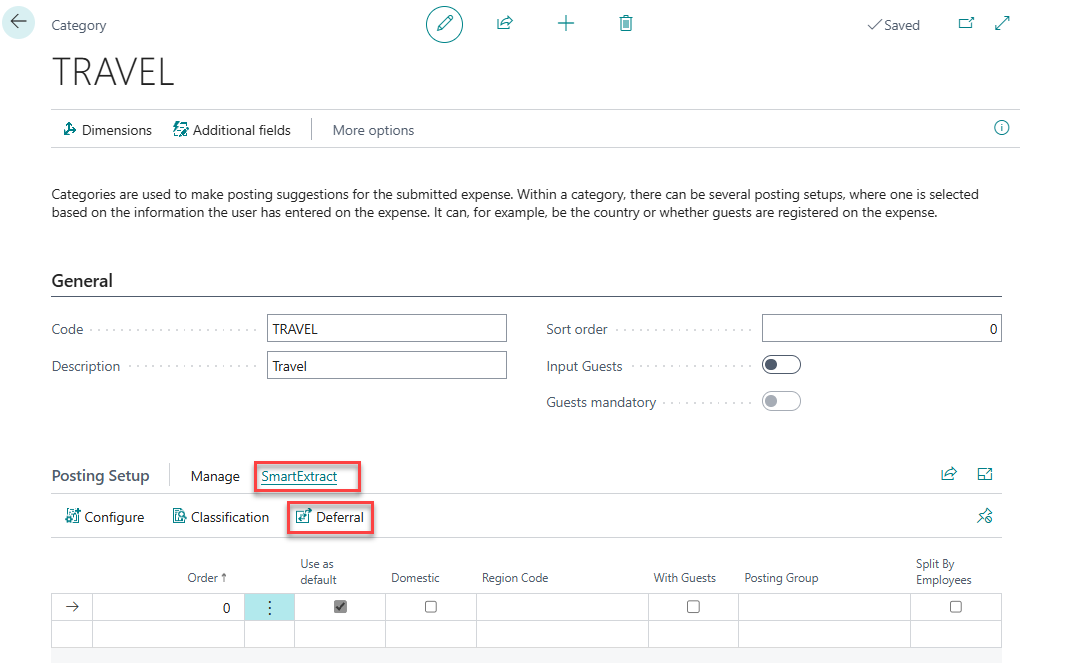
Configure SmartExtract Classify
- On the Expense Category, select the appropriate Posting Rule to configure.
- In the Posting Setup section, open the Smart Extract menu and click Configure.
- SmartExtract action: Select Classify
- Select the Posting Groups to apply to this Expense Category and Posting Setup.
SmartExtract Deferral
SmartExtract Deferral allows you to assign a predefined Deferral Template (standard BC functionality) to an expense category. This will allow you to automatically defer certain types of expenses over a series of time.
- On the Expense Category, select the appropriate Posting Rule to configure.
- In the Posting Setup section, open the Smart Extract menu and click Deferral.
- Configure each category with applicable deferral templates.
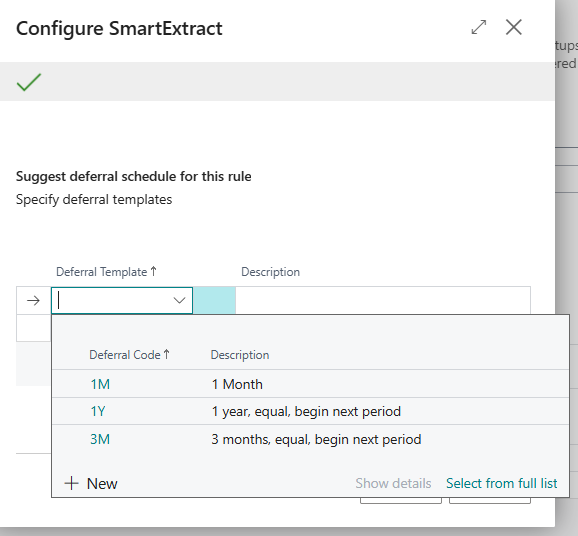
- When an expense is submitted, SmartExtract will identify relevant dates and apply the matching template.