Sales Order Import Setup
Go to: ExFlow Sales Order Import Setup
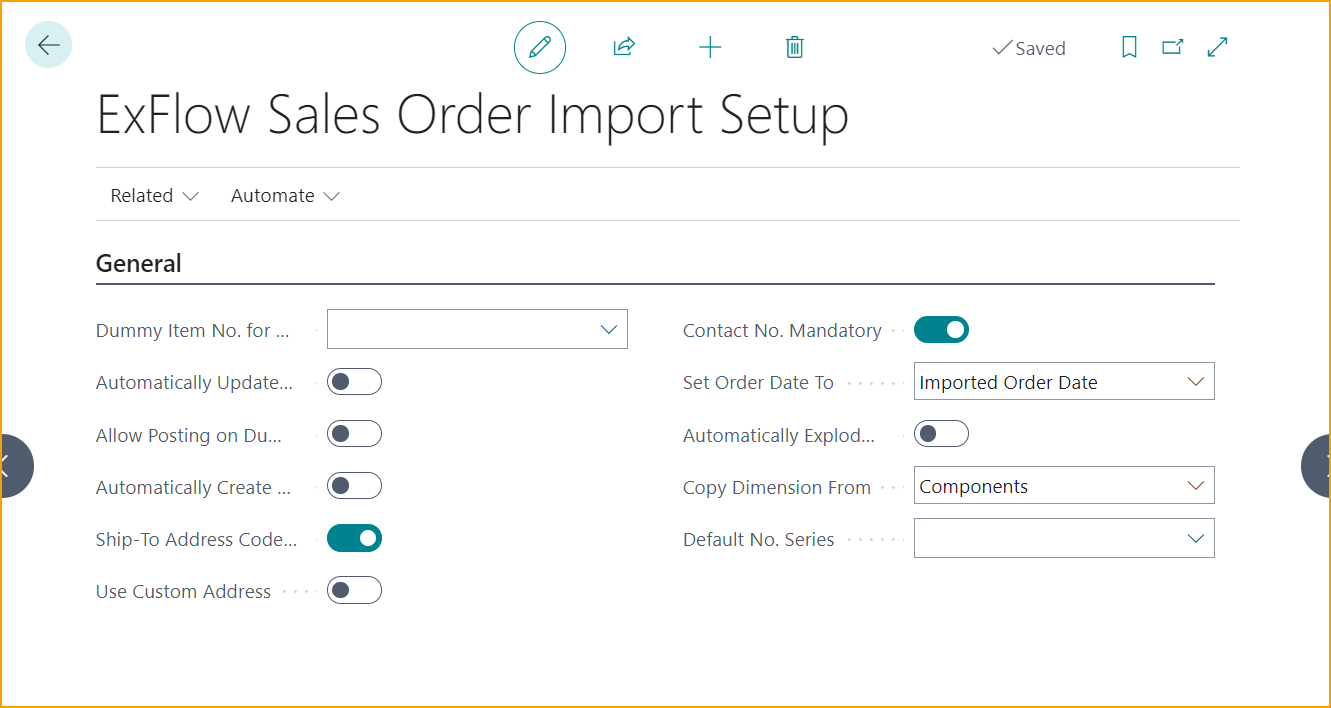
Next step is to specify a couple of parameters in ExFlow Sales Order Import Setup.
| General | |
|---|---|
| Dummy Item No. for Sales Order Import: | Specifies the Dummy Item to be used in case there is no other match for imported sales order line. |
| Automatically Update OCR Mapping When Dummy Item is Applied | Specifies if the OCR Mapping will be automatically updated if the user made selection, after dummy item was applied during import. |
| Allow Posting on Dummy Item | Specifies if the posting is allowed on Dummy Item. |
| Automatically Create Documents | Decides if documents without errors will be automatically created as sales orders on import. |
| Ship-To Address Code Mandatory | Specifies if the field Ship to Address Code is required, if enabled a code needs to be selected to create the Sales Order. |
| Use Custom Address | Use the custom address interpreted from the OCR Service or add it manually after the order has been created. If address fields are not populated from import, the order will be created with the customers default shipping address. If this setting is enabled, then ''Ship-To Address Code'' will be disabled. |
| Contact No. Mandatory | Specifies if the field Contact No. is required, if enabled a code needs to be selected to create the Sales Order. |
| Map Contact Name | If this setting is enabled, then the interpreted Contact Name can be mapped to Contact No. on a customer level. Mapping can then be found in Dynamic OCR Mapping Header table list. OCR takes highest priority and will be matched over any contact matching based on contact details. When matching on contact details the contact with the most matches against the contact matching criteria (name, email, phone no, or mobile phone no.) will take priority. For example: if you have 2 contact matches on the phone no., but the name matches for only 1 of those contacts, then the contact with the matching phone no., and name will be chosen. |
| Set Order Date To | Specifies what the Order Date should be set to on the Sales Order. |
| Automatically Explode BOM Items | Specifies if imported BOM-Item lines will be exploded when sales order is created. |
| Copy Dimension From | Specifies from where exploded BOM-Items should copy dimensions from. |
| Default No. Series | Specifies the No. Series that is used when creating sales orders with ExFlow. If blank, No. Series from the Sales & Receivables Setup will be used. Mandatory to have No. Series set to be able to import. |
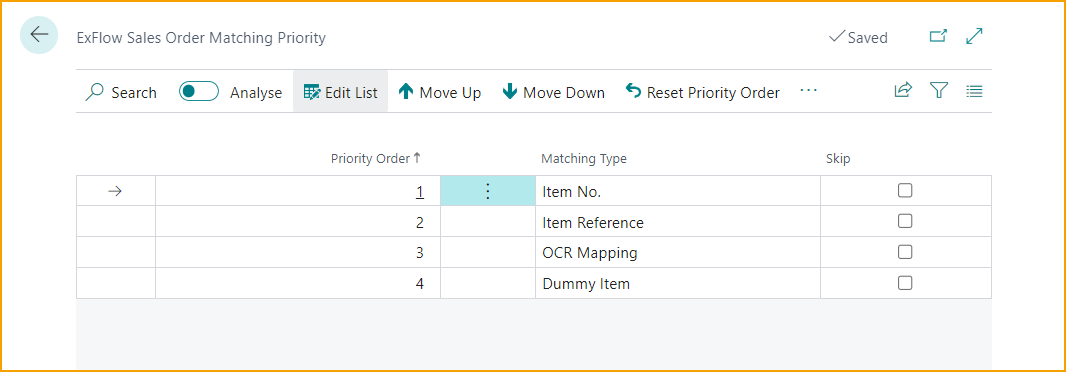
ExFlow Sales Order Matching Priority
Go to: ExFlow Sales Order Import Setup --> Related --> ExFlow Sales Order Matching Priority
Edit the list if a matching priority is to be followed, or excluded in the matching process.
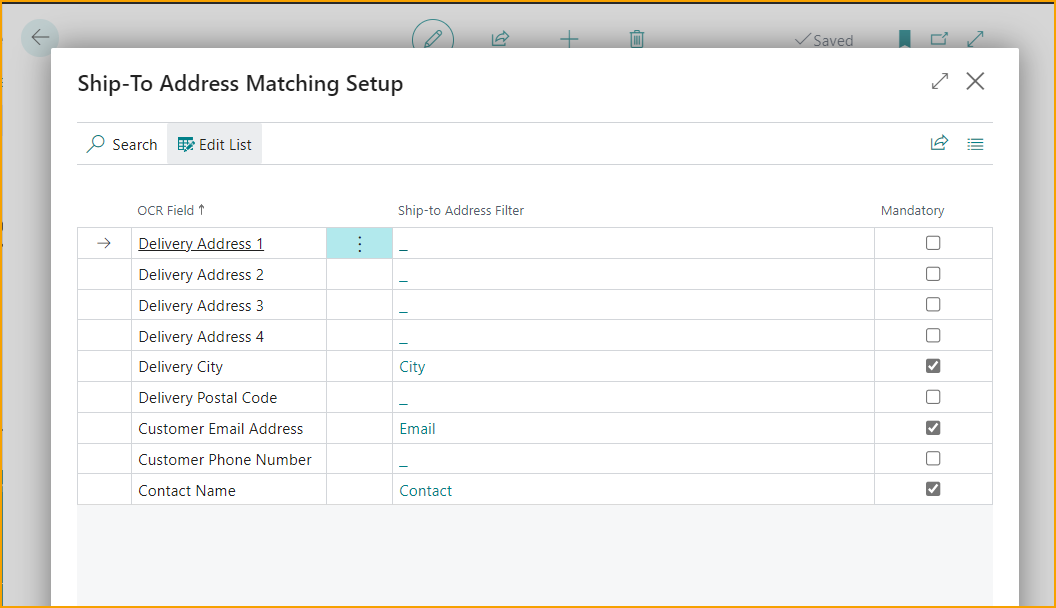
Ship-To Address Matching Setup
Go to: ExFlow Sales Order Import Setup --> Related --> Ship-To Address Matching Setup
Edit the list to make changes regarding the mandatory fields of interpreted values, like Contact name or Delivery City. If the interpreted value mismatch customers Ship-To Address then the imported document will stay in the imported sales list with error and needs to be handled manually.
All mandatory -marked fields must be met to avoid error on the imported document, so it must for example have a Ship-to Address Filter ''City'', ''Email'' and ''Contact'' according to the example below.
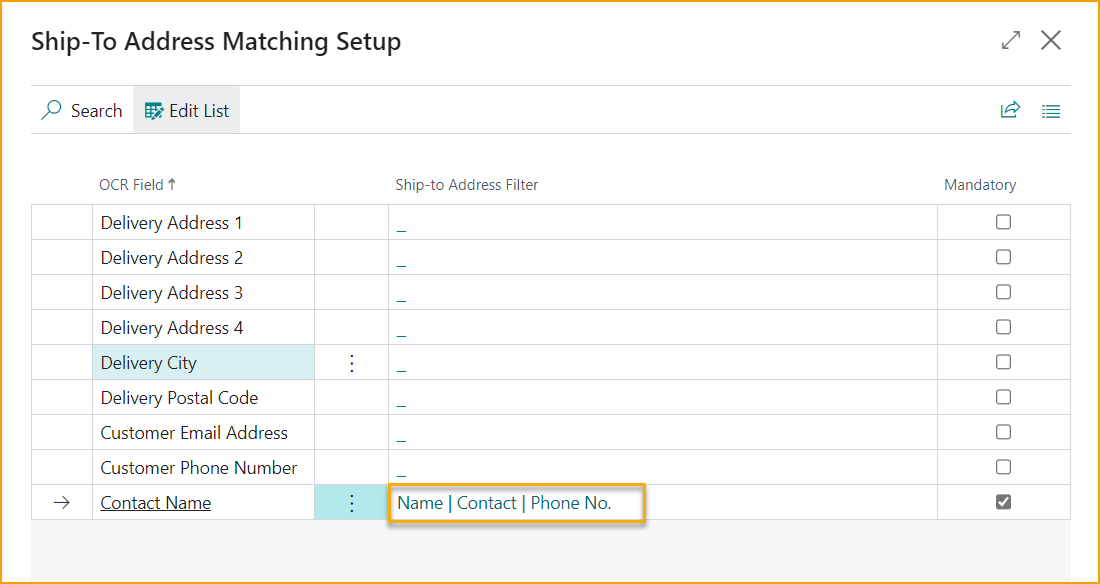
Furthermore, it possible to add more than one value on the Ship-to Address Filter. For instance, in the OCR Field ''Contact Name'', add filter ''Name, Contact and Phone No.'' in the Ship-to Address Filter. So, when interpreting a Contact Name in EDC, it's possible to interpret for example a phone no instead of a Name. It's also possible to work with interpreting more than one specific Contact/Name. As long the information exist on the Customer in Business Central, then the sales document will be processed and created when imported.
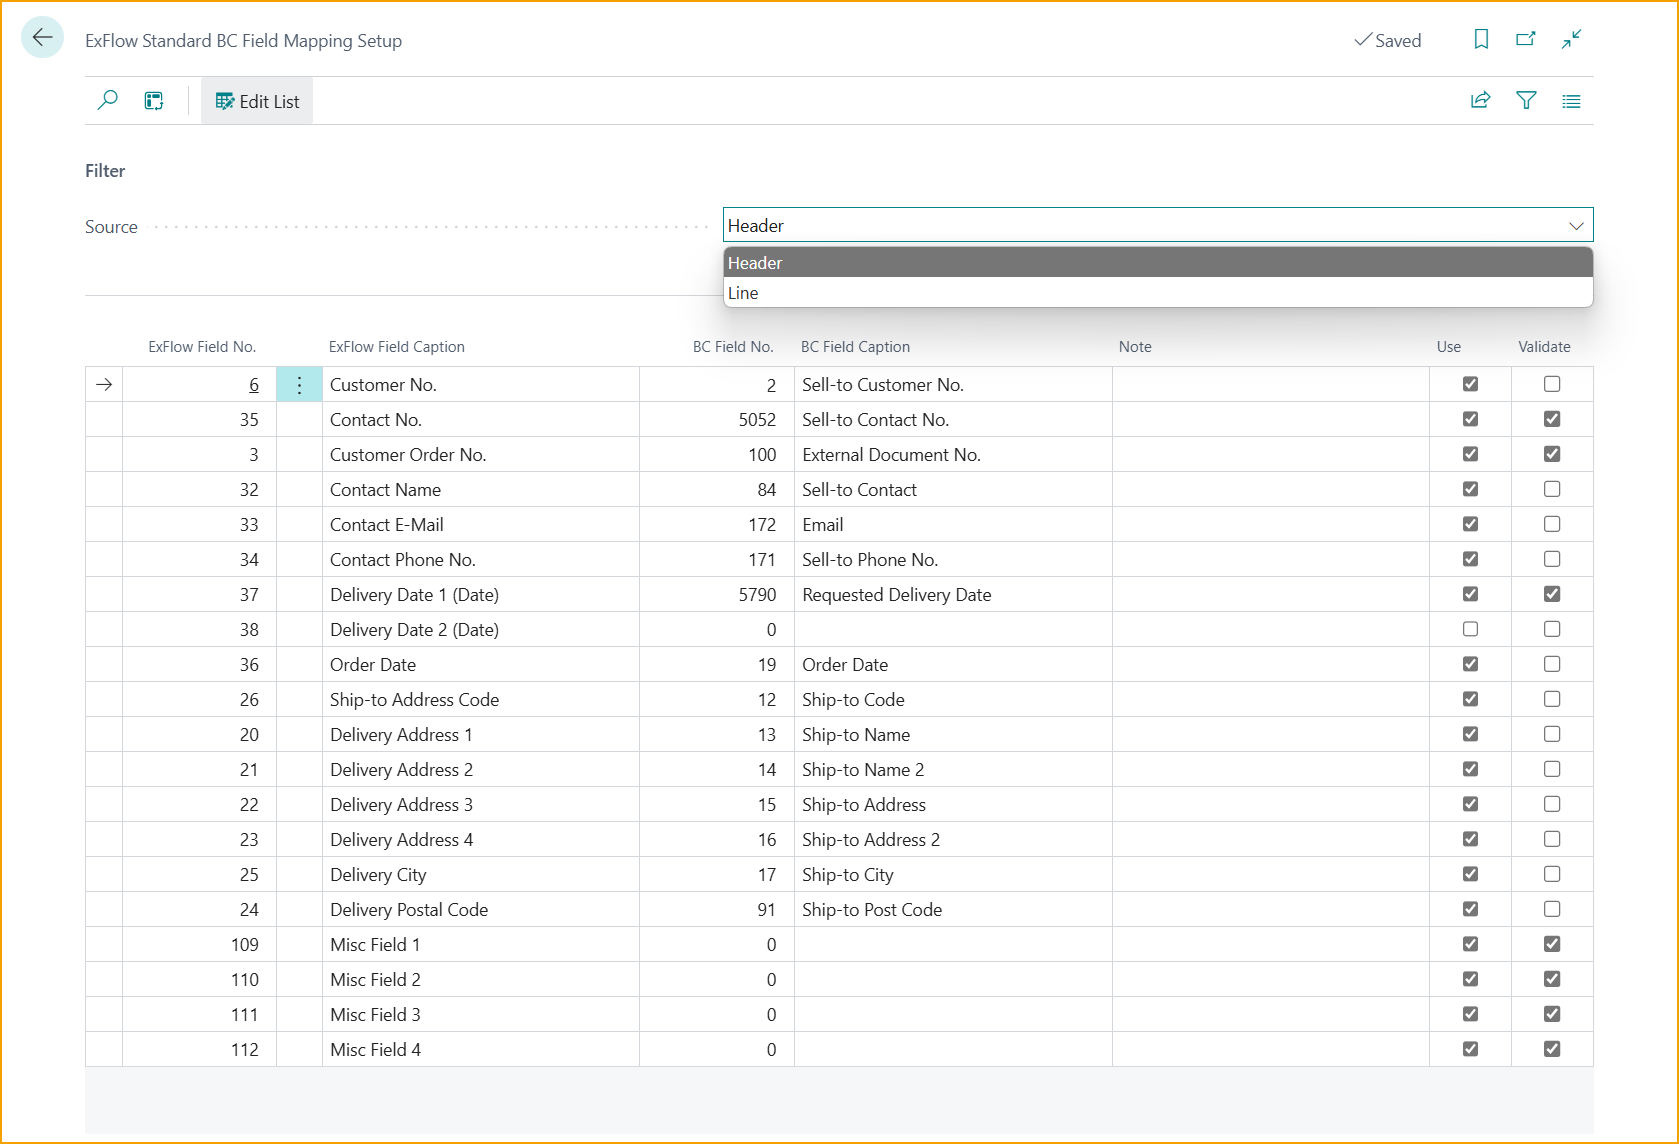
Field Mapping Setup
Go to: ExFlow Sales Order Import Setup --> Related --> Field Mapping Setup
With ExFlow Standard BC Field Mapping we can transfer interpreted data from imported fields to BC Sales header and line fields.
Click the “Edit List” button and select “Header” or “Lines” in order to display a list of the current mappings. Select a “BC Field No.” to change the field mappings.
When the Sales Order is created, the ExFlow BC Field mapping functionality will transfer the values to the fields on the sales order, as selected in this setup.
This feature can map to all general fields on a sales order, including special ISV and custom fields.
The Misc fields cannot be mapped to a blob field.
Technical Misc Field precautions
-
"Misc" fields mapped to decimal values will not support adding a comma as a thousand separator (ie: 12,000.20). All decimal values must be entered without a thousand separator (ie: 12000.20 or 12000,20), or else they will not convert properly as the comma by default is being used as the dollars/cents separator in ExFlow. This issue can be mitigated by setting up transformation rules in the data exchange definition so the values imported from EDC are formatted appropriately.
-
The dollar sign "$" in amount fields is not supported in misc fields mapped to decimal fields. A transformation rule can be used to remove dollar signs from imported amount values.
-
Misc fields don't support mapping to dimensions. If misc fields are mapped to dimensions please be advised that dimensions may not behave as expected.
-
There are currently no restrictions, and fields that are no longer active, or are not editable in BC (for example: the Quantity Invoiced field) can be mapped to misc fields. There is potential to enter bad data that can cause problems with sales orders so field mapping must be done carefully.
-
Invalid decimal or date values will not be mapped. They will show as 0 (decimals) or blank (dates) on the sales order.
-
The only accepted date format is: YYYYMMDD (for example: 20251224, for December 24th 2025). Other date formats will be ignored when a sales order is created. The original date value will still be visible in the imported sales document but will not appear on the converted sales order. Date format issues can be handled through data exchange definition transformation rules.
-
The Data Exchange Definition templates used for misc fields need to be imported manually at this time.
-
Always create or modify sales order mappings in a sandbox environments/companies and run tests to ensure everything will work as expected.
-
Mapping code fields with multiple key fields is not supported in the Misc fields at this time. For example, the "Shipping Agent Service Code" field relies on both "Shipping Agent Code" and "Shipping Agent Service Code." This means the misc fields do not support mapping "Shipping Agent Service Code." There may be other fields in the sales header like this that is not supported. This will be supported in a future release. By contrast, "Shipping Agent Code" is a single key field and is not reliant on another field in the sales order header so it is supported by the misc fields.
Reset Field Mapping Setup
Go to: ExFlow Sales Order Import Setup --> Related --> Reset Field Mapping Setup
Clicking on Reset Field Mapping Setup will give the pop up question: ''Are you sure you want to reset field mappings?'' Clicking on ''Yes'' will then reset any added custom mappings in Field Mapping Setup page.