Setup and configuration
The Visual Planning parameters are in the following menu item: Production control > Setup > Planning & Control > Planning parameters
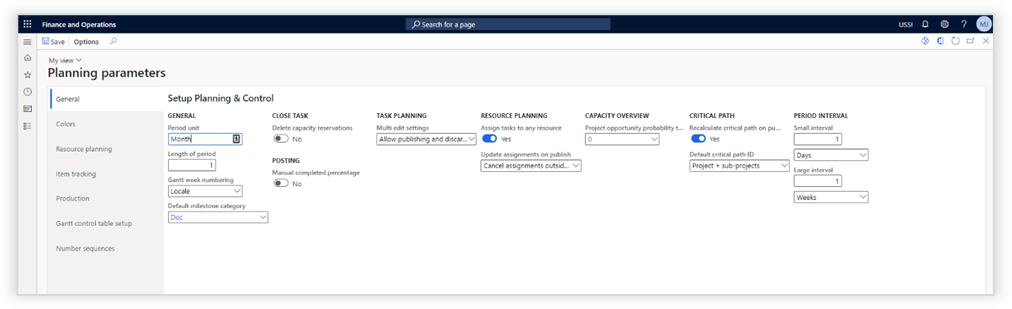
General
| Parameter General | Description |
|---|---|
| Period unit | This unit specifies the default planning horizon that will be shown from today on forward when a form is opened without any context. |
| Length of period | This length specifies the number of periods that will be shown from today on forward when a form is opened without context. |
| Gantt week numbering | It is possible to configure per legal entity the week numbering. Locale: Setting the week numbering according to the user locale settings in Dynamics 365 ISO8601: Setting the week numbering according to the ISO8601 standard US: Setting the week number according to the US standard |
| Default milestone category Close task | (Only applies to Axtension® Project Management) |
| Delete capacity reservations Posting | When set to yes, the system will remove the capacity reservations for tasks that are marked as "closed". This will free up the resource to be assigned to a different task. |
| Manual completed percentage Task planning | (Only applies to Axtension® Project Management) |
| Activity planning method | (Only applies to Axtension® Project Management) |
| Multi-edit setting Resource planning | (Only applies to Axtension® Project Management) |
| Assign tasks to any resource | When set to yes, a resource that has non-matching competencies can be assigned to a task after confirming a warning message. This feature allows the user to move a job or operation to an entirely different resource group or a resource that does not meet the resource requirements specified on the route. |
| Update assignments on publish Capacity overview | (Only applies to Axtension® Project Management) |
| Project quotation probability threshold Critical path | (Only applies to Axtension® Project Management) |
| Recalculate critical path on publish | (Only applies to Axtension® Project Management) |
| Default critical path ID | (Only applies to Axtension® Project Management) |
| Store all chains Period interval\ In both task- & resource planning the date range that is visualized can be adjusted by selecting two dates. These dates can be selected manually, or you can use the small & large intervals | (Only applies to Axtension® Project Management) |
Small interval  | The small interval allows the user to change a date with a single click by days, weeks, or months. |
Large interval  Sustainability Sustainability | The large interval allows the user to change a date with a single click by days, weeks, or months. |
| Bing Maps API Key WBS | (Only applies to Axtension® Project Management) |
| Convert predecessors | (Only applies to Axtension® Project Management) |
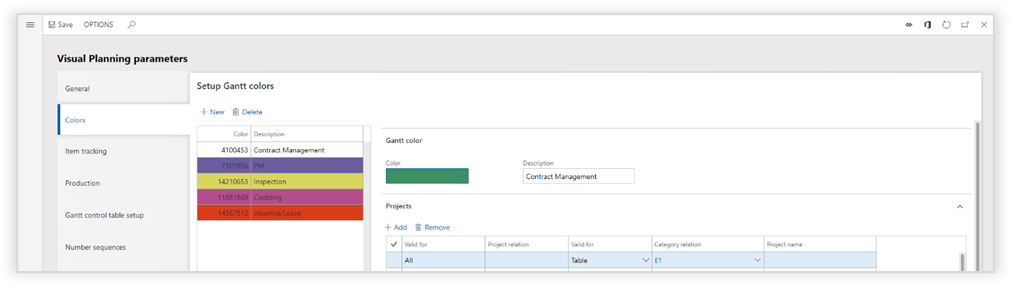
Colors
| Parameter Gantt Color | Description |
|---|---|
| Color | Define the color that should be applied to the activities that comply with the rules setup below. |
| Description Projects (Only applies to Axtension® Project Management) Production | Provide a clear description that describes when this color is applied. |
| Order Type | All: This color setting applies on all order types Production order: This color only applies on production orders Planned production order: This color only applies on planned production orders Simulation order: This color only applies on production orders part of a simulation |
| Valid for > Production Group | All: This color setting applies to all production groups Table: Production group: This color only applies to the selected group |
| Valid for > Production Pool | All: This color setting applies to all production pools Table: Production pool: This color applies to the selected pool |
| Route/job type | The color applies to the select route/job type. If left blank, it applies to all route job/types |
Resource planning
(Only applies to Axtension® Project Management)
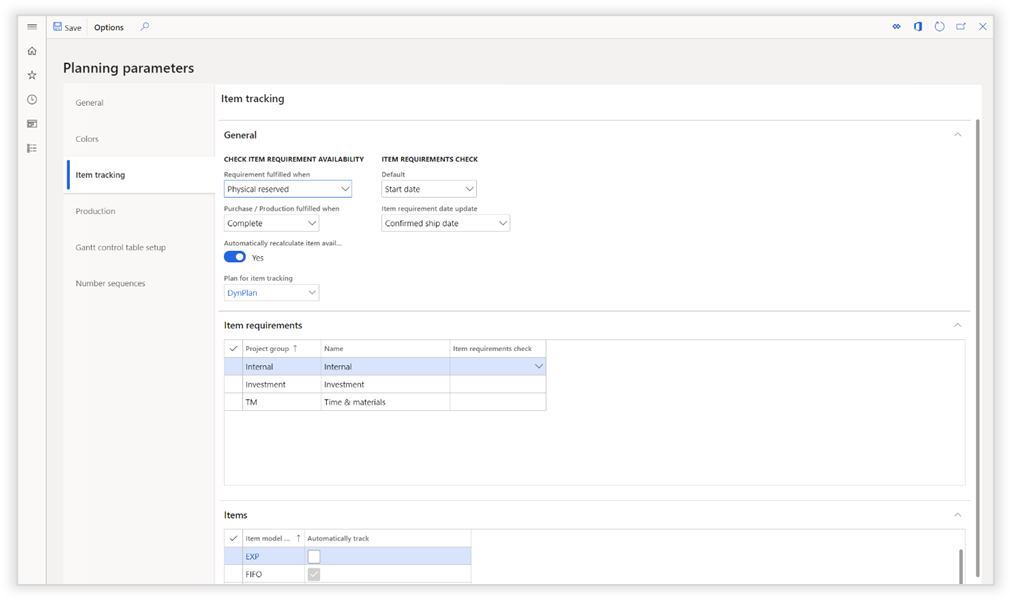
Item tracking
| Parameter Check item availability | Description |
|---|---|
| Requirement fulfilled when | Physical reserved: the system will show that the items tracked on the BOM are available when the inventory is physical reserved and on-hand.\ On hand in time: the system will show that the items tracked on a BOM are available at the required date of the operation. On hand available physical: the system will show that the items tracked on a BOM are currently available. |
| Purchase / Production fulfilled when | Items will be shown as available when:\ Complete: all items are (reserved and) on hand.\ Part delivery: some of the items are (reserved and) on hand. |
| Automatically recalculate item availability | When set to Yes, the system will constantly validate automatically if the items, linked to an activity via item tracking, are available. When set to No, the validation of item availability needs to be manually initiated. |
| Plan for item tracking Item requirements check | When item availability is validated and there is no reservation, the master plan identified in this field will be used to check on "delay's". |
| Default | (Only applies to Axtension® Project Management) |
| Item requirement date update Item requirements (Only applies to Axtension® Project Management) Items | (Only applies to Axtension® Project Management) |
| Item model group | Shows item model group |
| Automatically track | Select the item model groups that should be automatically set to "track in Visual Planning" on a BOM. Only items that are set to "track in Visual Planning" on the BOM are visualized. |
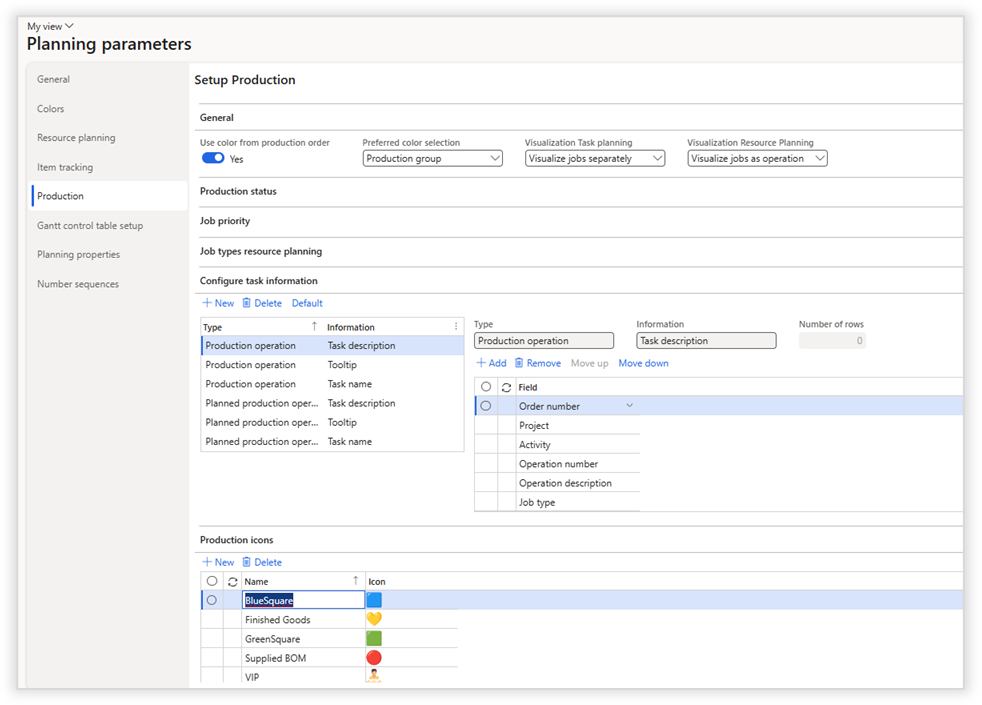
Production
| Parameter General | Description |
|---|---|
| Use color from production order | No: Color defined in these parameters will be applied. Yes: If there is a color specified on the production order, this color will be used for visualization. See for more information Configurable production icons and colors. |
| Preferred color selection | If there is a color configuration conflict, define which setting will get the preference. |
| Visualization Task planning | Visualize jobs as operation -- If job scheduling is executed, the task will be visualized as a single bar in resource planning. In this scenario al jobs will remain attached to one another. Visualize jobs separately -- If job scheduling is executed, the jobs will be shown as individual tasks and can therefore individually be rescheduled. |
| Visualization Resource planning Production status | Visualize jobs as operation -- If job scheduling is executed, the task will be visualized as a single bar in resource planning. In this scenario al jobs will remain attached to one another. Visualize jobs separately -- If job scheduling is executed, the jobs will be shown as individual tasks and can therefore individually be rescheduled. |
| Status / Allow drag Job priority | Allow to reschedule a production order only when it complies to these configured statuses. All but reported as finished is best practice. |
| Priority / Visible Job types resource planning | Define which job priorities are shown in the resource planning. Within the task planning all job priorities are shown. Primary only is the preferred setup. |
| Route/job type, Visible Configure task information\ This allows for configuration what information should be displayed on the job/operation, in the tooltip (when you hover over a task with your mouse) and on the description (show in the grid). | Define which job types should be shown during resource planning. Setup & Process time is best practice. |
| Type | Select for which type of order the setup should apply:\ Production operation - an operation or job of a production order. Planned production operation - an operation or job of a planned production order -- result of MRP. |
| Information | Select where you would like to change the information shown:  Task description – The description of a task displayed in the grid on the left side of the screen. Task description – The description of a task displayed in the grid on the left side of the screen. 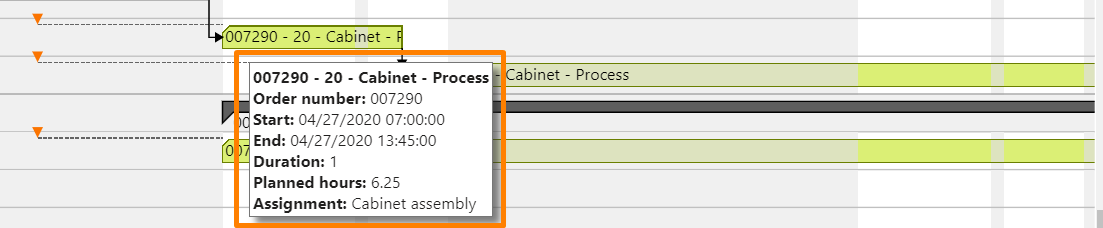 Tooltip – The description of job/operation when you hoover over a task. Tooltip – The description of job/operation when you hoover over a task.  Task name – The description shown in the Gantt bar Task name – The description shown in the Gantt bar |
| Configure description | 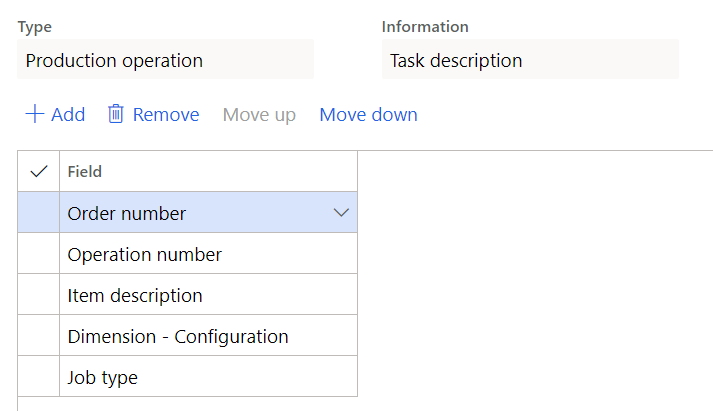 Select the fields that should be shown and sequence them with the up and down buttons. Select the fields that should be shown and sequence them with the up and down buttons. |
| Number of rows | See for more information Increase row heigt in resource planning. |
| Production icons | See for more information Configurable production icons and colors. |
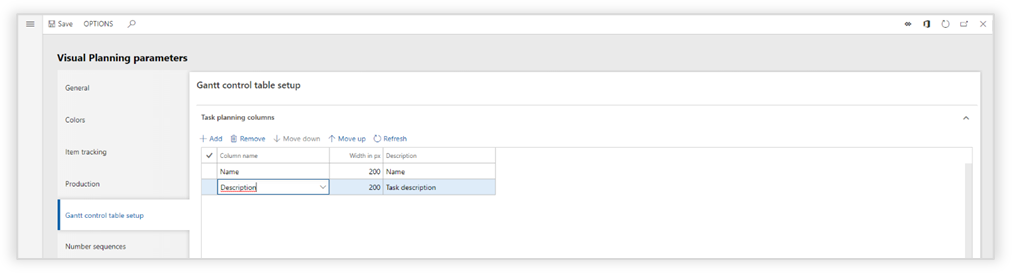
Gantt control table setup
Parameter Description
Task planning columns
Column name Activity field that should be displayed.
Width in px Number of pixels that should be used to show the information.
Description Description of the column name.
Visible columns Specifies the number of displayed columns (more columns can be displayed by adjusting the width of the task planning columns.
Resource planning columns
Column name Activity field that should be displayed.
Width in px Number of pixels that should be used to show the information.
Description Description of the column name.
Visible columns Specifies the number of displayed columns (more columns can be displayed by adjusting the width of the resource planning columns.
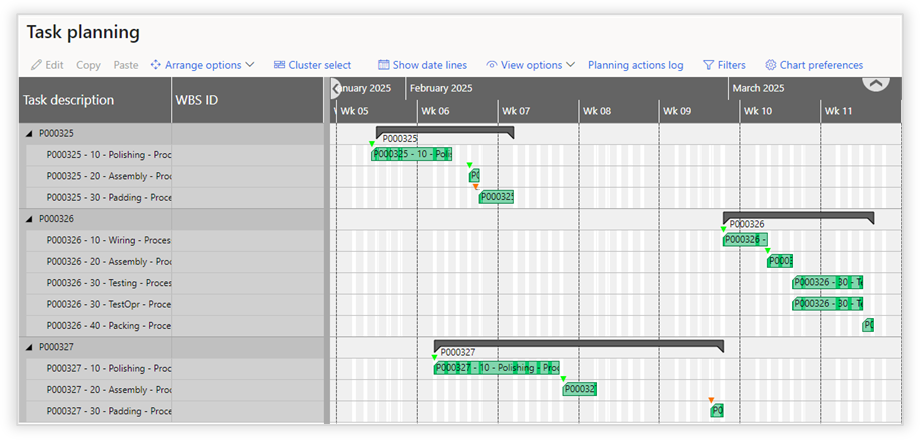
Task Planning
Open the task planning
The task planning for the (planned) production jobs and operations can be opened in 2 ways:
1: Generic task planning
Navigate to Production control > Planning for production > Task planning
The task planning will show all (planned) production jobs and operations within the configured date range from the chart preferences.
2. Task planning for selected production orders
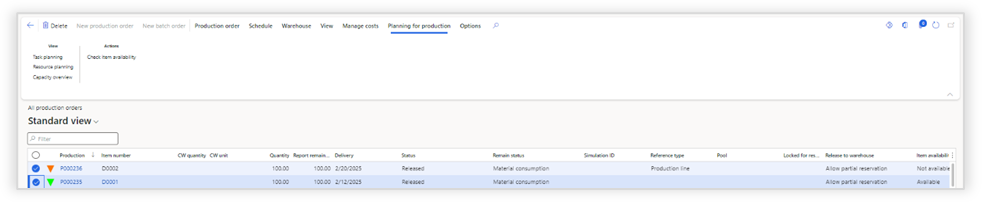
Navigate to Production control > Production orders > All Production orders
Select the production orders that need to be shown in the task planning. The production jobs and operations for the selected production orders are shown within the task planning.
After selecting the production orders, the task planning can be opened by using the ****ribbon action Planning for production > View > Task planning
How to use the task planning
The task planning - all available actions
Below a description of all available actions in the task planning.
Please note that based on how the task planning is opened (1. Generic resource planning or 2. Task planning for selected production orders) some actions might be unavailable.
| Function | Description |
|---|---|
| Edit | Show production operation/job information. |
| Copy | Copy the selected task(s). |
| Paste Arrange options (drop-down) | Paste the copied task(s) below the selected task in the task planning. |
| Add selection to a cluster | Adds the selected tasks to a cluster. You can add tasks to an existing cluster, merge and split clusters. When "show clusters" is enabled, the system will automatically select all operations/jobs when the selected operation/job is part of a cluster. This allows easy rescheduling for a group of operations and jobs. |
| Delete from cluster | Removes the selected tasks from a cluster. To remove a singly task from a cluster, first make sure the "show clusters" is disabled otherwise the system will automatically select the entire cluster. |
| Cluster | Go to the form in which a list of all clusters is shown. Here you can change the color coding, and the description applied to the clusters. |
| Cluster select | When enabled: The Gantt will highlight other tasks that are included in the same cluster as the selected task. When disabled: The Gantt will not display any clustering information. |
| Show date lines View options (drop-down) | When this toggle is enabled, the system will show lines representing the start date and time of the first operation, the end date and time of the last operation and the requirement dates from the pegging information. The production order lines are blue. 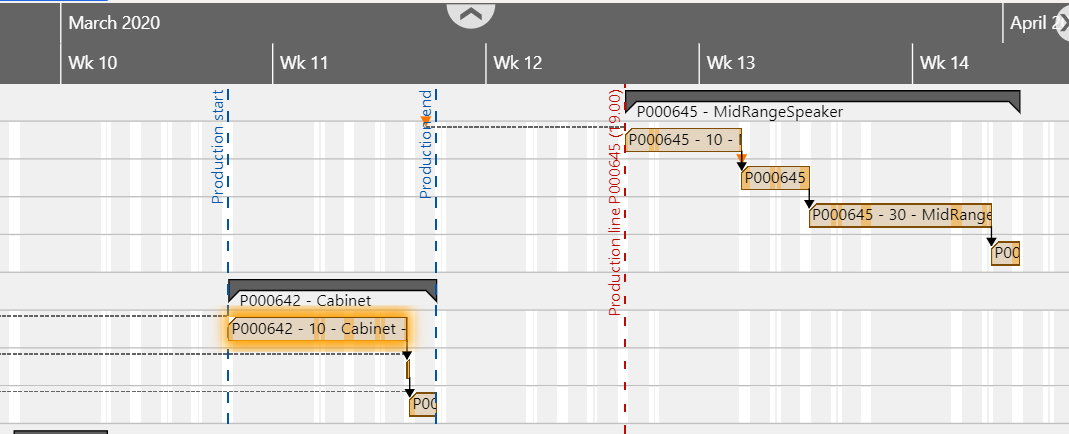 Requirement lines are red. Requirement lines are red. |
| Zoom in | Change the scaling of the entire Gantt. Zoom in, increases the readability. |
| Zoom out | Change the scaling of the entire Gantt. Zoom in, decreases the readability. |
| Reset Zoom | Set the zoom level adjusted with the zoom in & zoom out to default. |
| Fit into view | Show the entire planning horizon in a single view. This changes the scaling automatically. |
| Scroll to today | Independent of the scaling, move the view to today. |
| Hide non-working time Planning actions log | When enabled: the task planning will also display dates & times in which there is no capacity according to the calendar. When disabled: the non-working time defined in the calendar will not be displayed in the task planning. |
| Logging | Display the actions for all users or the actions for the current user. My logging: Displays actions for the current user. All: Displays actions for all users. |
| Logged action | The left pane displays the sequence of all actions and provides the option to show an action individually. |
| Comment | Ability to enter additional information on an action. |
| Lines | Overview of all orders and operations affected by the action. |
| Line details | Overview of the changes in time and/or resource on the affected lines. |
| Undo last Filters | Action to undo the latest action in the sequence. It is not possible to undo a task other than the latest. A user can only undo changes made by the user. |
| Saved views | When a filter is created, this filter can be stored as a view. Within this dropdown you can easily select predefined views. When saving a view, it can be marked as "private". In this situation the filter will not be visible to others in the organization. |
| Filters Chart preferences | All filters specified in the selection criteria are "AND" filters. This means the remaining jobs and operations need to comply to all criteria.\ Please note that more or less filters can be displayed based on the chart preferences. If e.g. the "Item tracking" icon is enabled in the chart preferences the filter "Material status" becomes available in the "Filters" form. |
| From | "From" date selection used in the task planning (intervals can be changed in the Planning parameters) |
| To | "To" date selection used in the task planning (intervals can be changed in the Planning parameters). |
 | Lock the period duration, allows the user to simultaneously move the “from” and “to” date when using the small & large interval buttons. |
| Show tasks | Active: Tasks that have not yet been closed.\ All: Active and closed tasks. |
| Show item tracking Projects | Show the item tracking icon based on the material status. |
| Show projects | Current: Show projects for the current legal entity. Intercompany: Show intercompany projects. |
| Include subprojects | Show the activities subprojects. |
| Quotations | Show the activities from project quotations. |
| Show resource availability | Show the resource availability for project activities. |
| Show estimated planning status | Show the estimated planning status for project activities. |
| Show budget status Production | Show the budget status for project activities. |
| Production orders | Show the operations and jobs for production orders. |
| Planned production orders | Show the operations and jobs for planned production orders. |
| Site | Filter (planned) production orders on site. |
| Master plan | Show (planned) production orders based on this master plan. |

The task planning - actions in the ribbon
A description of all available actions in the ribbon can be found below.
Please note that based on how the task planning is opened (1. Generic resource planning or 2. Task planning for selected production orders) some actions might be unavailable. The most important actions from the ribbon are also available as right click mouse actions.
| Action View | Description |
|---|---|
| Resource planning | Open the resource planning for the selected production order(s). |
| Capacity overview | Open the capacity overview for the selected production resources. |
| Publish log Maintain | (not applicable). |
| Edit assignments | Edit the selected assignment. |
| Calculate critical path Production details / Planned production Show all details of the selected job/operation like the BOM, Route and Explosion. Production process | Calculate the critical path for the project setup. |
| Release | Release the production order for the selected operation(s) or job(s). |
| Start | Start the selected operation(s) or job(s). |
| Report as finished Export | Report the selected operation(s) or job(s) as finished |
| File name | Ability to adjust the generated file name. |
| Page format | Ability to choose the desired page format. |
| Page orientation | Ability to choose the desired page orientation. |
| Print mode | Single page: the selected task- and/or resource planning will be exported to a single page. Cutting marks: the selected task- and/or resource planning will be exported to multiple pages (based on page format and orientation), as each page being part of the total plan. Paging: the selected task- and/or resource planning will be exported to multiple pages (based on page format and orientation), including the columns on each page. |
The task planning - icons and colors
| Visualization | Description |
|---|---|
 | Visualization of operations / jobs |
 | Item tracking on operations / jobs · Orange: Planned - Materials are not available but are expected to arrive on time. · Red: Delayed - Materials are not available on time. · Green: Available - Materials are available either on hand or on hand and reserved, depending on the parameter. · Blue: Picked - Items have been picked, but not yet consumed. · Grey: Consumed - Materials have been consumed on production order. |
 | Manually locked for rescheduling. The operation or job can’t be rescheduled. |
 | Operations / jobs are included in a simulation. Operations / jobs that are included in a simulation can’t be rescheduled via the task planning. Operations / jobs that are included in a simulation can be rescheduled via the simulation. |
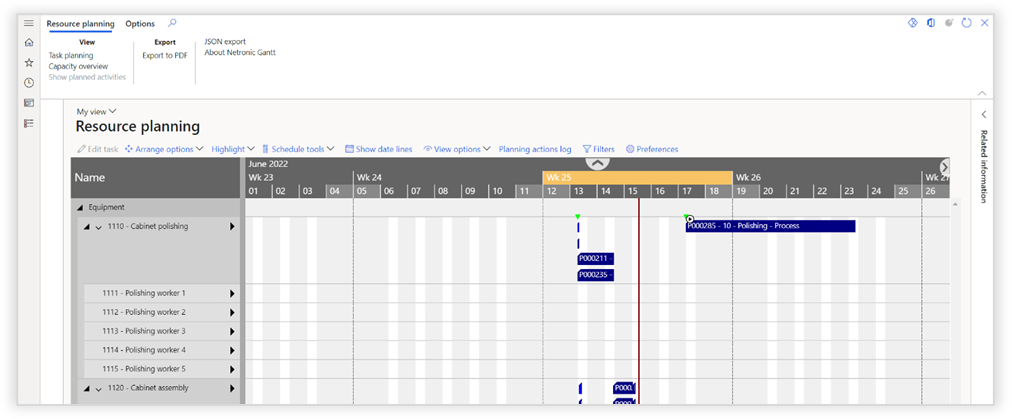
Resource planning
Open the resource planning
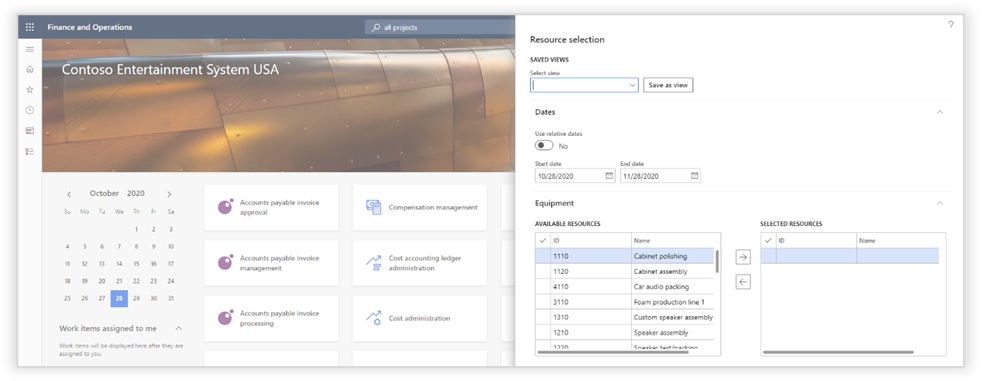
The resource planning for the (planned) production jobs and operations can be opened in 2 ways:
1: Generic resource planning
Navigate to Production control > Planning for production > Resource planning
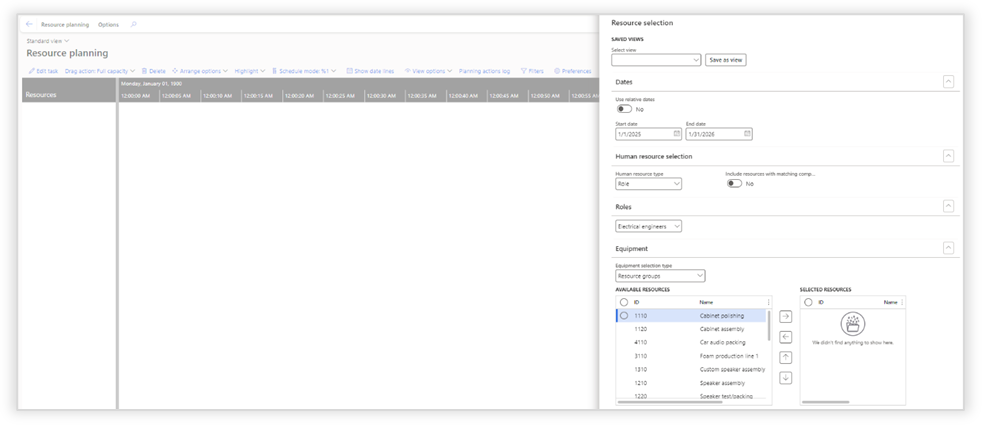
The resource planning will show all (planned) production jobs and operations according to the criteria from the resource selection form. This form is automatically shown when opening the resource planning.
Below an overview of all available criteria from the “Resource selection” form can be found:
| Fields Saved views | Description |
|---|---|
| Select view Dates | You can save the selected resources as a view. The dates will not be stored as part of a view. When a view is marked as private it will not be visible to the rest of the organization. |
| Use relative dates Equipment | If toggle set to no, select the start & end date manually\ If toggle set to yes, select a number of periods to the past and a number of periods to the future. The system will dynamically detirmine the selected dates. Relative dates will be saved in "saved views". |
| Equipment selection type | Resource -- Allows to select both resource groups as resources.\ Resource groups -- Allows only to select resource groups. |
| Equipment | Selection of the resource groups that need to be shown in the resource planning. The resources are defined in: Organization administration > Resources > Resource groups. NOTE: If the equipment selection type is set to "Resource" you have full flexibility in selecting the resources and determining the order. This could result in a resource group and a resource shown without a logical relation. |
2. Resource planning for selected production orders
Navigate to Production control > Production orders > All Production orders
Select the production orders that need to be shown in the resource planning. The production jobs and operations for the selected production orders are shown within the resource planning.
After selecting the production orders, the resource planning can be opened by using the ****ribbon action Planning for production > View > Resource planning
The resource planning is opened based on the start and end date of the selected (planned) production orders.
How to use the resource planning
The resource planning -- all available actions
An overview of all available actions can be found below. Note that not all actions will be available depending on how the resource planning is opened and what information is shown.
| Action | Description |
|---|---|
| Edit task Arrange options (drop-down) | Show the details of the selected operations/jobs |
| Cluster select | When enabled: The Gantt will highlight other tasks that are included in the same cluster as the selected task. When disabled: The Gantt will not display any clustering information. |
| Snap | When enabled: The operation will automatically snap to another operation.\ When disabled: The operation will snap to another operation, which could potentially create a capacity gaps or an overlap between operations. **** |
| Connect selection | Connect all selected jobs/operations to one-another in the selected sequence. The result is a perfectly scheduled resource with no capacity gaps. |
| Connect next | Connect the next job/operation of the same order to the selected job/operation |
| Connect previous | Connect the previous job/operation of the same order to the selected job/operation |
| Add selection to a cluster | Adds the selected tasks to a cluster. You can add tasks to an existing cluster, merge and split clusters. When "show clusters" is enabled, the system will automatically select all operations/jobs when the selected operation/job is part of a cluster. This allows easy rescheduling for a group of operations and jobs. |
| Delete from cluster | Removes the selected tasks from a cluster. To remove a singly task from a cluster, first make sure the "show clusters" is disabled otherwise the system will automatically select the entire cluster. |
| Cluster | Go to the form in which a list of all clusters is shown. Here you can change the color coding, and the description applied to the clusters. |
| Reschedule based on progress Highlight (drop-down) | When progress is posted to a job or operations, this feature allows to automatically reschedule the operation/job to "now", based on that progress. Example: A production order that takes 8 hours and should have been completed yesterday, has only 4 hours of progress. When selected and rescheduled based on progress, the system will reschedule the remaining 4 hours from now on forward. |
| Order | When enabled, the system will highlight all operations belonging to the same production order. |
| Referenced | When enabled, the system will highlight all referenced operations. |
| Disabled Schedule Mode (drop-down) | No operations are highlighted |
| Individual | The Gantt will select all related jobs in the order of the selected job. When disabled, The Gantt will select only the selected job. |
| Order | The Gantt will select all related jobs to the same production order and schedule the whole order. |
| Referenced | The Gantt selects all jobs of referenced production orders and allows to schedule all production orders. |
| Show date lines View options | When this toggle is enabled, the system will show lines representing the start date and time of the first operation, the end date and time of the last operation and the requirement dates from the pegging information. The production order lines are shown in blue. Requirement lines are shown in red. |
| Zoom in | Change the scaling of the entire Gantt. Zoom in, increases the readability. |
| Zoom out | Change the scaling of the entire Gantt. Zoom out, decreases the readability. |
| Reset Zoom | Set the zoom level adjusted with the zoom in & zoom out to default. |
| Fit into view | Show the entire planning horizon in a single view. This changes the scaling automatically. |
| Scroll to today | Independent of the scaling, move the view to today. |
| Non-working time | When enabled, the Gantt will also display time frame in which there is no capacity according to the calendar.\ When disabled, the non-working time defined in the calendar will not be displayed in the Gantt. |
| Pin | The selected resource will be pinned at the top of the screen. This way, when scrolling through the resource list, the pinned resource will remain visible. The pinning of resources is only remembered for a single session, when reopening the screen, the pinning of resources will be gone. |
| Unpin Planning actions log | Unpin a previously pinned resource. |
| Logging | Display the actions for all users or the actions for the current user. My logging: Displays actions for the current user. All: Displays actions for all users |
| Logged action | The left pane displays the sequence of all actions and provides the option to show an action individually. |
| Comment | Ability to enter additional information on an action. |
| Lines | Overview of all orders and operations affected by the action. |
| Line details | Overview of the changes in time and/or resource on the affected lines. |
| Undo last Filters | Action to undo the latest action in the sequence. It is not possible to undo a task other than the latest. A user can only undo changes made by the user. |
| Saved views | When a filter is created, this filter can be stored as a view. Within this dropdown you can easily select predefined views. When saving a view, it can be marked as "private". In this situation the filter will not be visible to others in the organization. |
| Filters Preferences | All filters specified in the selection criteria are "AND" filters. This means the remaining jobs and operations need to comply to all criteria. |
| From | From date selection for the resource planning (intervals can be changed in the Planning parameters) |
| To | To date selection for the resource planning (intervals can be changed in the Planning parameters) |
| Lock the period duration, allows the user to simultaneously move the “from” and “to” date when using the small & large interval buttons. |
| Show tasks | Active: Show the active tasks.\ All: Active and closed tasks. |
| Show all tasks for resource | When set to Yes, For the resources in the resource planning, all tasks will be shown (including other Production orders). When set to No, only tasks applicable to this Production order will be shown. |
| Show item tracking Projects (Only if Axtension® Project Management is licensed) | Show the item tracking icon based on the material status. |
| Show Projects | If set to yes, project tasks assigned to the selected resources will be shown. |
| Quotation | If set to yes, project quotation tasks assined to the select resources will be shown |
| Show resrouce availability | Show the resource availability for project activities. |
| Show estimated planning status Production | Show the estimated planning status for project activities. |
| Production orders | Show related production orders and their planning |
| Planned production orders | Show related planned orders and their planning |
| Master plan | Show planned production orders based on this master plan |
 The resource planning – actions in the ribbon
An overview of all available actions can be found below. Note that not all actions will be available depending on how the resource planning is opened and what information is shown.
| Action View | Description |
|---|---|
| Task Planning | Open the task planning of the project that belongs to the selected order. |
| Capacity overview | Open the capacity overview for the project that belongs to the selected order resources. |
| Show planned activities Edit | Show all planned activities for the selected resource. |
| Task planning Planned production Additional details for the selected job/operation like the BOM, Route and Explosion. | Show the task planning for the selected operation. |
| Lock for rescheduling | Lock full production order for rescheduling. |
| Lock operation for rescheduling Production process | Lock individual jobs or operations for rescheduling. |
| Release | Release the full production order for the selected operations or jobs. |
| Start | Start the selected operations or jobs. |
| Report as finished Resource assignments (Only if Axtension® Project Management is licensed) Assign resources to project tasks that are visualized in the resource planning. Selection | Report the selected operations or jobs as finished. |
| Resources Export | Open the resource selection pane to change the resource selection of the currently visualized orders. |
| File name | Ability to adjust the generated file name. |
| Page format | Ability to choose the desired page format. |
| Page orientation | Ability to choose the desired page orientation. |
| Print mode | Single page: the selected task- and/or resource planning will be exported to a single page. Cutting marks: the selected task- and/or resource planning will be exported to multiple pages (based on page format and orientation), as each page being part of the total plan. Paging: the selected task- and/or resource planning will be exported to multiple pages (based on page format and orientation), including the columns on each page. |

The resource planning - icons and colors
| Visualization | Description |
|---|---|
 | Resource Group Resource |
 | Expanded resource group histogram Expanded resource histogram |
 |   |
   | Task status: Can be started, predecessors are completed completed or there are no predecessors. Is started Should not be started, predecessors are not completed. |
 | Operation or job locked for rescheduling |
 | Operations / jobs are included in a simulation. Operations / jobs that are included in a simulation can’t be rescheduled via the resource planning. Operations / jobs that are included in a simulation can be rescheduled via the simulation. |
 | Cluster color, in the right corner of the operation(s)/job(s) the cluster color is displayed. |
 | BOM requirement |
Increase row height in resource planning
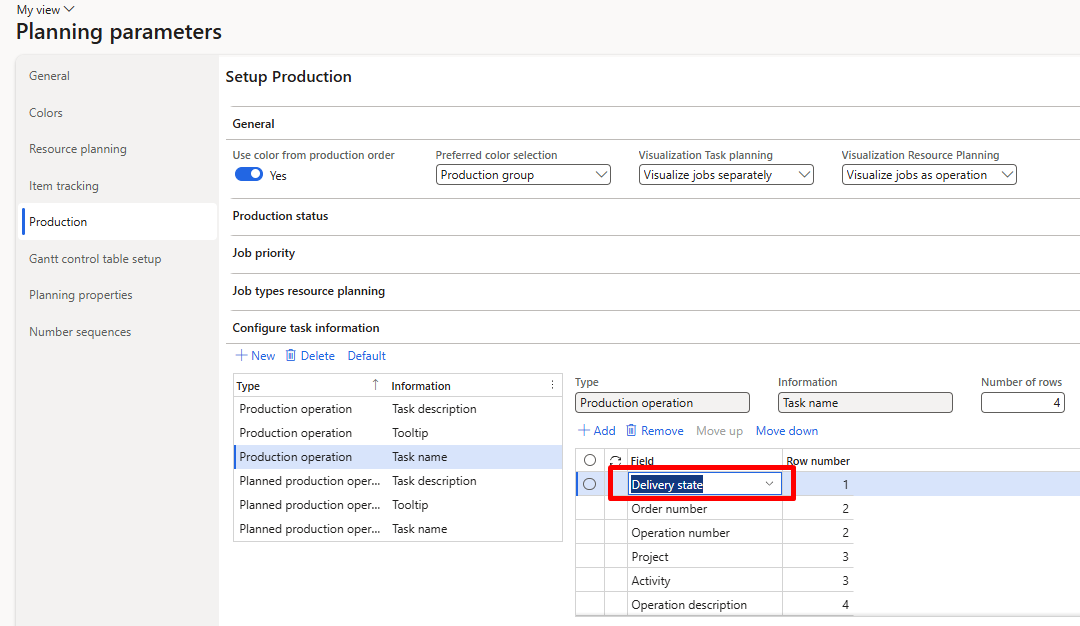
To improve readability and comprehensibility of the operations and jobs information in the resource planning, it is now possible to set the numbers of rows on the task name and what information needs to be shown per row.
Configuring the operation and jobs information in the resource planning can be done in the “Planning parameters” on the “Production” tab.
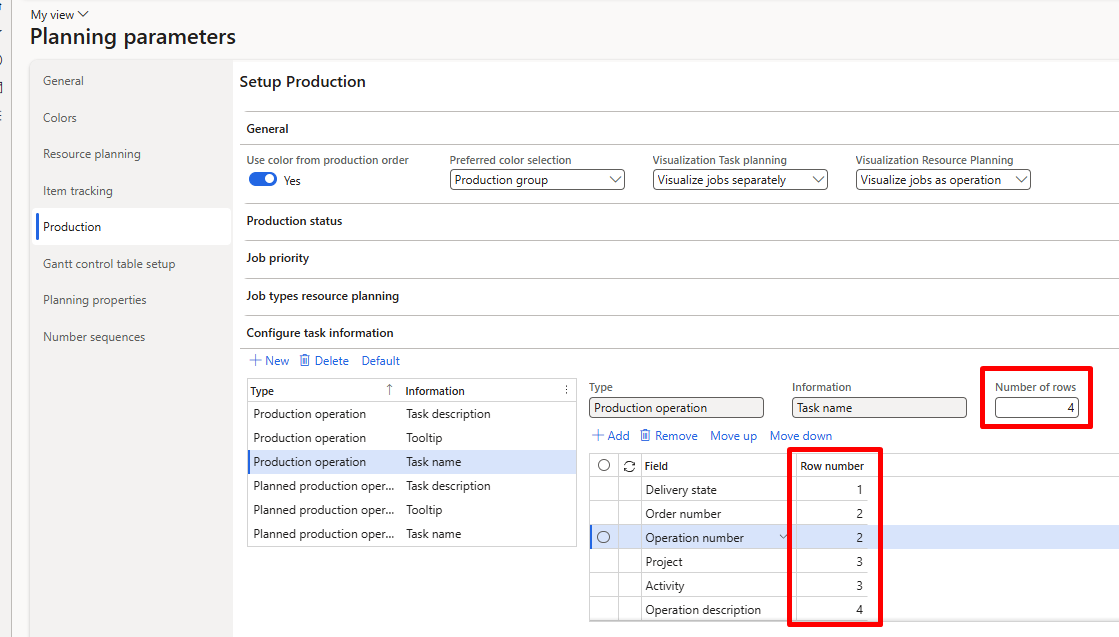 To configure the number of rows and what information needs to be shown, select the “Production operation” or “Planned production operation” in the “Type” column and “Task name” in the “Information” column. The “Number of rows”, add the “Fields that need to be displayed and assign the “Row number” to determine the orders.
Configurable production icons and colors
Distinguished colors and icon can be assigned to released products and individual production orders for easy identification of a product and it's production order.
On a released product the following can be configured:
· Color of the bar
· The color of the bar border
· The desired patern and color of the bar
· A specific icon for an item
 On the “Engineer” fast tab on a released product the colors and icon can be configured:

The defaults from a released product will be applied automatically on a new production order, but can be adjusted on the production order if needed:
Once applied the colors, pattern and icon will be shown in the resource planning.

To use the colors from released products and production orders the option "Use color from production order" needs to be enabled in the "Planning parameters" on the "Production" tab.

Icons can be added in the “Planning parameters” on the “Production” tab. Add a label and select the desired icon(s) from the predefined icon list.
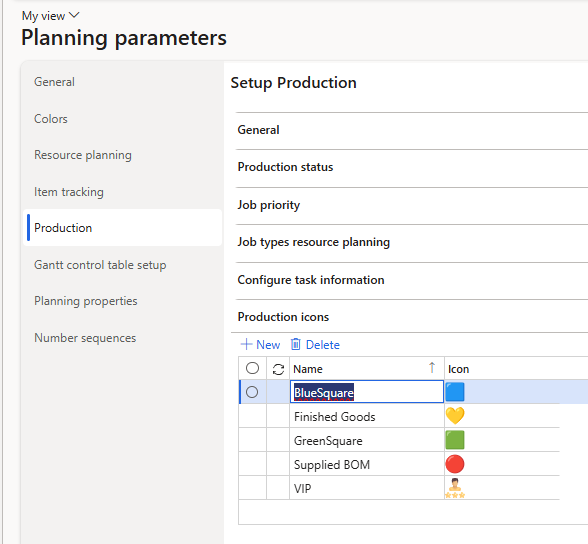
After creating the production icon(s), the created production icon(s) can be selected on a released product and production order.
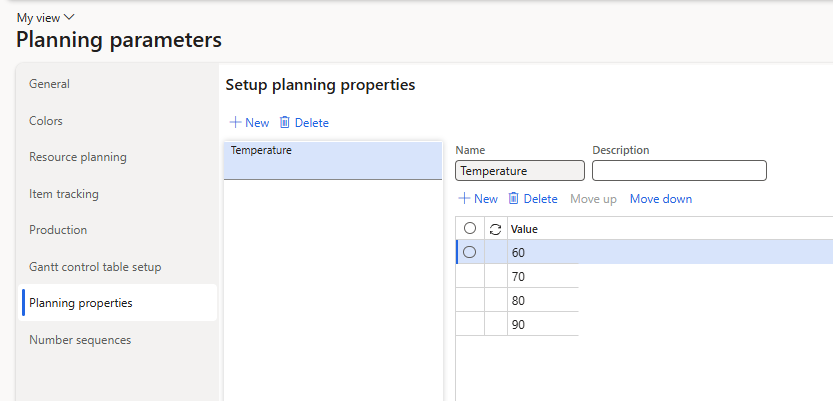
Sequence operations based on properties
To optimize operation sequencing, it is now possible to setup planning properties which can be assigned to specific operations of a released product route. By setting such planning properties, operations can be clustered in a production simulation to optimize a resource utilization by avoiding redundant setup times.
An example could be a required oven temperature for an operation.
First step is to define a planning property with its values and the order of the values, which will define how the operations are sequenced. The planning properties can be configured in the "Planning parameters" on the "Planning properties" tab.
Once a planning property has been set up, the route of a released product can be configured by assigning a planning property to one or more operations. This can be done by navigating to the “Planning properties” tab on an operation.
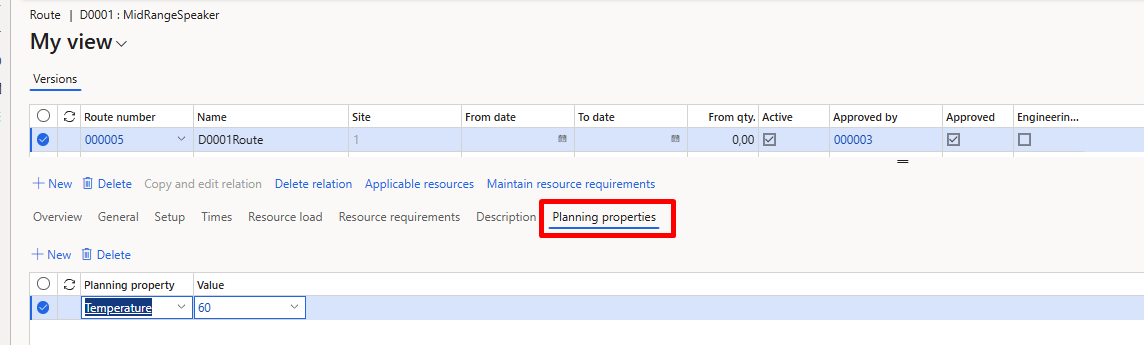
Next step is to apply the planning property to either a resource group or individual resources.
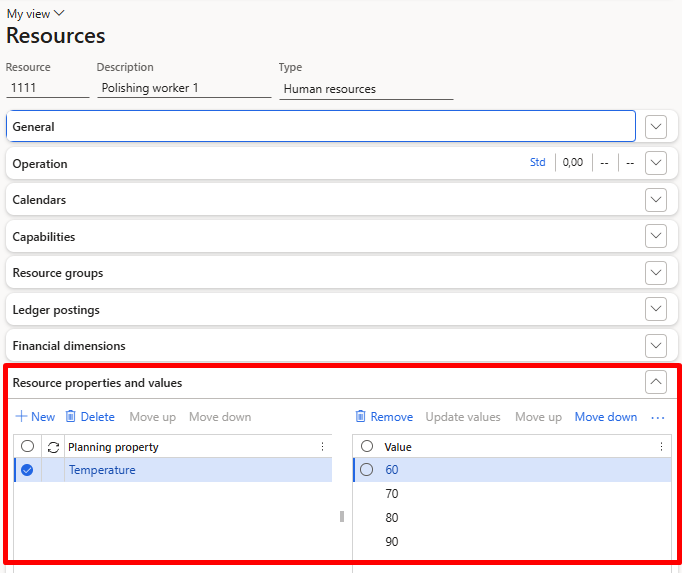 On the resource group and resource, a new fast tab “Resource properties and values” is added. The required planning property or planning properties can be selected while also having the ability to finetune the values in the correct order.
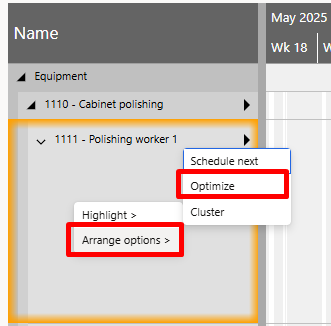
Once a planning property is assigned to a resource group or resource, a new arrange option will become available in a production simulation.
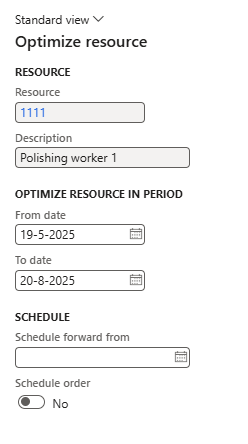 Selecting “Optimize“ will show a form in which the user can:
· Select the period in which operations need to be optimized
· Starting date from which operations will be scheduled forward
· Ability to reschedule the whole order of affected operations
After selecting **"**Ok", operations in the defined period are rescheduled following the planning property order as defined on the resource group/resource.
Rescheduled operations are also automatically added to a cluster in the simulation for easy identification of optimized operations.
Publishing the simulation will ultimately update the new schedule for the rescheduled operations.
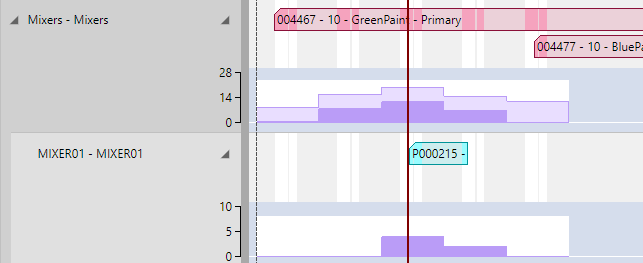
Delivery date control
The delivery state field shows the value "On time" or "Delayed". If the production end date is scheduled before the first requirement date, it will be shown as on time. If scheduled after the first requirement date, it will be shown as delayed.
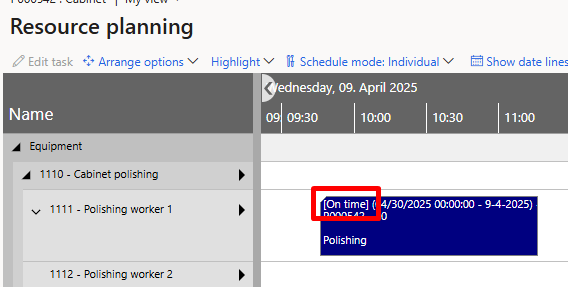
This field can be used on the task description, tooltip and task name in the resource planning.
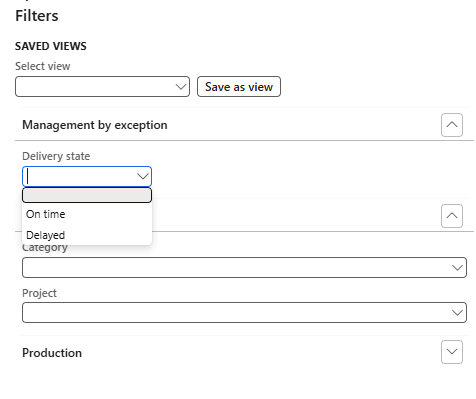
In addition, a new management by exception filter is introduced to filter production orders on the delivery state.
Capacity overview
Open the capacity overview
The capacity overview be opened in 2 ways:
1: Generic capacity overview
Navigate to Production control > Planning for production > Capacity overview
The capacity overview form will show all capacity loads that comply with the selection criteria provided in the resource selection form.
Below an overview of the available criteria from the resource selection form can be found
| Field Saved views | Description |
|---|---|
| Select view Dates | You can save the selected resources as a view. The dates will not be stored as part of a view. When a view is marked as private it will not be visible to the rest of the organization. |
| Use relative dates Equipment | If toggle set to no, select the start & end date manually\ If toggle set to yes, select a number of periods to the past and a number of periods to the future. The system will dynamically detirmine the selected dates. Relative dates will be saved in "saved views". |
| Equiptment | Selection of resource groups. These are the resources defined in: Organization administration > Resources > Resource groups |
2. Task planning for selected production orders
Navigate to Production control > Production orders > All Production orders
Select the production orders that need to be shown in the capacity overview. The capacity overview will show all capacity loads for resources assigned to the orders. After selecting the production orders, the capacity overview can be opened by using the ****ribbon action Planning for production > View > Capacity overview.
How to use the capacity overview
With the "Resources" action in the ribbon the selected resources can be changed.
Below an overview can be found of all available action within the capacity overview:
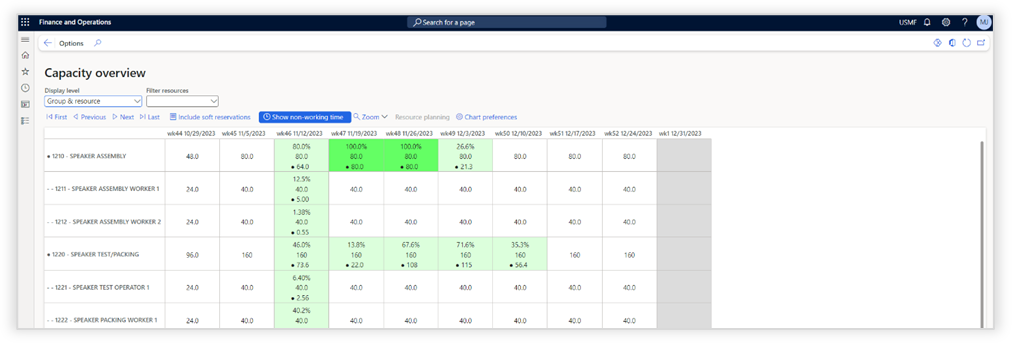
| Action | Description |
|---|---|
| Display level | Toggle between: · Showing only resource groups · Individual resources · Combination of group and resources |
| Filter resources | Show all resources or the resources which are overloaded. |
| First | Go to the first page (See the "Page start" drop-down for the available periods) |
| Previous | Go to the first page (See the "Page start" drop-down for the available periods) |
| Next | Go to the first page (See the "Page start" drop-down for the available periods) |
| Last | Go to the first page (See the "Page start" drop-down for the available periods) |
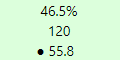
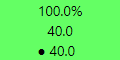
| Include soft reservations | Include the hours from planned production orders when calculating the resource utilization percentage. |
| Include posted hours | Include posted hours when calculating the resource utilization percentage |
| Show non-working time | If highlighted each period that contains no capacity will be shown for the selected roles and resources. If not highlighted all periods will be shown. |
| Zoom | Show the capacity overview per day, week, month or quarter. |
| Page start | Navigate to the desired timeframe. The screen will by default show a maximum of periods. This drop-down helps navigate through these multiple pages. |
| Resource Planning Chart preferences | When one of the capacity cells has been selected, the resource planning button will become available. This will open the resource planning for the selected resource, the selected role and the selected cell's period + the period before and after. |
| Start date | Set start of date range selection. |
| End date | Set end of date range selection. |
| Plan | (only available when Visual Planning for Production is licensed) |
Below an overview of all colors and visualizations can be found:
Function Description
 No Capacity
 No Capacity demand
 Partial capacity demand
 Full capacity demand
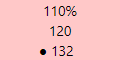 Lightly overloaded capacity demand
 Overbooked capacity demand
 Hard reserved (Production orders) / Soft reserved (Planned orders)
 The resource role
 The resource
Production planning simulation
How to open the production planning simulation
Production simulation can be opened via Production Control > Planning for production > Simulation planning.
Creating and using a production planning simulation
 With the “New simulation" form the period and site must be selected, to determine which production orders will be included in the simulation.
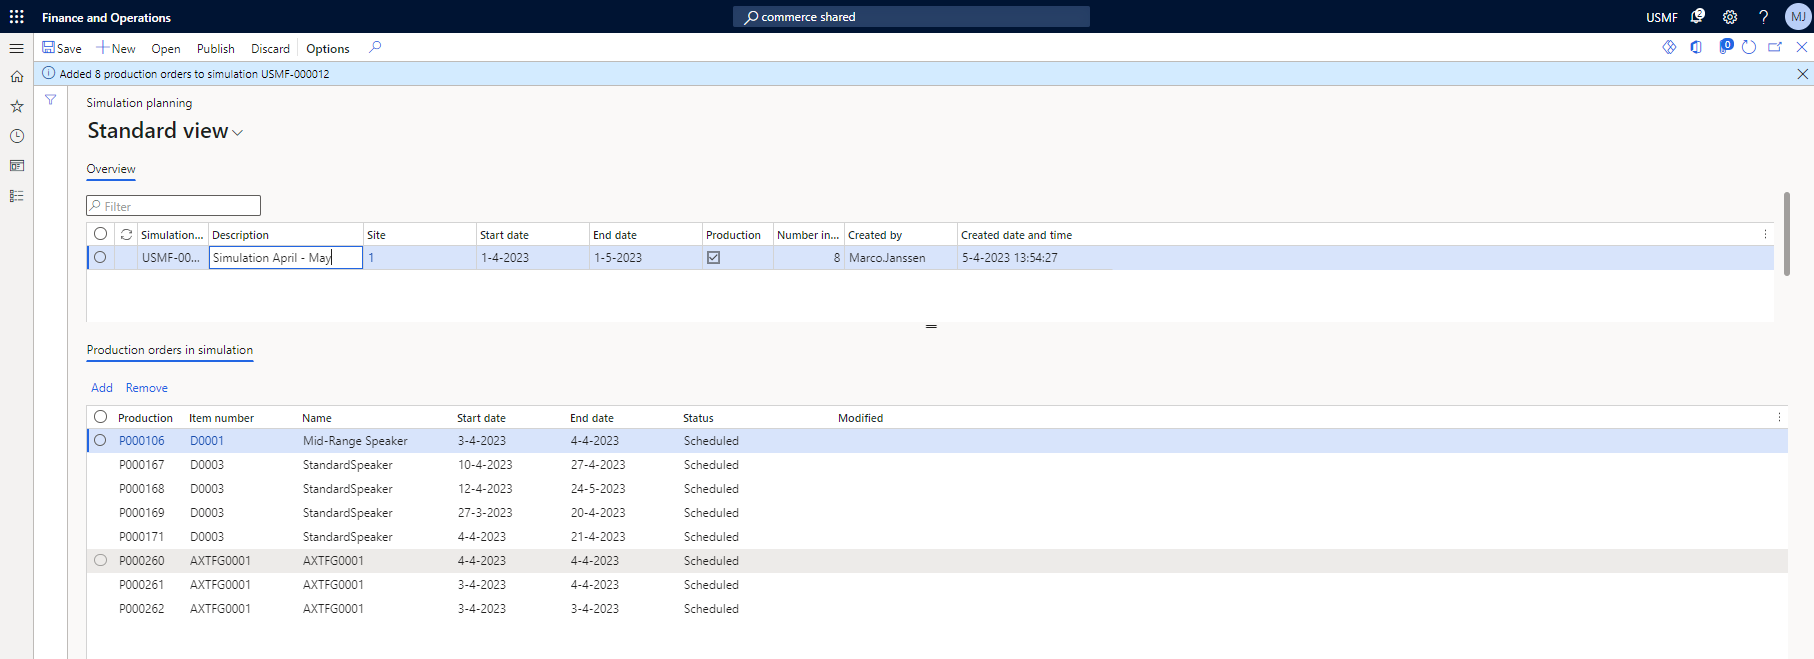
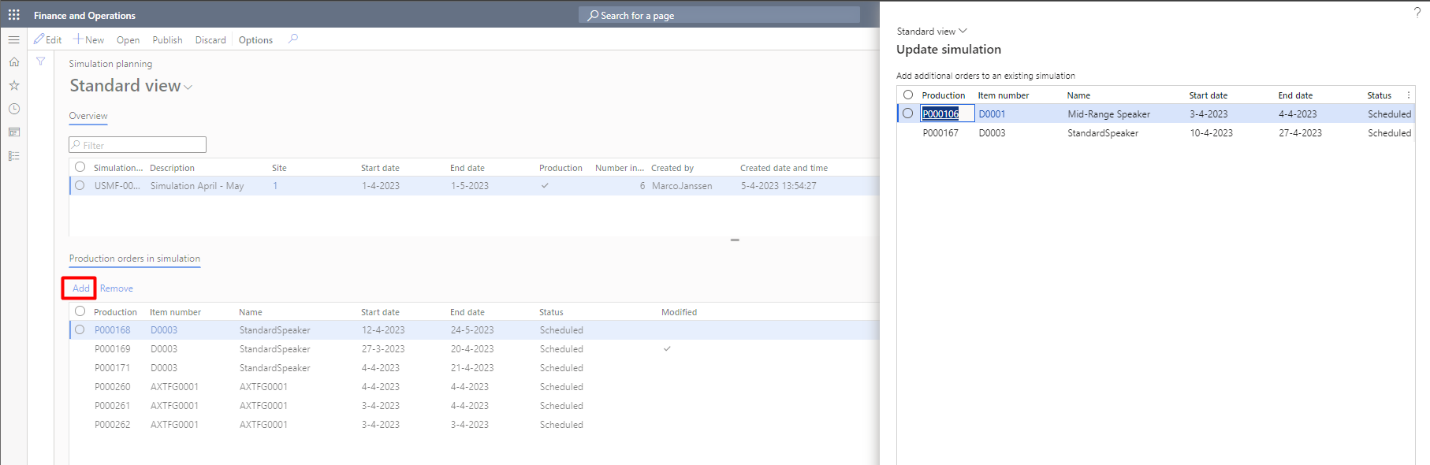 Production orders can be added or removed to a planning simulation. The “Add” action will show production orders which are not already part of the simulation and are scheduled between the start and end dates of the selected simulation.
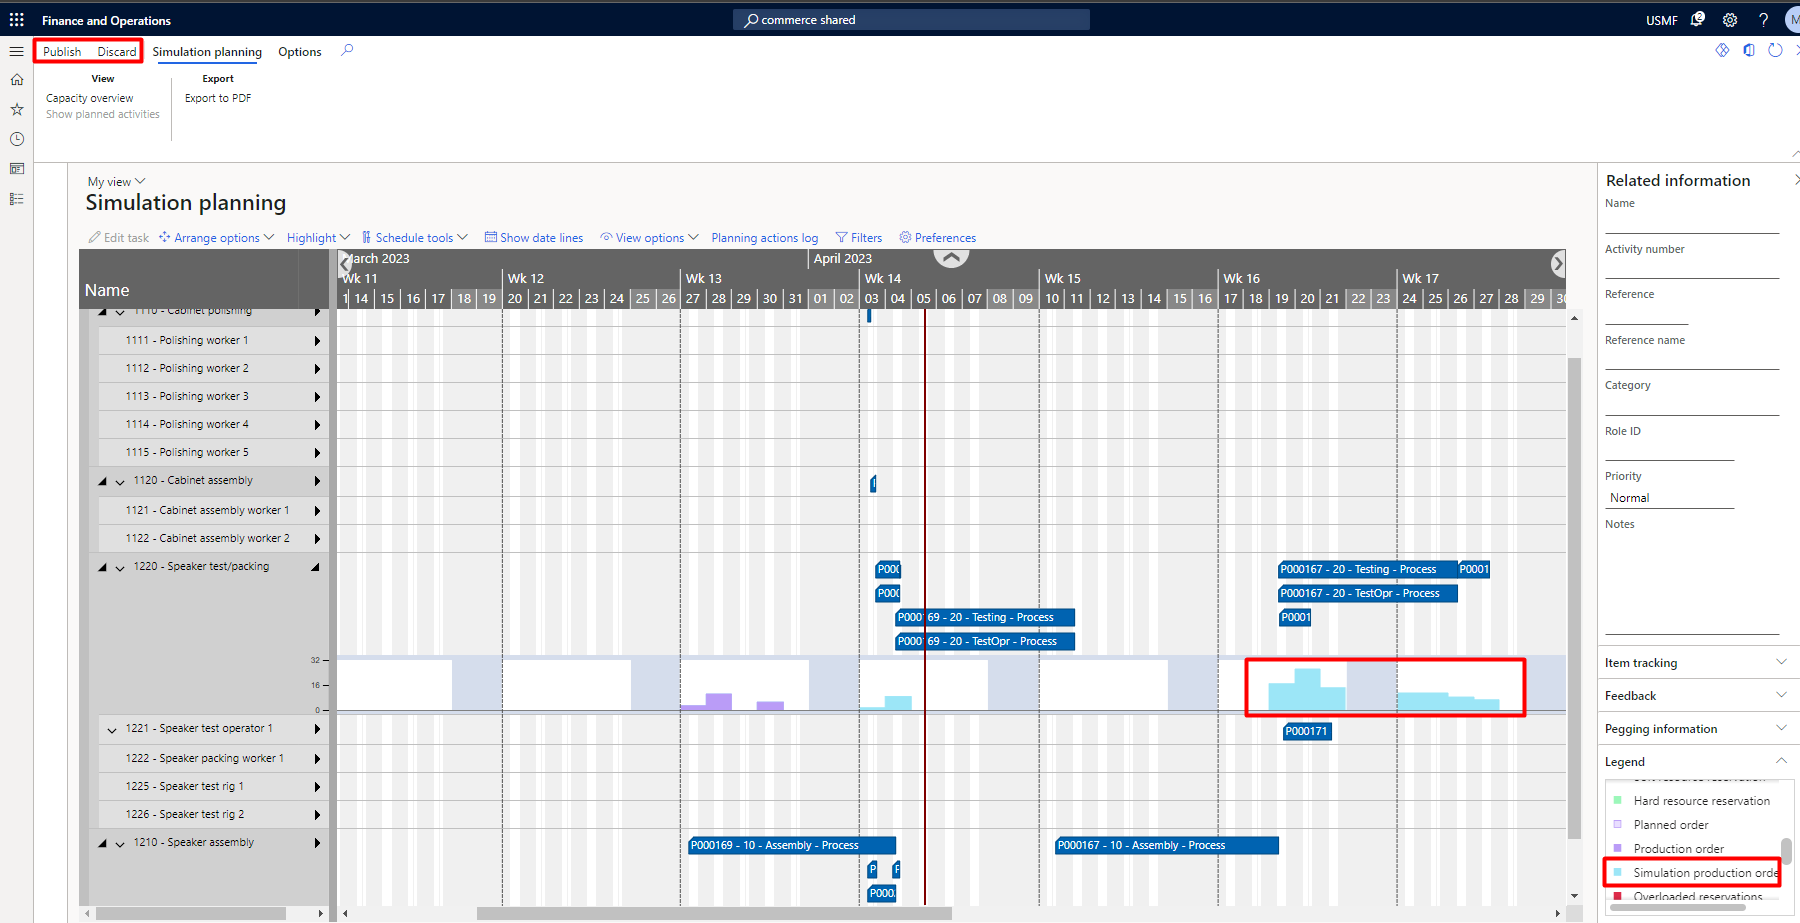
By using the “Open” action, the simulation planning of the selected production orders will be displayed in the resource planning. The simulation planning provides the ability to move production orders in time or assign them to another resource which are part of the simulation. This provides the ability to determine the best possible production planning, while not adjusting the actual production planning. The simulation planning has the ability to show the familiar histogram of resource group(s) and resource(s) but adds the insight of a blue indicator showing the impact of the simulation planning on the capacity of the selected resource group/resource.
The actions Publish and Discard will apply the simulation planning or delete the simulation planning.
 Familiar schedule tools from the Axtension® Production resource planning are available in the new simulation planning.
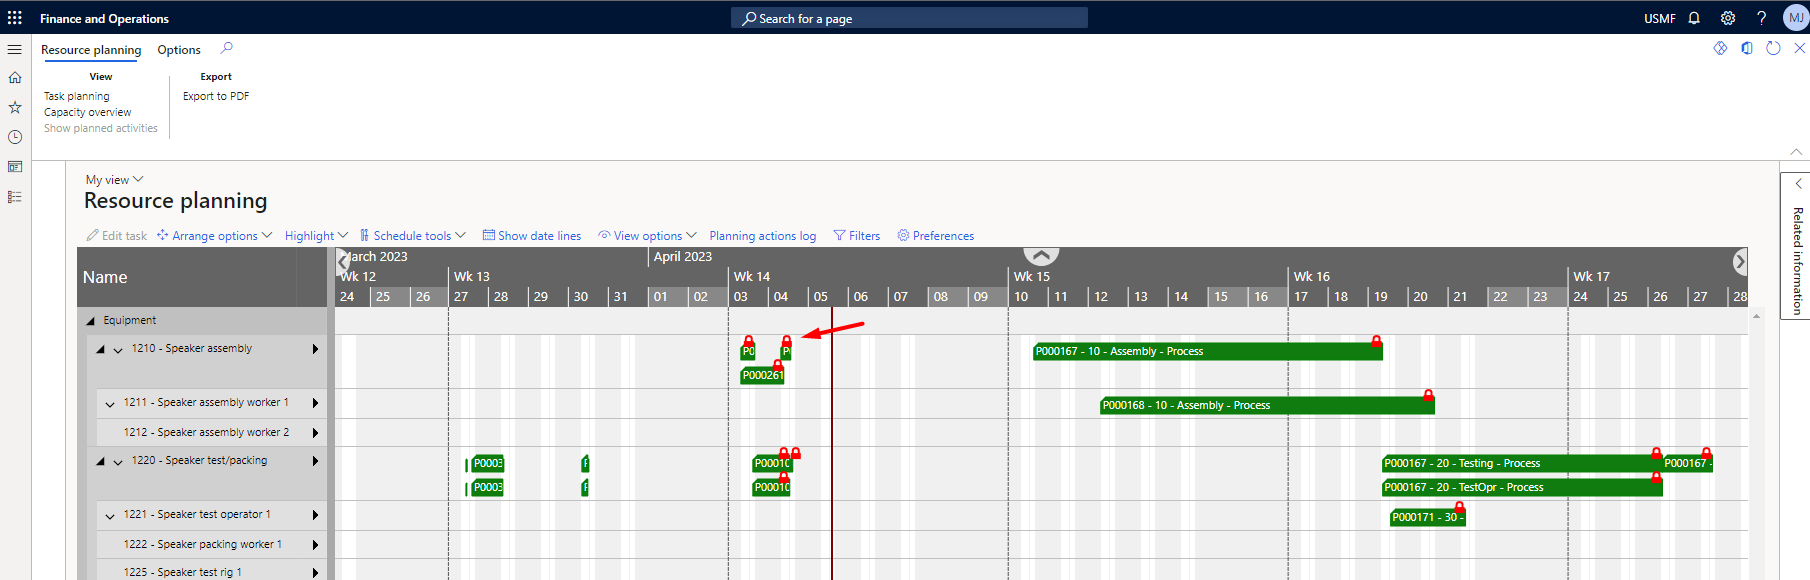 Production orders part of a simulation are displayed with a red lock icon in the Axtension® Production resource planning.
Production orders part of a simulation are displayed via the simulation ID in the “All production orders” list page.

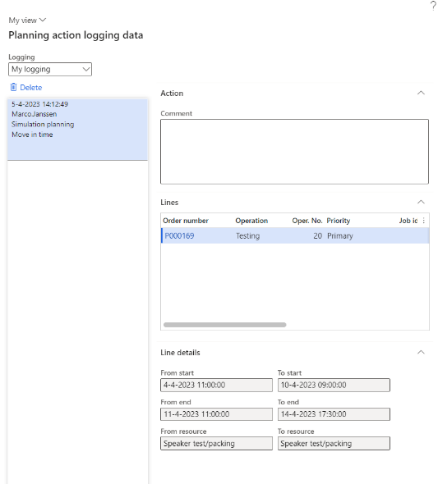
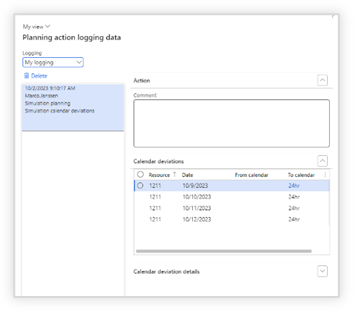
Changes applied according to the simulation planning are noted in the planning action log of the resource planning and can be undone completely if necessary.
Apply production planning simulation on resource capacity
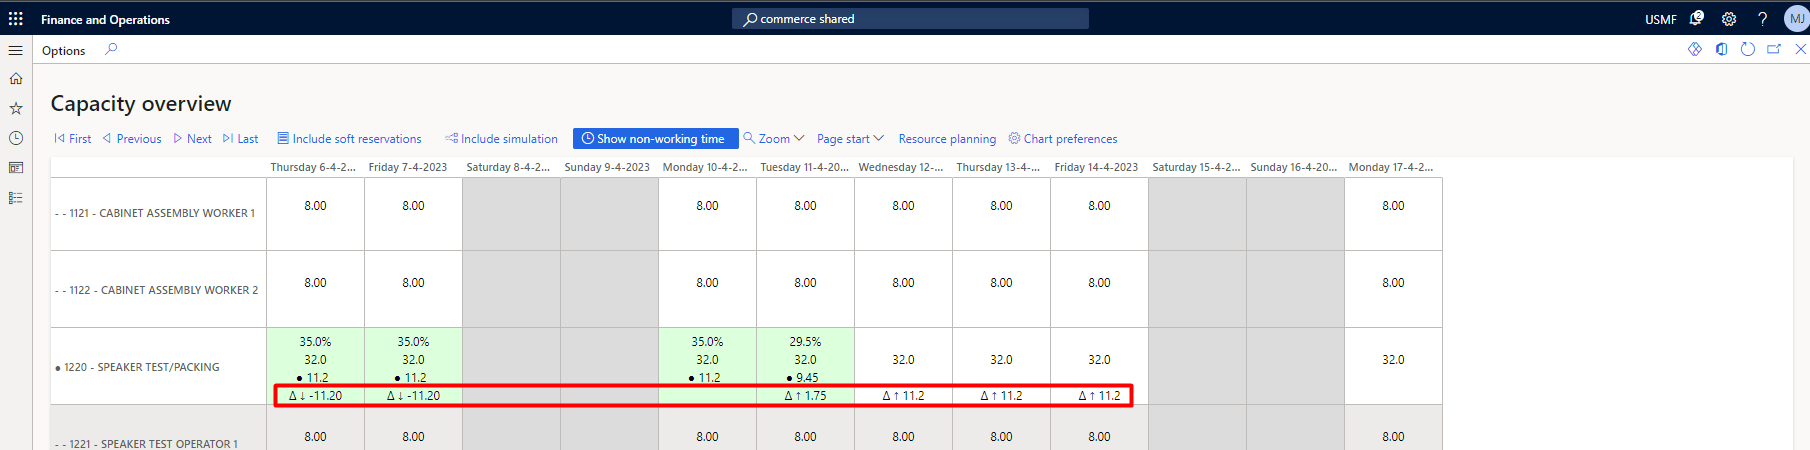
It is possible to open the capacity overview from the simulation planning and understand the impact of the simulated planning on the resource group(s) and resource(s).
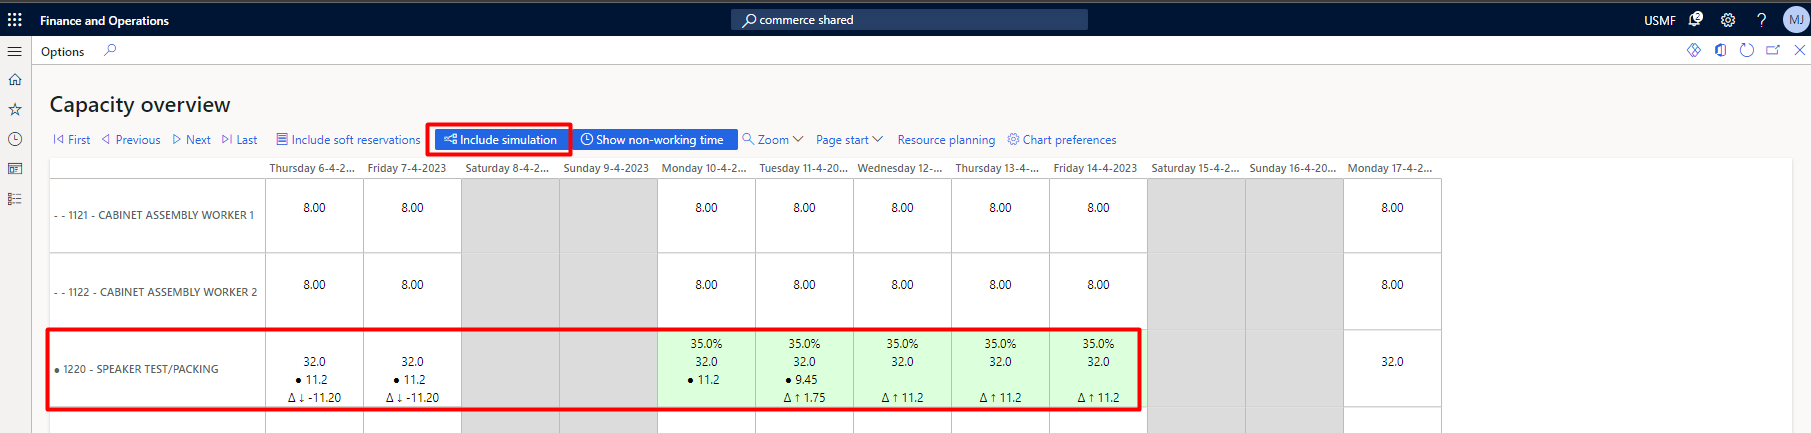
When including the simulation, the capacity overview gets updated according to the changes made in the production simulation. Changes caused by the simulation via the removal or addition of hours to resource group(s) and or resource(s) are indicated by the delta icon under the scheduled effort. When including the simulation, the percentage of utilization is updated based on the resource requirement of the simulation.
Any change will be shown via the following indicators:
 Indicating that hours are removed with the reduced amount.
 Indicating that hours are added with the assigned amount.

Simulate calendar deviations in production planning simulation
Calendar simulations are available in the fact pane when a resource is selected.
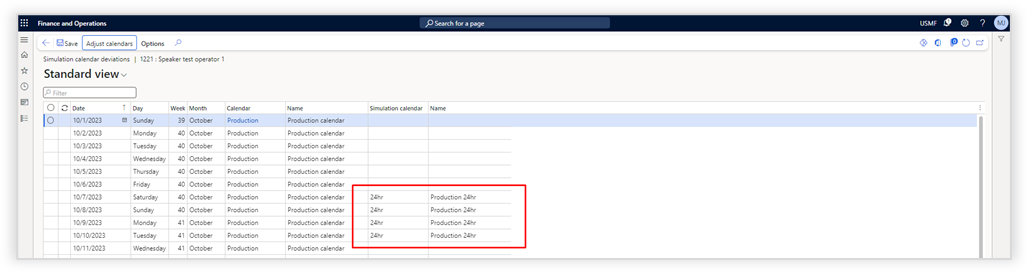 When selecting calendar deviations, it is possible to change the calendar for the selected resource.
 The Calendar deviation will only be visible in the simulation and can be applied on the actual calendar of the resource when publishing the simulation. Using the "Adjust calendars" action, allows to apply another calendar to multiple, selected, days.
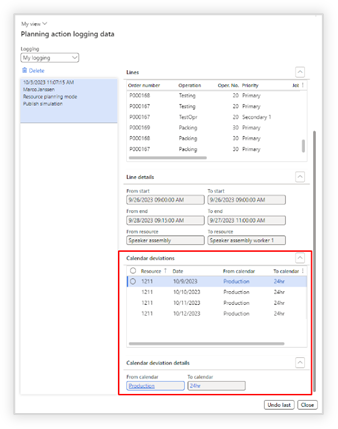 Calendar deviations are noted in both the Planning action log within the simulation and the Planning action log of the resource planning when the simulation is published.
New production planning simulation version(s)
Creating new versions of the simulation planning can be done by using the "New simulation version" icon:
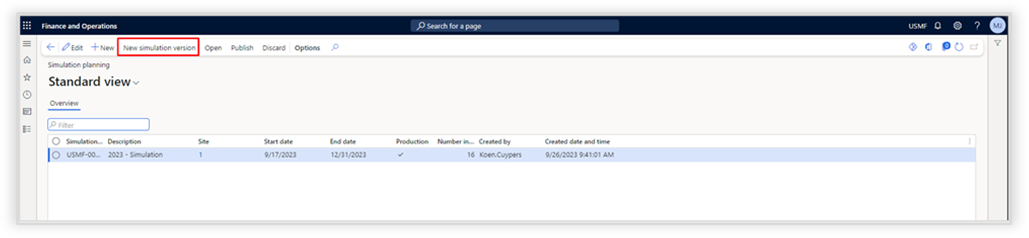 A new version can be created based on the actual planning or from the already existing simulation.
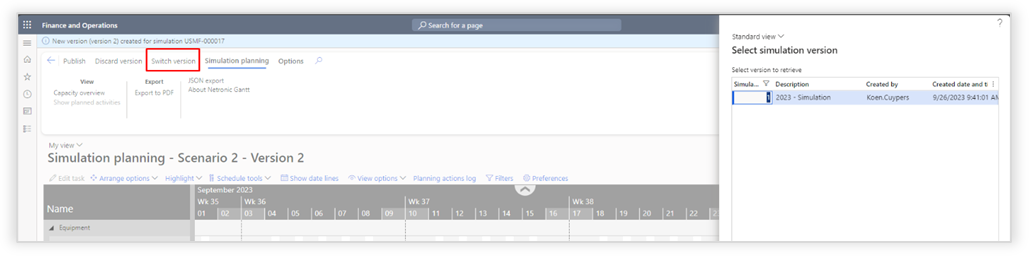 Once a new version is created it is possible to switch between versions by using the "Switch version" icon.