Configuring ADFS for ExFlow OnPrem
In AD FS Manager:
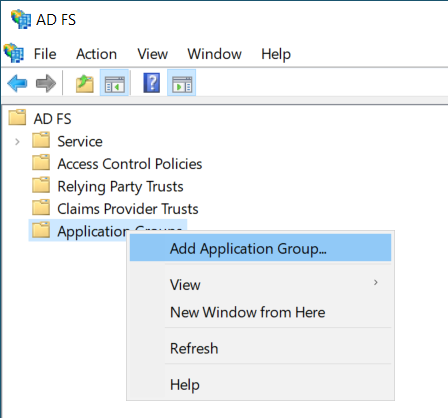
Right-click Application Groups and pick Add Application Group...
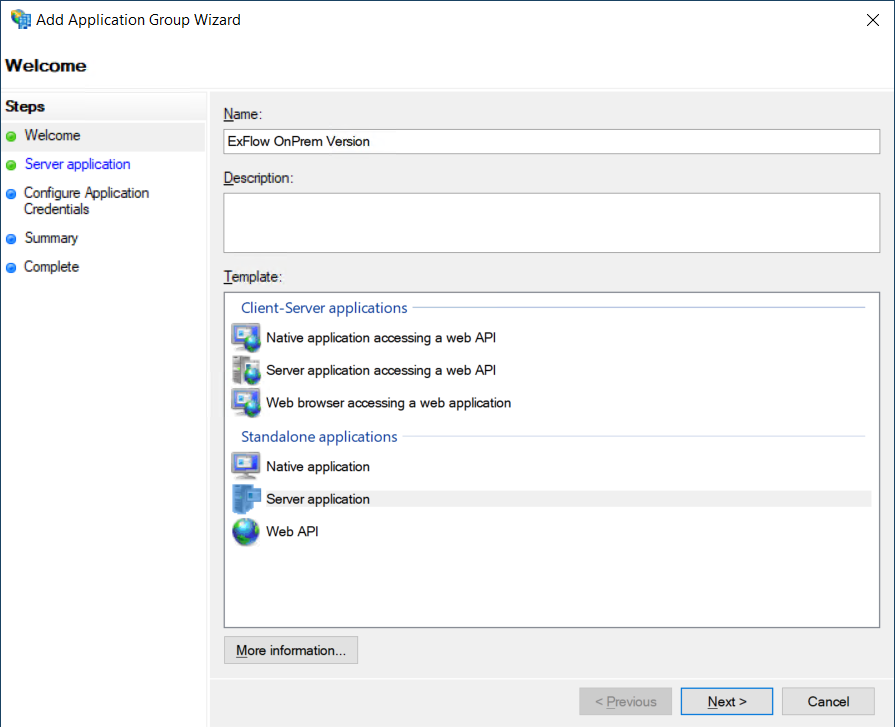
In the Wizard, select:
- Standalone application: Server Application
Next:
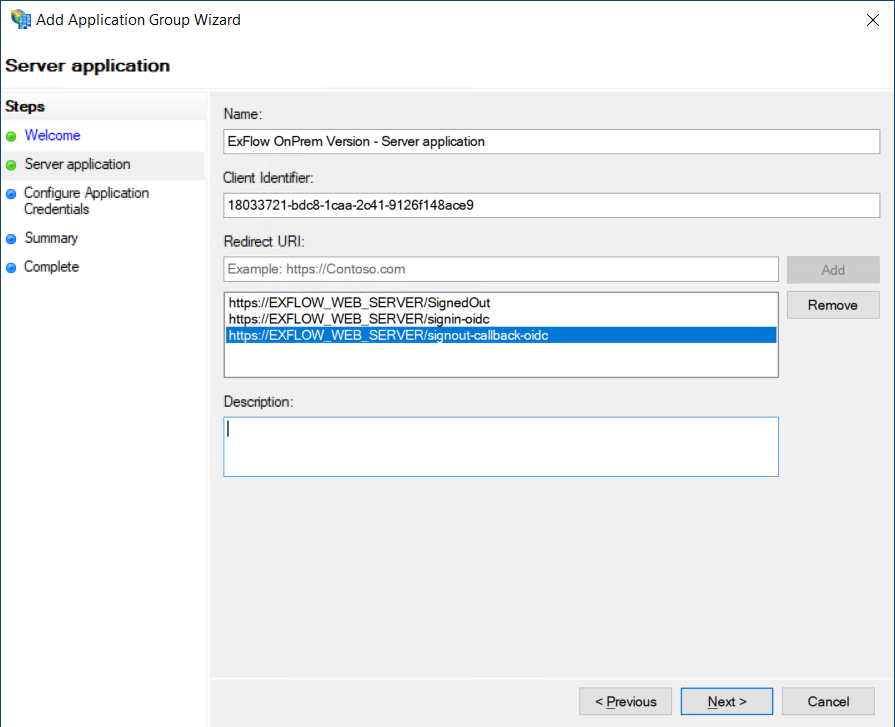
A Client Identifier is generated; write it down. It is later placed in appsettings.json, section ADFS:ClientId.
Example — Client identifier:
18033721-bdc8-1caa-2c41-9126f148ace9
Fill in the Redirect URI with these values:
https://EXFLOW_WEB_SERVER/SignedOut
https://EXFLOW_WEB_SERVER/signin-oidc
https://EXFLOW_WEB_SERVER/signout-callback-oidc
EXFLOW_WEB_SERVER can either be a local DNS domain name or an IP address
Next:
In Configure Application Credentials, select Generate a shared secret. Write it down; it should be entered into appsettings.json, section ADFS:ClientSecret.
Example — Client Secret:
FizgYhIUN4Vopr_hJproakhTiVj_jUWEAkPNtVpw
Next, Next, Close.
Right-click the newly created Application Group and select Properties. In the properties window, click Add application again and select Web API. Click Next.
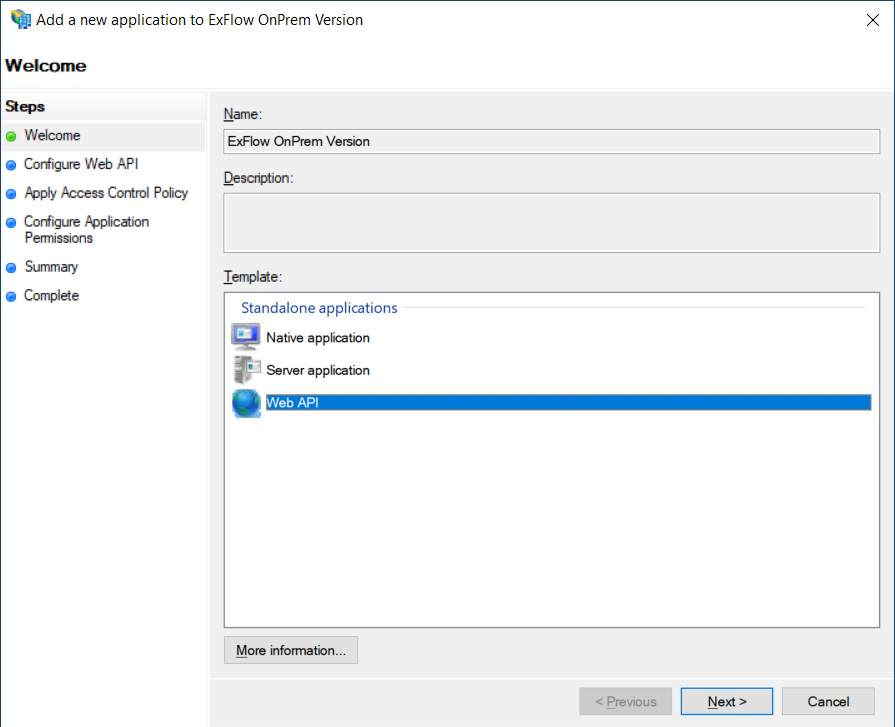
In the window Add a new application to..., add these identifiers:
00000015-0000-0000-d000-000000000000
https://EXFLOW_WEB_SERVER
The serial number comes from FnO
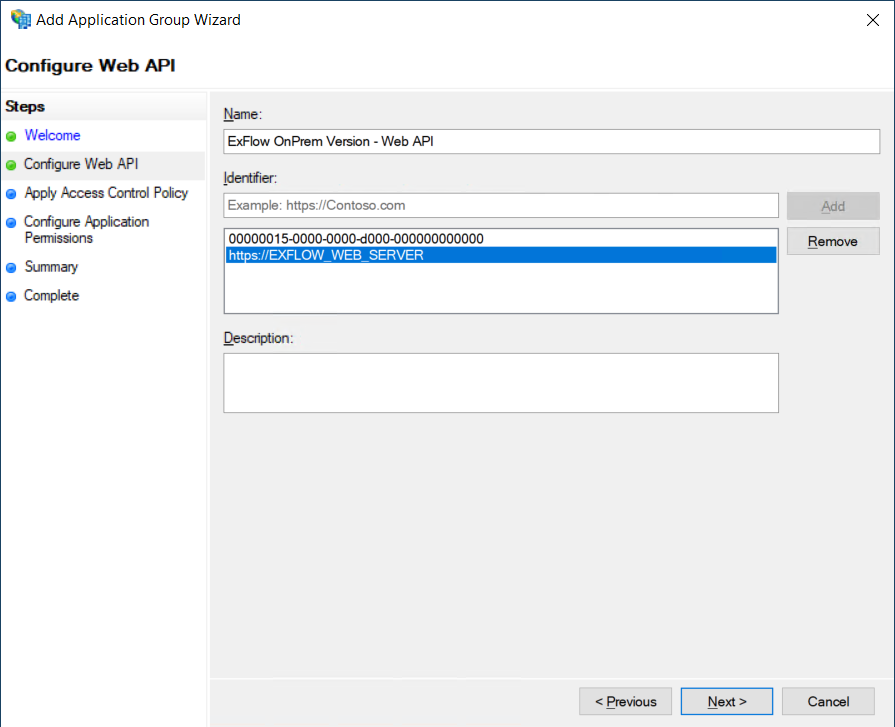
Next: Choose Access Control Policy:
- Add Policy: Permit everyone if it isn't there already.
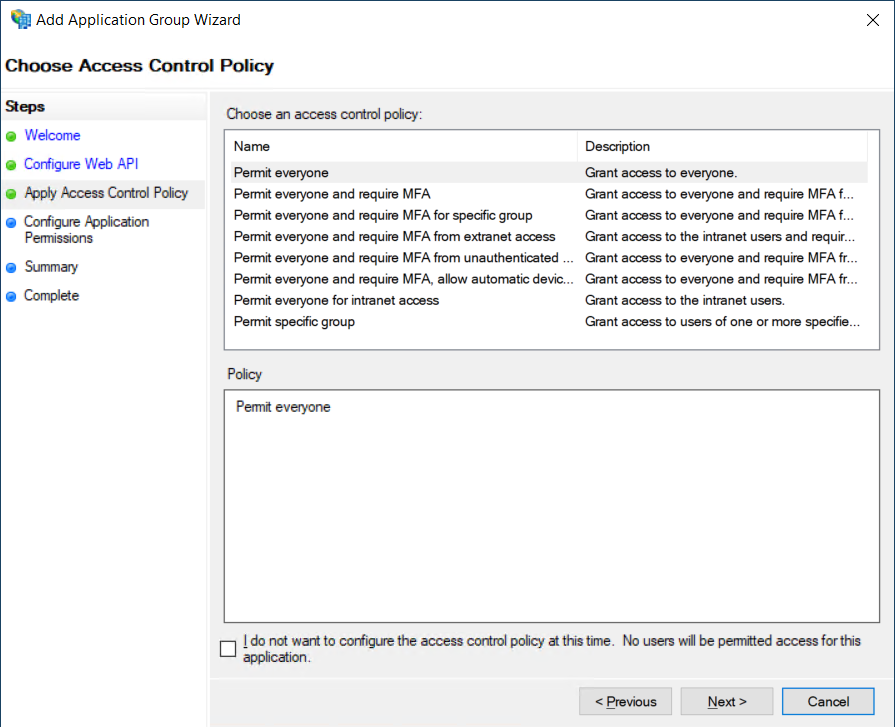
Next: Configure Application Permissions
Add scopes:
email
openid
profile
user_impersonation
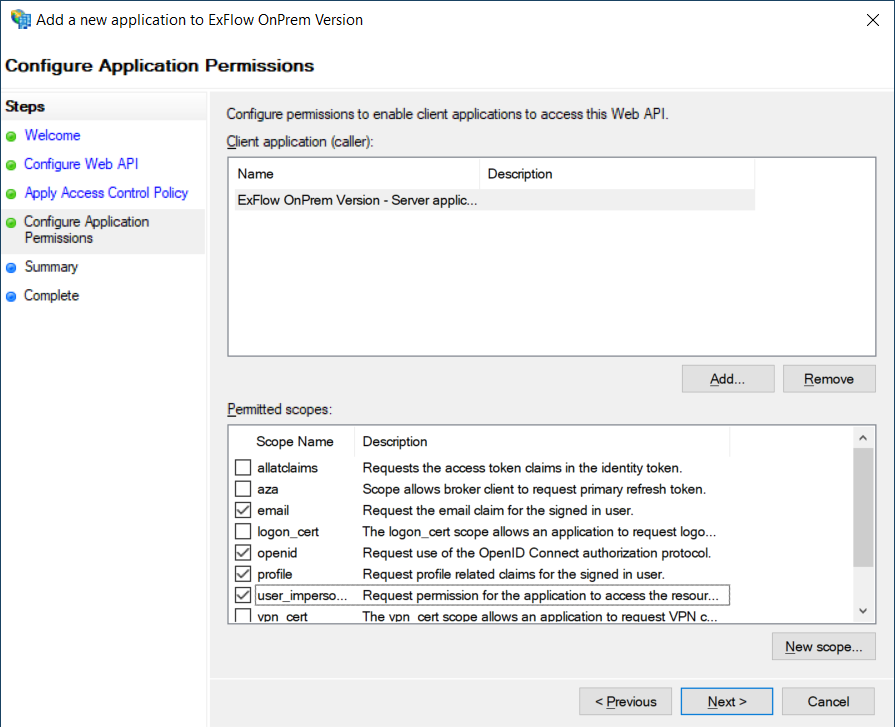
Next, Next, Close.
Issuance Transform Rules
From the Properties window for the new Application Group, select the entry under Web API and click Edit.
In the Web API properties window, go to the tab Issuance Transform Rules and add these:
(for all new Rules, the option "Pass through all claim values" should be checked)
UPN
- Click Add rule
- Select Transform an incoming Claim from Claim rule template
- Next
- Claim rule name: UPN
- Incoming claim type: UPN
- Outgoing claim type: Surname
- Done
Email to Name
- Click Add rule
- Select Transform an incoming Claim from Claim rule template
- Next
- Claim rule name: Email to Name
- Incoming claim type: E-Mail Address
- Outgoing claim type: Name
- Done
UPN to Name
- Click Add rule
- Select Transform an incoming Claim from Claim rule template
- Next
- Claim rule name: UPN to Name
- Incoming claim type: UPN
- Outgoing claim type: Name ID
- Outgoing name ID format: Email
- Done
Email Address
- Click Add rule
- Select Pass through or Filter an Incoming Claim from Claim rule template
- Next
- Claim rule name: Email Address
- Incoming claim type: E-Mail Address
- Done
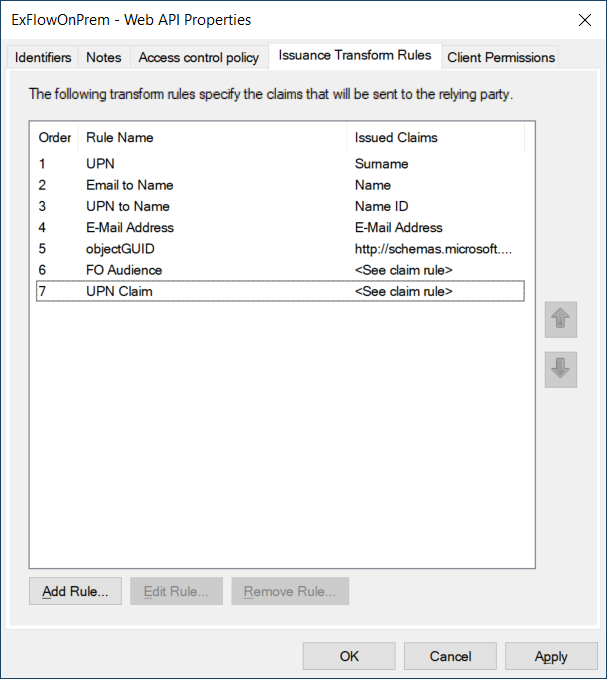
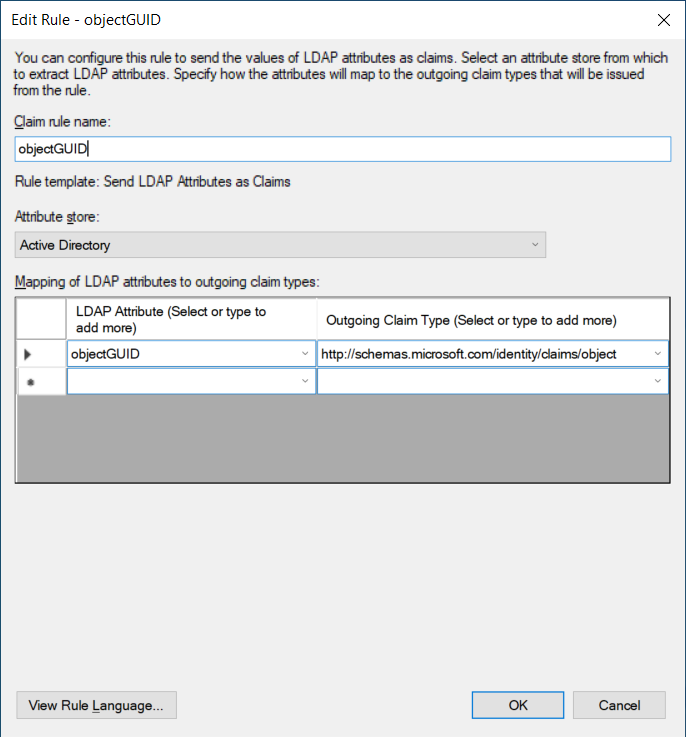
objectGUID
- Click Add rule
- Select Send LDAP attributes as Claims from Claim rule template
- Next
- Claim rule name: objectGUID
- Attribute store: Active Directory
- In table Mapping of LDAP attributes to outgoing claim types:
- Column 1:
objectGUID - Column 2:
https://schemas.microsoft.com/identity/claims/object
- Column 1:
Custom Rules
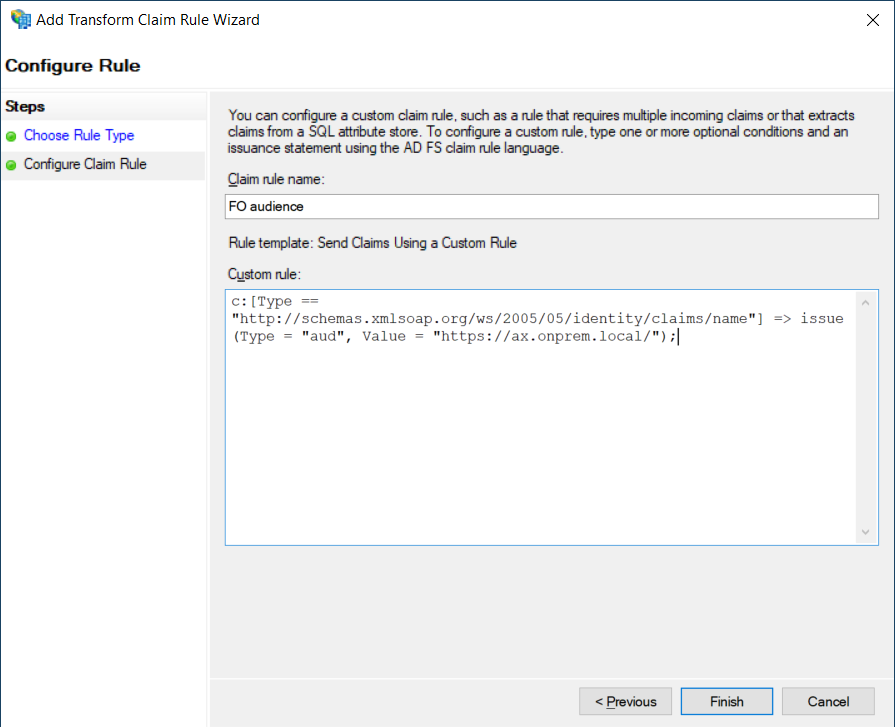
Also add these two custom rules using the template Send Claims using a Custom Rule:
Claim rule name: UPN Claim
Custom rule:
c:[Type == "http://schemas.xmlsoap.org/ws/2005/05/identity/claims/upn"] => issue(claim = c);
Claim rule name: FO audience
Custom rule:
c:[Type == "http://schemas.xmlsoap.org/ws/2005/05/identity/claims/name"] => issue(Type = "aud", Value = "https://ax.onprem.local/");
Grant ADFS Application Permissions
Open PowerShell as Administrator and run the following command, replacing <Client Identifier> with the one created for the new Server Application:
Grant-AdfsApplicationPermission -ClientRoleIdentifier "<Client Identifier>" -ServerRoleIdentifier "https://DynamicsEndpoint.local" -ScopeNames openid
<Client Identifier>= the "Client Identifier" as noted before.https://DynamicsEndpoint.local= the URL to your Finance & Operations Local Business Data.
No output means the command completed successfully.
To verify, use the command:
Get-AdfsApplicationPermission -ClientRoleIdentifier "<Client Identifier>"
Test connection manually
This step is not required, but it is included to assist with troubleshooting during testing. Any error messages generated may help identify the root cause of an issue.
To test the connection, first a Client Secret is needed. Run this command in an elevated PowerShell prompt:
$clientId = ""
$clientSecret = ""

$RequestAccessTokenUri = "https://opad.onprem.local/adfs/oauth2/token"
$foBaseUrl    = "https://ax.onprem.local"

$TLS12Protocol = [System.Net.SecurityProtocolType] 'Ssl3 , Tls12'
[System.Net.ServicePointManager]::SecurityProtocol = $TLS12Protocol
Add-Type -AssemblyName System.Web
$encodedSecret = [System.Web.HttpUtility]::UrlEncode($clientSecret)

$body = "grant_type=client_credentials&client_id=$clientId&client_secret=$encodedSecret&resource=$foBaseUrl"
try
{
    $authtoken = Invoke-RestMethod -Method Post -Uri $RequestAccessTokenUri -Body $body -ContentType $contentType
}
catch { throw }
The Client Secret is saved in the variable $clientId. To view it, simply type this in the same prompt:
$clientId
To make the SOAP call and retrieve a list of users, run the script below. Fill in the Client Id and Client Secret from the result of the previous script:
$clientId = ""
$clientSecret = ""

$RequestAccessTokenUri = "https://opad.onprem.local/adfs/oauth2/token"
$foBaseUrl    = "https://ax.onprem.local"

[string]$soap = "$foBaseUrl/namespaces/AXSF/api/services/EXF_ServiceGroup/EXF_Service/wsGetUsers"

#Test FO connection

$TLS12Protocol = [System.Net.SecurityProtocolType] 'Ssl3 , Tls12'
[System.Net.ServicePointManager]::SecurityProtocol = $TLS12Protocol
Add-Type -AssemblyName System.Web
$encodedSecret = [System.Web.HttpUtility]::UrlEncode($clientSecret)

$body = "grant_type=client_credentials&client_id=$clientId&client_secret=$encodedSecret&resource=$foBaseUrl"
$contentType = 'application/x-www-form-urlencoded'
try
{
    $authtoken = Invoke-RestMethod -Method Post -Uri $RequestAccessTokenUri -Body $body -ContentType $contentType
}
catch { throw }
$headers = @{ 'authorization' = "$($authToken.token_type) $($authToken.access_token)" }
$Result = Invoke-RestMethod -Method Post -Uri $soap -Headers $headers -ContentType "application/json"
Entering $Result after the script has finished should list the User table from FnO.