Transsmart parameters
The Transsmart parameters are available in the module Inventory Management -> Setup -> Shipping Connect.
Connection
The section “Connection” contains the settings that are required for connecting with the Transsmart-platform, as well as information about the data that is configured in the Transsmart-platform.
This section consists of the following sub-sections:
- Company independent account information
- Carriers
- Transsmart cost centers
- Package types
- Incoterms
- Mail types
- Service level types
- Service level others
- Booking profiles
- Services
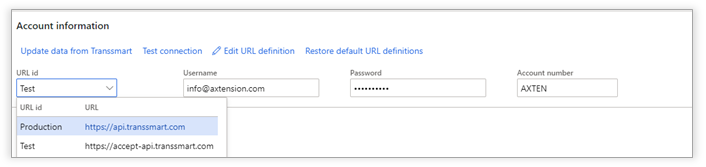
Company independent account information
The section “Company independent account information” contains the settings that are required for connecting to the Transsmart-platform. These settings are legal entity specific.
|
Field |
Description |
|
URL id |
The URL to the Transsmart-platform |
|
Username |
The username used for logging in |
|
Password |
The password used for logging in |
|
Account number |
The Transsmart account number |
The connection can be tested using the “Test connection” button.
With the button “Update data from Transsmart”, all necessary information that is configured in the Transsmart-platform, is imported into Dynamics 365 for Finance and Supply Chain Management.
Using the “Edit URL Definition” button it is possible to change the preset URLs, if required in specific cases.
Note: When entering or changing the connection settings, it is required to close the Dynamics 365 session after saving (for example by closing all browser windows). After re-opening the form, the configuration data can be retrieved from Transsmart.
Carriers
The section “Carriers” shows all carriers that are configured in the Transsmart-platform.
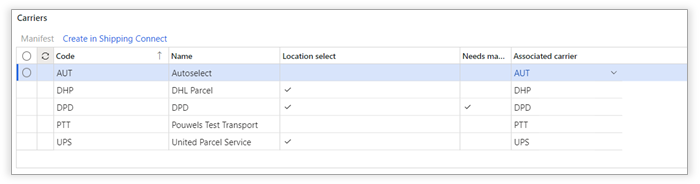
“Create in Shipping Connect” must be selected after the initial import of the carrier information from Transsmart. When selecting “Create in Shipping Connect” an associated carrier will be created and set on all or on the individually selected carriers. This action must be done every time a new carrier is added.
For carriers that require manifesting, a batch job can be created to automatically manifest the shipments for the specific carrier at a specified time. To setup this batch job, select a carrier and click the “Manifest” button.
Service level times
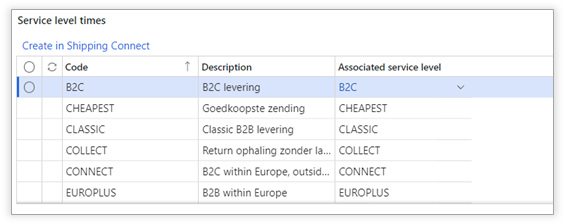
As for carriers, “Create in Shipping Connect” must be selected after the initial import of the service level times information from Transsmart. When selecting “Create in Shipping Connect” an associated service level will be created and set on all or on the individually selected service levels. This action must be done every time a new service level is added.
Transsmart cost centers
The section “Transsmart cost centers” shows all cost centers that are configured in the Transsmart-platform.

Package types
The section “Package types” shows all package types that are configured in the Transsmart-platform.

When using Axtension Shipping Connect for processes in the Warehouse Management module, a mapping between the containers used in the Warehouse Management module and the package types in Axtension Shipping Connect needs to be created.
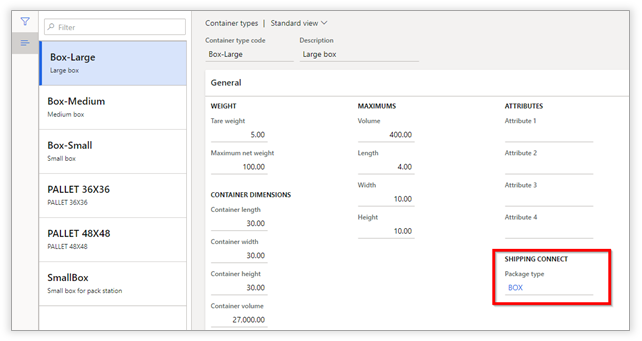
You can go directly to the overview of container types in Warehouse Management by clicking the“Container types” button. In this screen, you can create the mapping for each container type by selecting a corresponding package type in the “Package type” dropdown.
Incoterms
The section “Incoterms” shows all incoterms that are configured in the Transsmart-platform.

Mail types
The section “Mail types” shows all mail types that are configured in the Transsmart-platform.

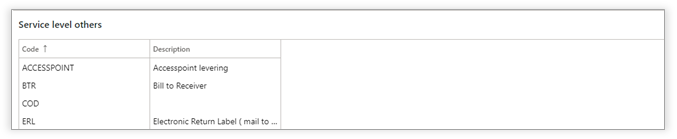
Service level others
The section “Service level others” shows all additional service level options that are configured in the Transsmart-platform.
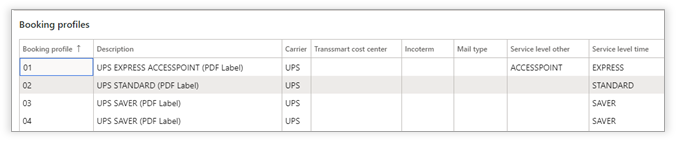
Booking profiles
The section “Booking profiles” shows all booking profiles that are configured in the Transsmart-platform. A booking profile is a combination of carrier, service level time and service level other.
Services
The section “Services” shows all services that are configured and provided by the Transsmart-platform.

Transsmart cost center setup
Specific rules can be configured to define when Transsmart cost centers must be used. Using different cost center make it possible to support more advanced scenarios with the Transsmart-platform. Each cost center has a specific configuration in the Transsmart-platform, which makes it possible to use specific carrier contracts when shipping goods from a specific warehouse.
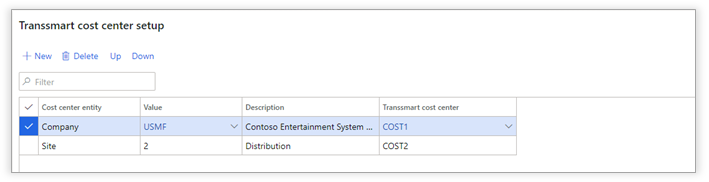
Use the “New” button to add a new cost center entity. When booking a shipment, Axtension Shipping Connect will validate these rules from top to bottom, stopping when it finds an applicable rule. If no applicable rule is found, the default on cost center on the “General” tab is used.
The Transsmart cost center can support several scenarios depending on the Transsmart-platform configuration.
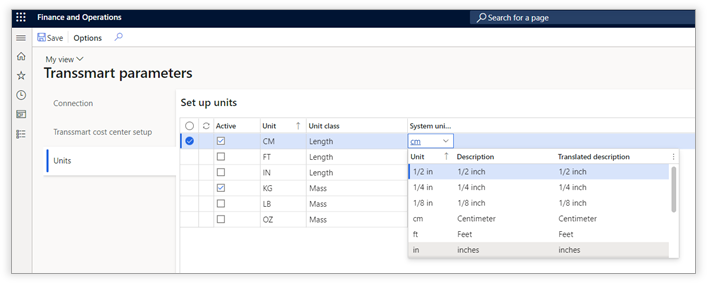
Units
This section can be used to activate and assign the units coming from Transsmart against the system units available in Dynamics 365.
Shipping Connect parameters
The Shipping Connect parameters are available in the module Inventory Management -> Setup -> Shipping Connect.
General
The section “General” contains the general settings for the integration of Axtension Shipping Connect into Dynamics 365 for Finance & Supply Chain Management.
This section consists of the following sub-sections:
- General shipment parameters
- Shipment bookings
- Sales order shipments
- Warehouse management shipments
- Transfer orders
- Purchase order shipments
- Return order shipments
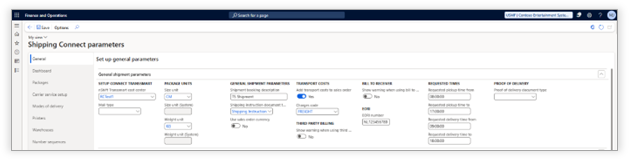
General shipment parameters
The “General shipment parameters” section contains the general settings that are used when booking a shipment. These settings need to be specified for each legal entity.
|
Field |
Description |
|
Transsmart cost center |
The Transsmart cost center assigned to the current company in Dynamics 365 for Operations |
|
Size unit |
The size unit used when specifying package units in Transsmart |
|
Weight unit |
The weight unit used when specifying package units in Transsmart |
|
Shipment description |
The default shipment description* |
|
Shipping instruction document type* |
The document type used for shipping instructions |
|
Mail type |
The default Transsmart mail type that is used |
|
Add transport costs to sales order |
Default setting for determining when shipping costs are added to the sales order. |
|
Charges code |
If the transport costs are added to a sales order, this charge code is used |
|
Show warning when using third party billing |
Show a warning to the user when the shipment is sent and third-party billing is used |
|
Show warning when using bill to receiver |
Show a warning to the user when the shipment is sent and bill to receiver is used |
|
EORI number |
Ability to set the EORI number for all outbound shipments for the legal entity. |
|
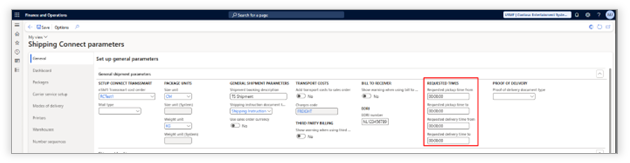
Requested times |
Ability to define the default pickup and delivery times for sales order. See for more information Set pickup and delivery times for sales orders. |
|
Proof of delivery document type** |
Configure the location where the proof of delivery should be stored. |
A document type of the type “Note” in Dynamics 365 for Finance and Supply Chain Management can be created. When creating a shipment booking, notes of the configured type will be used as shipping instruction. First, Axtension Shipping Connect will look for notes on the sales order. If there are no shipping instructions on the sales order, Axtension Shipping Connect will look for notes on the customer level, before falling back to the default, configured value.
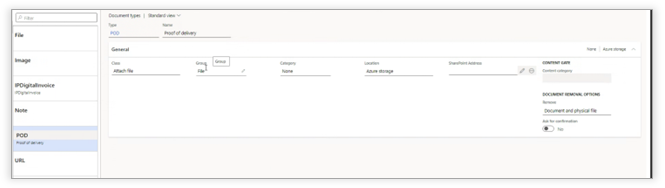
**A document type of the type “POD” in Dynamics 365 for Finance and Supply Chain Management can be created. This document type can be used to store the proof of delivery created after delivery of a shipment.
Shipment bookings

The “Shipment bookings” section contains the settings required for creating generic shipments.
|
Field |
Description |
|
Enable Shipping Connect for shipment bookings |
Enable or disable the possibility to create a generic shipment |
|
Sender address |
The default address of the sender for generic shipments |
|
Mode of delivery |
The default mode of delivery for generic shipments |
|
Delivery terms |
The default delivery terms (incoterms) for generic shipments |
|
Pick-up time from/to |
The default pick-up time-window for generic shipments |
Sales order shipments
The “Sales order shipments” section contains the settings required for creating shipments when posting the packing slip of a sales order.

|
Field |
Description |
|
Enable Shipping Connect for sales orders |
Enable or disable the possibility to create shipments when posting a packing slip for a sales order |
|
Create shipment booking on |
Definition of when the shipment booking will be created: When posting the packing slip When generating the picking list |
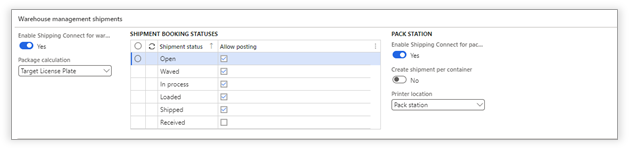
Warehouse management shipments
The “Warehouse management shipments” section contains the settings required for creating shipments using the Warehouse Management module in Dynamics 365 for Finance & Supply Chain Management.
|
Field |
Description |
|
Enable Shipping Connect for warehouse management shipments |
Enable or disable the possibility to create shipment bookings directly from a shipment in warehouse management. |
|
Package calculation |
Automatically propose a package calculation based on the number of Target License Plates or no calculate the packaging |
|
Shipment booking status |
Enable or disable the option to book a shipment to the Transsmart-platform based on the status of the shipment in the Warehouse Management module. |
|
Enable Shipping Connect for pack station |
Enable or disable the Shipping Connect integration with the pack functionality in the Warehouse Management module. |
|
Create shipment per container |
Enabling this function will create a new shipment booking to the carrier for each container, causing labels to be printed after closing each container. Additional costs may be involved. |
|
Printer location |
Select the desired printer location. Options are: - Pack station: location of the selected pack station will be used as printer location. - Final shipping location chosen location when closing the container will be used as printer location. - Final shipping location container packing profile: the final shipping location configured on the container packing profile used at the pack station, will be used as printer location.
More information about setting up printer location can be found at the chapter Printer. |
Transfer orders
The “Transfer orders” section allows the setup of a default mode of delivery and delivery terms when a transfer order is created.

|
Field |
Description |
|
Enable Shipping Connect for transfer orders |
Enable the Shipping Connect integration for transfer orders. |
|
Mode of delivery |
Choose the default mode of delivery for transfer orders |
|
Delivery terms |
Choose the default delivery terms (incoterms) for transfer orders |
Purchase order shipments
The “Purchase order shipments” contains the settings for the integration of Shipping Connect for purchase orders.

|
Field |
Description |
|
Enable Shipping Connect for purchase orders |
Enable or disable the Shipping Connect integration for purchase orders |
|
Add transport cost to purchase order |
Specify whether the transport costs need to be added to the purchase order |
|
Charges code |
Defines under which charges code the costs should be added to the purchase order |
|
Add transport costs to return order |
Specify whether the transport costs need to be added to the purchase return order |
|
Charges code |
Defines under which charges code the costs should be added to the purchase return order |
Return order shipments
The “Return order shipments” section contains the setting for using Shipping Connect in combination with the with the sales order returns (RMA) functionality in Dynamics 365 for Finance and Supply Chain Management.

|
Field |
Description |
|
Enable Shipping Connect for return orders |
Enable or disable the Shipping Connect integration for return orders (RMA) |
|
Mode of delivery |
Sets the default mode of delivery used for creating sales return order shipments |
|
Add transport cost to return order |
Specifies whether the transport costs need to be added to the sales return order |
|
Charges code |
Defines under which charges code the costs should be added to the sales return order |
Dashboard
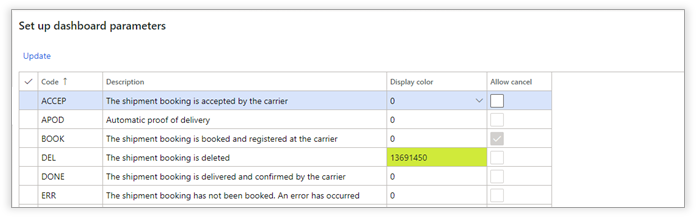
The “Dashboard” section contains the settings for the Shipping Connect dashboard.
For each status code of a shipment, the following settings can be done:
|
Field |
Description |
|
Display color |
The display color for lines in the dashboard for the specific status code |
|
Allow cancel |
Specifies whether a user is allowed to cancel the shipment if it has this specific status code. Note that if the Transsmart-platform cannot cancel the booking, an error will be shown to the user. |
The “Update” button can be used to update the status codes that are available in the Transsmart-platform.
Packages
The “Packages” section contains information about the packages that are used within the organization in relation to the package types that are available in the Transsmart-platform.
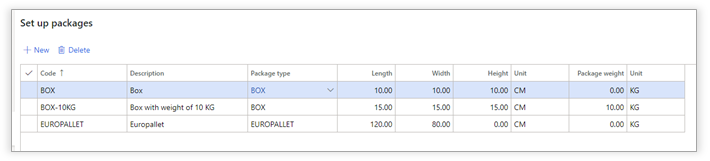
For each package, the following settings can be applied:
|
Field |
Description |
|
Code |
The package code |
|
Description |
The description |
|
Package type |
The package type from the Transsmart-platform |
|
Length |
The default length |
|
Width |
The default width |
|
Height |
The default height |
|
Unit |
The unit of measurement (read-only setting, based on the Unit of measurement option in the general settings form) |
|
Weight |
The weight of the package |
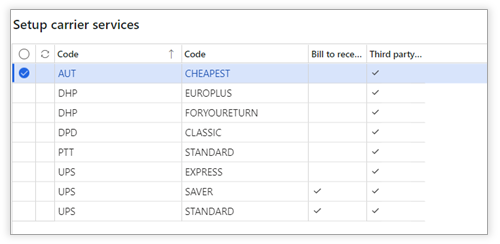
Carrier service setup
This page provides an overview with the carrier; available service levels of the carrier and available billing methods (bill to receiver or third-party billing) as defined in the Transsmart parameters.
Modes of delivery
The “Modes of delivery” section defines the mapping between the modes of delivery in Dynamics 365 for Finance & Supply Chain Management and the booking profiles in the Transsmart-platform.
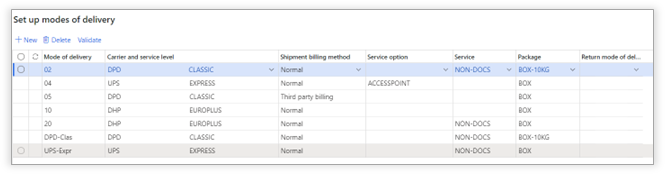
For each mapping, the following settings can be specified:
|
Field |
Description |
|
Mode of delivery |
The mode of delivery in Dynamics 365 for Finance and Supply Chain Management |
|
Carrier and service level |
The carrier and service level used for this mode of delivery, as configured in the Transsmart parameters |
|
Shipment billing method |
The billing method used for this mode of delivery |
|
Service option |
Additional service level options |
|
Service |
The service offered by the Transsmart-platform |
|
Package |
The default package type used for the mode of delivery |
|
Return mode of delivery |
The mode of delivery that is used for the return shipment. Note that this configuration is only applicable when the carrier does not offer a “label in the box” solution. |
The “Validate” button can be used to validate if the specified combinations are still valid, for example after a change in the configuration or an update of service levels.
To use Axtension Shipping Connect for Warehouse Management processes, it is required to select a mode of delivery that is configured as shipping carrier in the Warehouse Management module.
Printers
The section “Printers” contains the settings that are related to the printer setup.
This section consists of the following sub-sections:
- General printer settings
- Printers
- Printer locations
General printer settings
The “General printer settings” section contains the default printer settings. These settings are used as fallback or for scenarios where no printer location is defined.

|
Field |
Description |
|
Label printer |
The default label printer |
|
PDF printer |
The default document printer |
|
Blind shipments PDF printer |
The default document printer for blind shipments. |
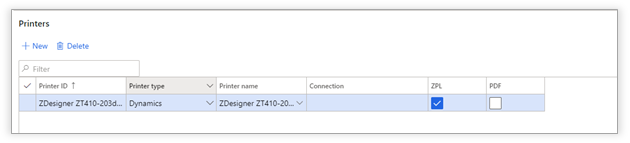
Printers
The “Printers” section is used to define the printers that can be used with Shipping Connect.
|
Field |
Description |
|
Printer ID |
The id of the printer that is used. |
|
Printer type |
The type of printer. When the Document Routing is used for printer, choose “Dynamics”. When Smartprint of Transsmart is used, choose “Smartprint”. |
|
Printer name |
The name of the printer on the print server. |
|
Connection |
When “Smartprint” is used, the configured connection name needs to be specified here. |
|
ZPL |
Check this box if the printer is a ZPL printer. |
|
|
Check this box is the printer is a regular document printer. |
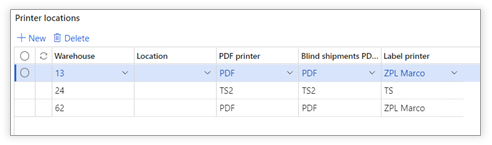
Printer locations
In the “Printer locations” section, it can be configured which printer is used on which location in the warehouse.
|
Field |
Description |
|
Warehouse |
The id of the warehouse |
|
Location |
The id of the location in the warehouse. If no location is specified, the printer settings will be used for every shipment that is shipped from the warehouse. |
|
Label printer |
The label printer to use at the specified location |
|
PDF printer |
The document printer to use at the specified location. |
|
Blind shipments PDF printer |
The document printer to use at the specified location in case of a blind shipment. |
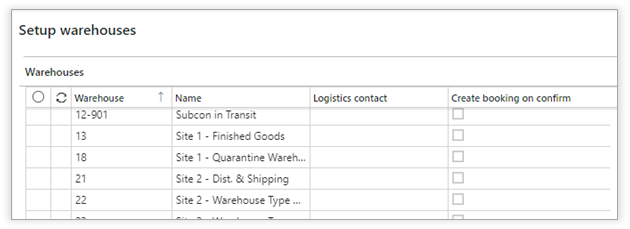
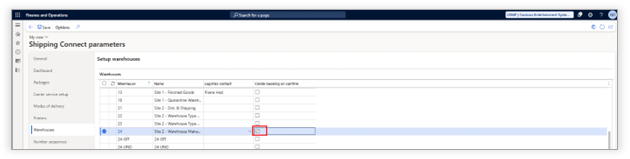
Warehouses
The section “Warehouses” contains an overview of all configured warehouses in the company and provides the following options per warehouse:
|
Field |
Description |
|
Warehouse |
The id of the warehouse |
|
Name |
The name of the warehouse |
|
Logistics contact |
Primary logistics contact for the warehouse, which will be added to the shipment booking |
|
Create booking on confirm |
Ability to automatically create a shipment booking when the shipment in advanced warehouse management is confirmed. |
Number sequences

The section “Number sequences” contains the number sequences that are used within Shipping Connect.
Integrate with Delivery
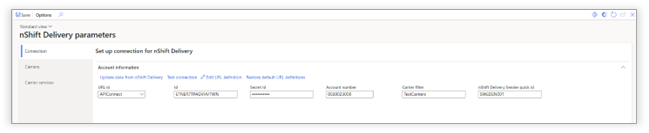
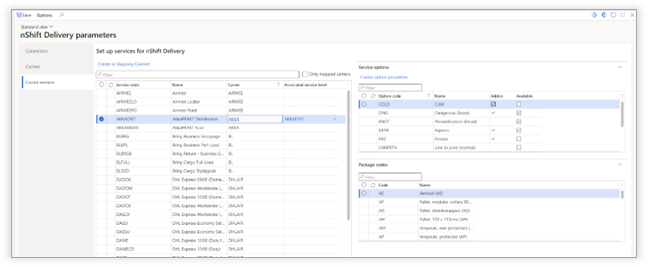
The setup of this integration can be found in the module Inventory management -> Setup -> Shipping Connect -> nShift Delivery parameters.
 Connection
|
Field |
Description |
|
URL id |
Default URL to the nShift Delivery platform. This can be adjusted by using to the Edit URL definition action and can be restored by using the Restore default URL definition action. |
|
Id |
nShift Delivery API ID as available in nShift Delivery. |
|
Account number |
Account number as provided by nShift Delivery. |
|
Carrier filter |
Name of the printing favorite in nShift Delivery which will be used in this legal entity. |
|
nShift Delivery Sender quick id |
Name of the Sender quick id in nShift Delivery which can be used by this legal entity. |
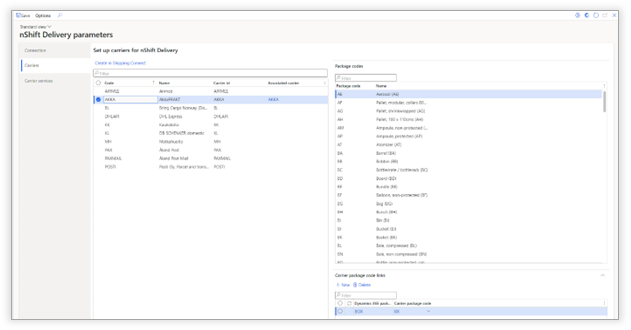
This form will show all carriers as configured in the selected Carrier filter based on the printing favorite in nShift Delivery.
|
Field |
Description |
|
Create in Shipping Connect |
Create the selected carrier code so it can be assigned to a mode of delivery in the Axtension Shipping Connect parameters. |
|
Package code |
Supported package codes by the carrier as provided from nShift Delivery. |
|
Carrier package code link |
Connect a carrier package code with a Dynamics 365 package code. |
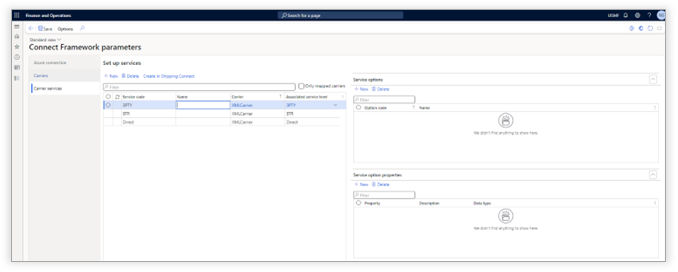
Carrier services
Each carrier provides specific service information which can be configured to be used in Axtension Shipping Connect. In addition, each service can contain specific service options which can require specific types of information so the service option can be used by the carrier. The carrier service form provides the ability to configure the services and related service options.
|
Field |
Description |
|
Create in Shipping Connect |
Create the selected carrier service code so it can be assigned to a mode of delivery in the Axtension Shipping Connect parameters. |
|
Service options |
Overview of service options of the selected service. More information further in this document. |
|
Package codes |
Supported packages of the selected service. |
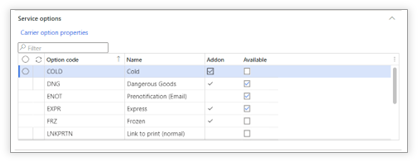
Service options
Carriers can provide additional options with services. The ‘service options” section shows if and which options are available on the selected service.
|
Field |
Description |
|
Addon |
Options which do not require additional information. |
|
Available |
Select the preferred options so they can be used in Axtension Shipping Connect. |
Options not marked as add-on require additional information, so the carrier is able to handle them. This requirement is displayed by selecting the “Carrier option properties” action on the selected option.
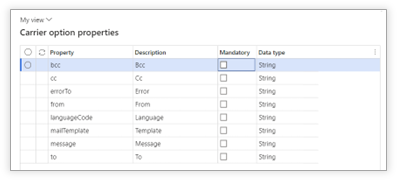
“Carrier option properties” show all possible properties on the selected option and the expected data type by nShift Delivery.
The mandatory column provides the ability to mark a property mandatory to be entered with a value during the setup of a shipment booking.
Note: nShift Delivery does not provide any validation of mandatory fields and it values. Hence Axtension does not provide any recommendation or validation of the best setup of nShift Delivery in Axtension Shipping Connect.
Note : Extension points are available to add additional data to the nShift Delivery shipment booking. Axtension does not provide any support on customization of the extension points.
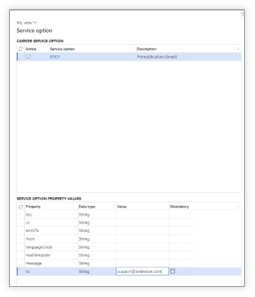
Options marked as available can be enabled on individual mode of deliveries in the Shipping Connect parameters:
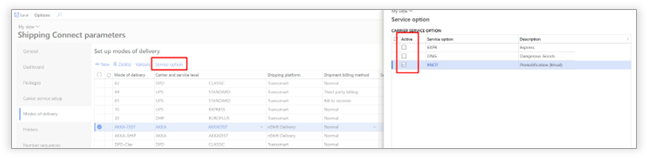
Enabled options can be used on e.g., generic shipments or sales orders to validate the additional information necessary to use the option on the service.
The service option pop-up provides the ability to enter required information per property of the option manually.
Export shipment bookings to Azure Blob
This feature provides the ability to generate shipment booking data outside of Dynamics 365 for organizations which are not using the carrier platforms nShift Transsmart and/or nShift Delivery.
The setup of this export feature is via Inventory management -> Setup -> Shipping Connect -> Export parameters.
Azure connection
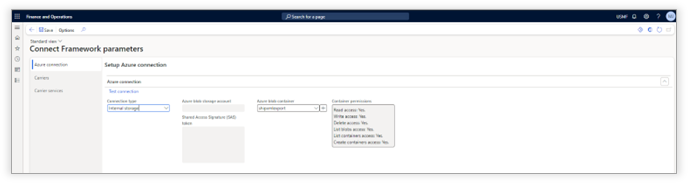
Axtension Shipping Connect supports the following Azure Blob connection types:
|
Field |
Description |
|
Internal storage |
Shipment bookings will be exported to the internal Azure Blob container of Dynamics 365. This is not recommended for production environments. |
|
Use access key |
Connection with Azure Blob established via an access key. |
|
Use SAS token |
Connection with Azure Blob established via a SAS token. |
|
Azure blob container |
Ability to select an existing container or create a new one. |
Carriers and carrier services
Since there is no connection with a carrier platform, carrier and carrier service level information needs to be entered into Axtension Shipping Connect manually.
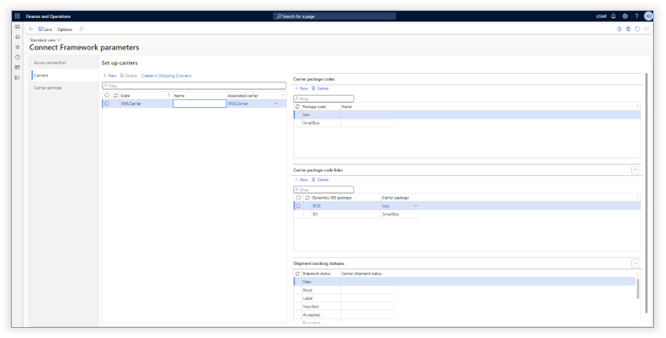
Carriers
|
Field |
Description |
|
New carrier |
Enter the carrier code as given by the carrier |
|
Create in Shipping Connect |
Create the configured carrier code so it can be assigned to a mode of delivery in the Axtension Shipping Connect parameters. |
|
New carrier package code |
Enter the package code as given by the carrier |
|
New carrier package code link |
Connect the carrier package code with the Dynamics 365 package code. |
Carrier services
|
Field |
Description |
|
New service code |
Enter the carrier service code as given by the carrier |
|
Create in Shipping Connect |
Create the configured carrier service code so it can be assigned to a mode of delivery in the AXtension Shipping Connect parameters. |
|
New service option |
Enter the service option code as given by the carrier. Examples of services options are email notifications, Saturday delivery, dangerous goods, insurance. |
|
New service option property |
Enter service option properties as
required by the carrier for the selected service option. |
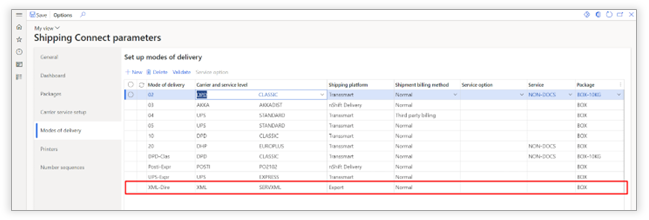
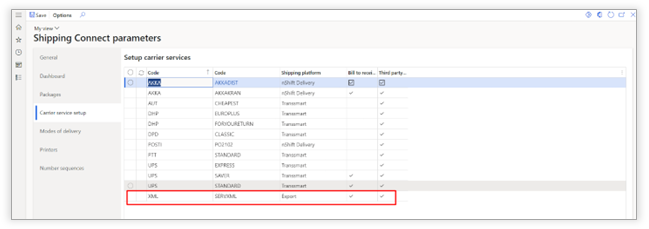
Configured carrier(s) will be displayed in the Axtension Shipping Connect parameters with "export" as "carrier platform" for easy identification.
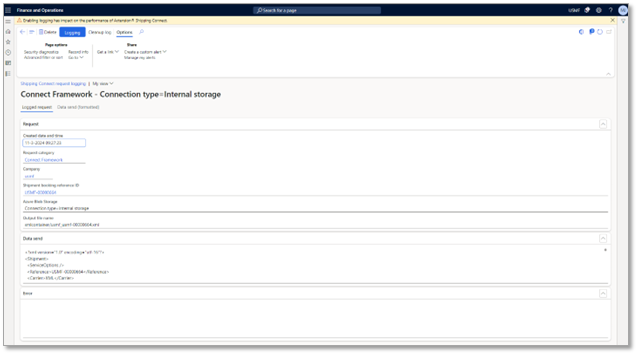
Logging of Connect Framework shipment bookings
Shipment bookings created via the Axtension Shipping Connect - Connect Framework are now logged in the Shipping Connect request logging.
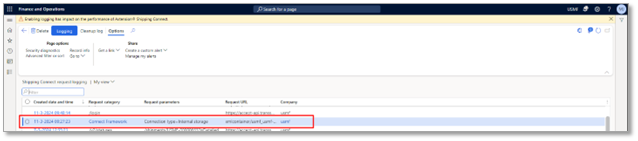
Detailed information can be found in each entry of the logging like the target Azure Blog storage, the timestamp, the shipment booking data and/or error information.
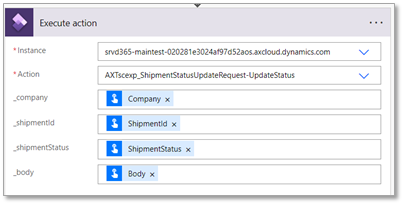
Update shipment booking status via OData
The shipment booking status can be updated in Axtension Shipping Connect via OData which are created via the Axtension Shipping Connect: Connect Framework.
The data entity available is "AXTscexp_ShipmentStatusUpdateRequest" and can be updated by using the action "UpdateStatus".
When updating the shipment booking status the following information must be provided:
- Company: Legal entity for the shipment booking
- ShipmentId: The shipment id of the legal entity
- ShipmentStatus: The shipment booking status
- Body: JSON body with update information for the shipment booking. See the example below with the available fields in the body:
{
"ShipmentCosts" : "576.80",
"ShipmentCostsCurrency" : "USD",
"TrackAndTrace" : "TAT-1234",
"AirWayBillNumber" : "AWB112",
"PlannedDeliveryDate" : "12/20/2024",
"PlannedDeliveryTime" : "2:45 PM"
}
The image below is an example of PowerAutomate Flow with the AXTscexp_ShipmentStatusUpdateRequest action.
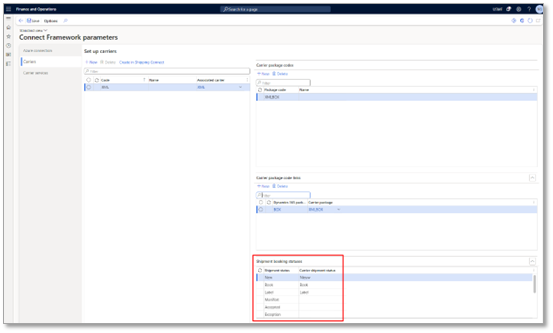
Shipment statuses can be configured per carrier in the Connect Framework parameters.
The column Shipment status shows the statuses supported by Axtension Shipping Connect. The column Carrier shipment status provides the ability to enter the carrier specific statuses and link them with the respective Axtension Shipping Connect Shipment statuses. The Carrier shipment status is the value imported via OData.
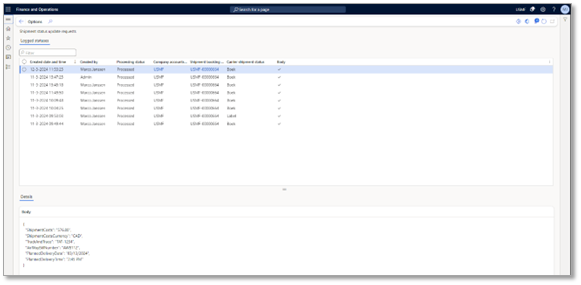
Logging of shipment status updates can be found in the Inventory Management > Inquiries and reports > Shipping Connect > Shipment status updates requests
Further assignment of configured carriers to mode of deliveries in Axtension Shipping Connect can be done in the familiar way.
Note: Extension points are available to add additional data to the export of the shipment booking. Axtension does not provide any support on customization of the extension points.
Use of the data after the export to an Azure Blob container is outside the support of Axtension. Write back of shipment information to Dynamics 365 with Axtension Shipping Connect is also not supported.
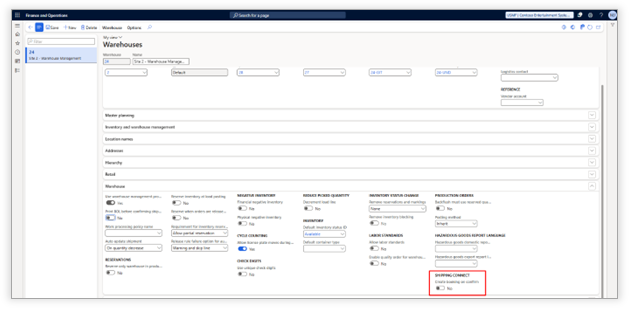
Automatically create shipment booking when confirming shipment
To simplify the shipment booking process for WHS shipments, it is now possible to automatically create a shipment booking when confirming the WHS shipment. Enabling this can be done per warehouse via the Shipping Connect parameters:
Or directly on the warehouse:
Third party billing setup
To setup the "Third party billing" functionality, make sure that there is a mode of delivery setup to use Third party billing.
To enable Third party billing for a mode of delivery, enable the checkbox "Third party billing" for the mode of delivery. This can be done in the Shipping Connect parameters form.

To specify the customer specific setup for third party billing, go to Inventory management -> Setup -> Shipping Connect -> Third party billing setup.
Select the customer for which you want to set up third party billing and add the details of the billing party and the appropriate account numbers for the carrier(s).
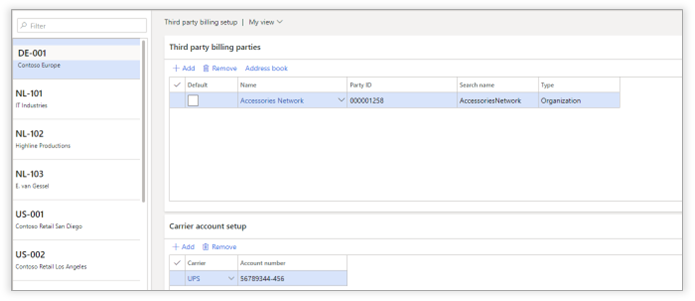
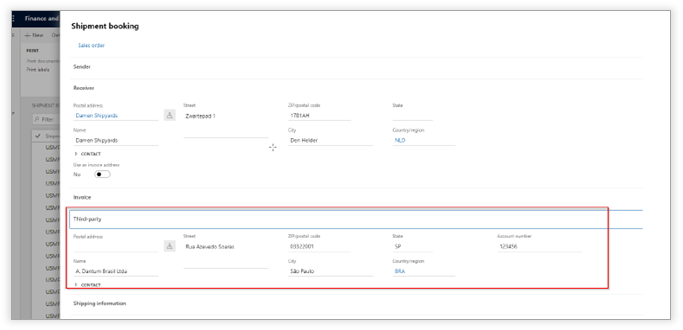
If there is a third-party billing setup for a specific customer and carrier, and a mode of delivery is used for which third party billing is enabled, the shipment booking will be done with the account number of the third party. To ensure the user creating the shipment is aware that third party billing is active, a warning will be shown when selecting a mode of delivery with third party billing.
Bill to receiver setup
To set up the bill to receiver functionality, go to Inventory management -> Shipping Connect ->Bill to receiver setup and select the customer for which this functionality needs to be set up. You can add the carrier account number by clicking the "Add" button.
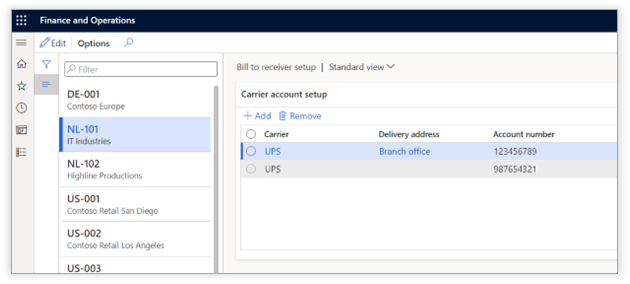
When creating a shipment booking for this customer with the configured carrier, the account number for the delivery address is used. The invoice address of the booking will be set to the same address as the delivery address.
If the delivery address is not specifically configured with a carrier account number, the generic carrier account number will be used for the selected customer. This can be done by keeping the delivery address field empty.

Customer settings
In the Shipping Connect section on the customer details page, the following customer specific settings can be specified:

|
Field |
Description |
|
Add transport cost to sales order |
Customer specific setting for adding the transport cost to the sales order. Possible values: - Default - No - Post shipment
If the value "Default" is selected, the default value specified in the Shipping Connect parameters will be used. |
|
Mail type |
The default mail type that is used for notifications from the Transsmart-platform |
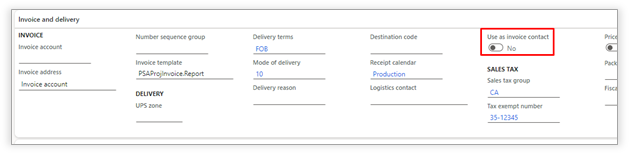
In the Invoice and delivery section a toggle is available to set the delivery address and delivery contact as standard invoice address and contact on a shipment booking.
Sales order settings
On the sales order header, the user has the option to specify if the transport cost for this specific order should be added to the sales order.

|
Field |
Description |
|
Add transport cost to sales order |
Sales order specific setting for adding the transport cost to the sales order. Possible values: - Default - No - Post shipment
If the value "Default" is selected, the default value specified at customer level will be used. |
|
Service point |
This field can be used when an integration with an online web shop is in place. This field is read-only and can only be filled by an interface with a web shop. |
Contact person setup
Several carriers require contact person details of the sending and receiving party. Depending on the type of shipment booking (incoming our outgoing), the corresponding contact persons can be configured.
The external contact person can be specified on the following entities:
- Customer
- Sales order (the value is defaulted based on the contact person specified on the customer, but can be adjusted)
- RMA order (the value is defaulted based on the contact person specified on the customer, but can be adjusted)
- Vendor
- Purchase order (the value is defaulted based on the contact person specified on the vendor, but can be adjusted)
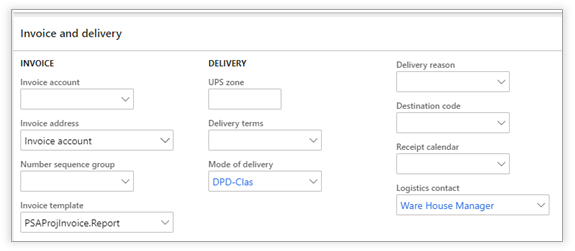
- For the entities mentioned above, the field "Logistics contact" can be used for specifying the right contact person. This field can be found in the fast tab "Invoice and delivery".
The internal contact person can be specified on the following entities:
- Site
- Warehouse
For the entities mentioned above, the field "Logistical contact" can be found in the fast tab "General" in the setup of the site or the warehouse.

Data upgrade script
As of version 10.1.0.23, the way the contact persons are determined are simplified by the setup as described above.
In the versions prior to this release, the contact person was determined based on the first party that was found based on the address of the customer/vendor.
If it is required that the contact person setup, as described above, is derived and filled based on the logic of the prior version, a data upgrade script is available. This upgrade data script can be found in the module Shipping Connect -> Data update tasks -> Update logistic contact data
User roles
The following user roles are available in Axtension Shipping Connect:
|
Field |
Description |
|
Shipping Connect Administrator |
This role enables users to configure Axtension Shipping Connect |
|
Shipping Connect generic shipment booking User |
This role enables users to create generic shipments with Axtension Shipping Connect |
|
Shipping Connect read only User |
This role enables users to view the Axtension Shipping Connect dashboard |
|
Shipping Connect User |
This role enables users to use all features of Axtension Shipping Connect |
Dashboard
The Shipping Connect dashboard contains an overview of all shipment bookings with their corresponding status.
The dashboard is in the module "Inventory management".
The following functions are available from the dashboard:
|
Field |
Description |
|
New |
The "New" button allows users to create new, generic shipment. For more information, see the section about the generic shipments in this document.
|
|
Details |
View the details of the selected shipment booking.
|
|
Update shipment booking status |
Refresh the status of the information in the dashboard.
|
|
Cancel shipment booking |
Cancel the selected shipment. This button is only enabled when canceling of the shipment booking is possible.
|
|
Track and trace |
If track and trace information is available, this information can be viewed by clicking this button. The user will be redirected to the track and trace information page of the executing carrier.
|
|
Inquiries |
The inquiries dropdown contains links to related information in Dynamics 365 for Finance and Supply Chain Management, if available.
|
|
Shipment request log |
This option shows the request that is sent to Transsmart. When troubleshooting any issues, this information can be useful of determining the problem. |
|
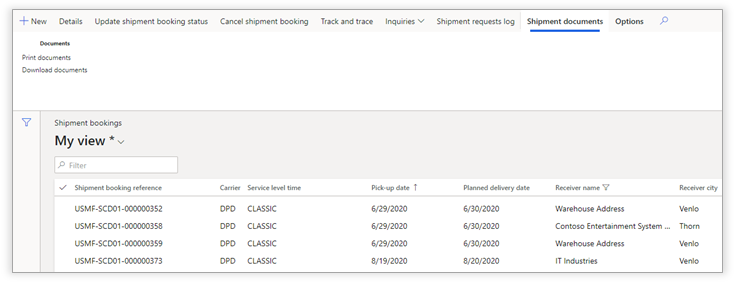
Shipment documents |
In the menu "Shipment documents" documents and labels can be reprinted if required. |
Failed shipments
In some scenarios it can occur that a shipment booking because it is rejected by the carrier or by the Transsmart-platform. In such cases, no label and/or documents are returned.
When clicking the shipment booking reference of a specific shipment it is possible to see why the shipment had failed and what needs to be corrected for the shipment to proceed.
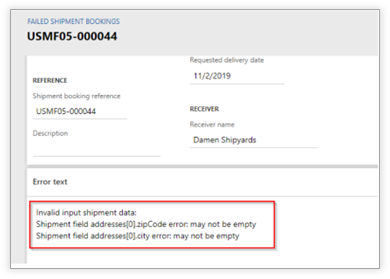
Depending on the reason for failing, data can be corrected in Dynamics 365 (for example the customer address) or on the shipment booking (for example the delivery date). After the error is fixed, the shipment booking can be sent gain to the Transsmart-platform, and the labels and/or relevant documents will be returned.
Preliminary shipments
Preliminary shipments are shipment specifications that can be created from the sales order. For more information, see the section "Preliminary shipments"
To get an overview of all preliminary shipments, the "Preliminary shipments" page can be opened from the module Inventory management.
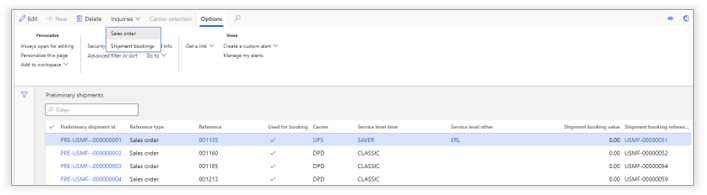
In this overview, the following information is available:
|
Field |
Description |
|
Preliminary shipment id |
The unique id of the preliminary shipment
|
|
Reference type & reference |
The reference to the order for which the preliminary shipment is created
|
|
Used for booking |
Indicates if a preliminary shipment is used for creating a shipment booking in the Transsmart platform |
|
Carrier |
The carrier specified on the preliminary shipment |
|
Service level |
The service level specified on the preliminary shipment |
|
Service level other |
The additional service level specified on the preliminary shipment |
|
Shipment booking value |
The shipment booking value specified on the preliminary shipment. |
|
Shipment booking reference |
If the preliminary shipment is used in a shipment booking that is send to Transsmart, the reference of this shipment booking is displayed. |
From the menu "Inquiries", the direct links to the related information can be accessed.
Generic Shipment
To create a generic shipment, click the "New" button in the Shipping Connect dashboard.
The following information can be provided:
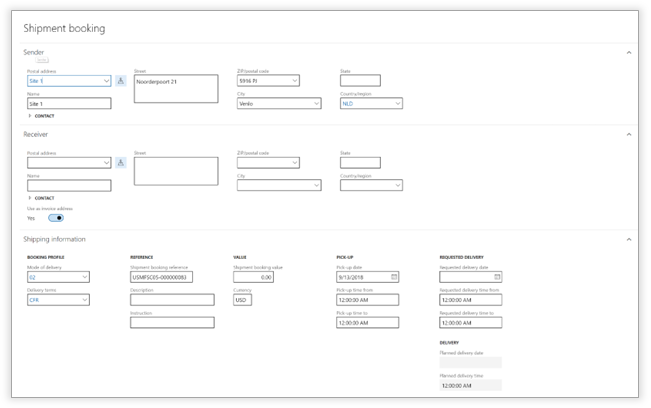
Sender
A sender can be selected from the address book in Dynamics 365 or can be entered manually.
|
Field |
Description |
|
Postal address |
The postal address from the address book in Dynamics 365 |
|
Name |
The name of the sender |
|
Street |
The street of the sender |
|
Zip/postal code |
The zip/postal code of the sender |
|
City |
The city of the sender |
|
State |
The state of the sender |
|
Country/region |
The country/region of the sender |
Under the heading "contact person", the user has the option to specify a contact person from the address-book.
Receiver
A receiver can be selected from the address book in Dynamics 365 or can be entered manually.
|
Field |
Description |
|
Postal address |
The postal address from the address book in Dynamics 365 |
|
Name |
The name of the receiver |
|
Street |
The street of the receiver |
|
Zip/postal code |
The zip/postal code of the receiver |
|
City |
The city of the receiver |
|
State |
The state of the receiver |
|
Country/region |
The country/region of the receiver |
Under the heading "contact person", the user has the option to specify a contact person from the address-book.
Shipping information
In the section "Shipping information", the user can specify which carrier to use and specify required pickup times.
|
Field |
Description |
|
Mode of delivery |
The mode of delivery to use |
|
Delivery terms |
The delivery terms for the shipment |
|
Shipment booking reference |
The reference of the shipment booking. This will automatically be generated but can be overruled. |
|
Description |
The description of the shipment |
|
Instruction |
Additional instructions that can be printed on the label (based on carrier, not all carriers support this functionality) |
|
Value |
The value of the shipment. |
|
Currency |
The currency of the value. |
|
Pick-up date |
The pick-up date of the shipment |
|
Pick-up time from/to |
Specifies the pick-up time window |
|
Requested delivery date |
The requested delivery date |
|
Requested delivery time from/to |
Specifies the delivery time window |
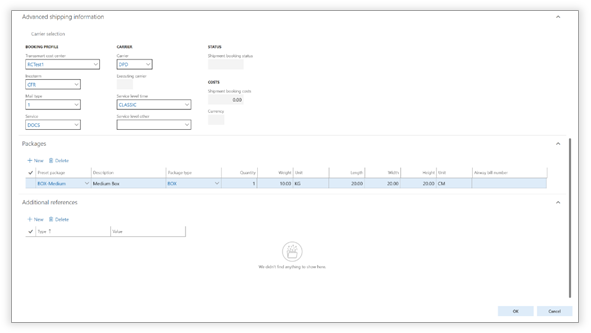
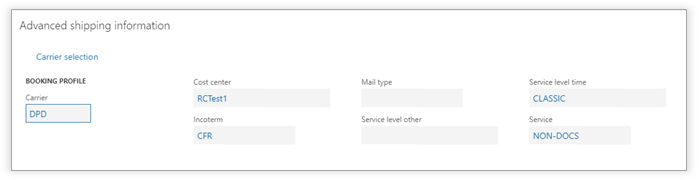
Advanced shipping information
In the "Advanced shipping information" section, a user can change the shipment settings as required.
If the package specification is filled, the user also has the option to open the "carrier selection" screen and select the appropriate carrier.
|
Field |
Description |
|
Transsmart cost center |
The Transsmart cost center to use. |
|
Incoterms |
The incoterms used for this shipment |
|
Mail type |
The Transsmart mail type to use. |
|
Service |
The Transsmart service to use. |
|
Carrier |
The carrier for the shipment |
|
Service level time |
The service level time for the shipment |
|
Service level other |
The service level other (additional service-level) for the shipment |
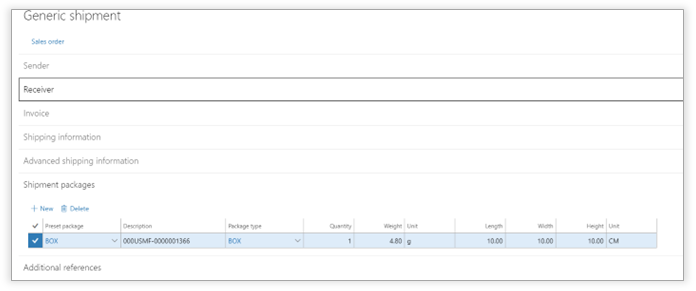
Packages
In the "Packages" section, the shipping specification can be created. For each container, the following information can be specified:
|
Field |
Description |
|
Preset package |
This offers the option to select a predefined container |
|
Description |
The description of the container |
|
Package type |
The Transsmart package type |
|
Service |
The Transsmart service to use. |
|
Quantity |
The number of containers |
|
Weight |
The weight of each individual container |
|
Unit |
The unit of measurement for the weight |
|
Length |
The length of the container |
|
Width |
The width of the container |
|
Height |
The height of the container |
|
Unit |
The unit of measurement for the size |
|
Airway bill number |
The airway bill number of the container |
Additional references
This section can be used to pass some additional references through to the Transsmart-platform. Which references are available and being used, depends on the configuration of the Transsmart-platform.
Sales order shipments
Set pickup and delivery times for sales orders
To determine specific delivery times on a shipment booking, Axtension Shipping Connect introduces the ability to set requested pick-up time from - to and requested delivery time from - to.
The legal entity default times can be set in the Shipping Connect parameters.
Which can then be specified per customer.
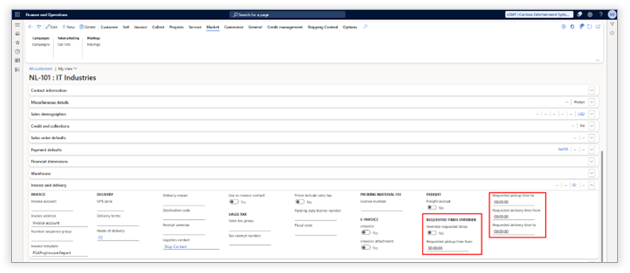
And ultimately be set per individual sales order header.

Set named place for Incoterms
To support Incoterm named places for shipments, Axtension Shipping Connect introduces the ability to set the default named place for a customer.
The named place for a customer can be set up by using the new address purpose: Named place.
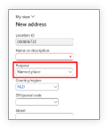
The new named place address purpose is enabled by running the data update task: Initialize named place address role type.

The default named place of a customer will automatically be applied as named place on:
- Sales orders
- Generic shipments
- Purchase orders
- Shipment definitions (when using Axtension Shipping Control)

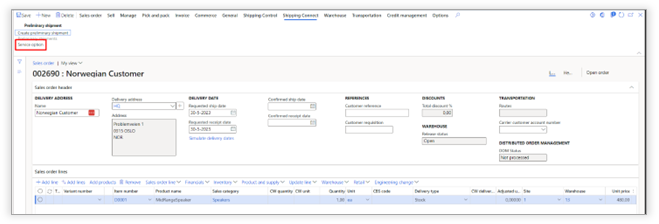
Preliminary shipments
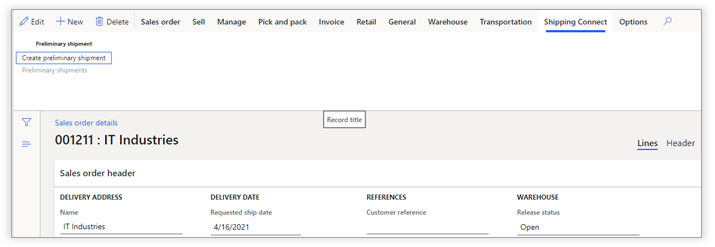
A preliminary shipment is a shipping specification that can be defined when creating the sales order. To create a preliminary shipment, the "Create preliminary shipment" option in the "Shipping Connect" menu can be used.
Shipping specification
When creating a preliminary shipment, the following information can be specified:

|
Field |
Description |
|
Transsmart cost center |
The Transsmart cost center for booking the shipment |
|
Delivery terms |
The delivery terms used for the shipment booking |
|
Requested pick-up date |
The requested pickup date used for the shipment booking |
|
Requested delivery date |
The requested delivery date used for the shipment booking |
|
Package information |
The specification of the packages and corresponding dimensions |
Rate shopping & carrier selection
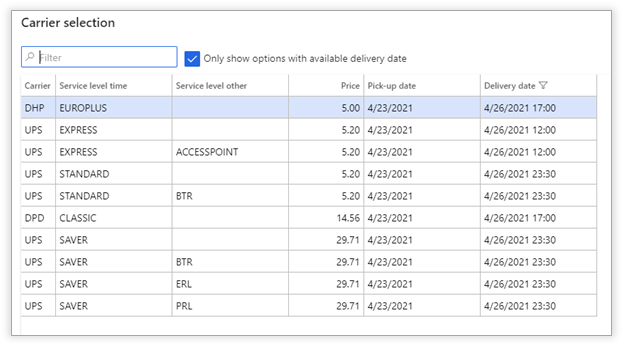
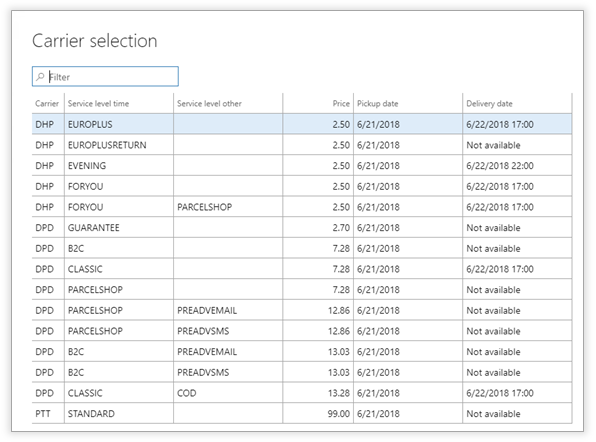
The carrier and service level on the created preliminary shipment is defaulted based on the mode of delivery on the sales order. This selection can be changed by making use of the "Carrier selection" functionality on the preliminary shipment.

When clicking the "Carrier selection" button in the menu, a dialog shows which available options are available for shipping the goods based on the information and the packaging specification as defined for the preliminary shipment. From this dialog, the most suitable carrier can be selected.
Create shipment booking when posting a package slip
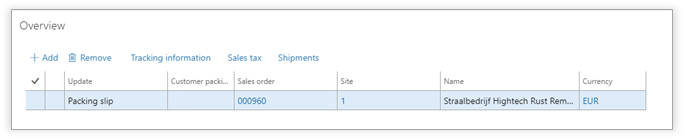
This feature can be enabled by setting the Create shipment booking parameter on the Sales order shipments to Picking list. Before posting the packing slip, the user must specify the shipment specifications. This can be done by clicking the Shipment button in the Overview section of the packing slip posting screen.
The shipment specification screen appears. If a preliminary shipment is created for the sales order, the shipping specification from the preliminary shipment will be used as default. If no preliminary shipment is used, then one line is added, and the weight is calculated based on the item information.

After saving this specification, the packing list can be posted. During the posting process, a shipment booking will be created and send to the Transsmart-platform, resulting in the labels being printed and/or downloaded. If a preliminary shipment is available for the sales order, the shipment information from the preliminary shipment is used for creating the shipment booking, otherwise the information will be taken from the sales order, based on the mode of delivery.

View shipment booking details from package slip journal
Information about the shipment booking related to a packing slip can be viewed from the packing slip journal.
The option "Details" opens the detail screen of the shipment booking, showing all relevant information.
The option "Shipments" opens the Shipping Connect dashboard, where labels and documents can be reprinted, the shipment booking can be cancelled etc.
Blind shipment
When the toggle "Blind shipment" on the sales order is set to "Yes", the printer for blind shipments will be used (for example, for printer documents on different stationary).
Create shipment booking when generating the picking list
This feature can be enabled by setting the "Create shipment booking" parameter on the Sales order shipments to Packing slip.
When the parameter is set to "Packing slip", a shipment booking is created automatically when the packing slip on the sales order is generated. The package set up on the shipment booking will be based on the configured package of the selected mode of delivery set on the sales order. See for more information section Mode of Delivery.
Warehouse management support
Create shipment booking from shipment
To create a shipment booking from the shipment, select a shipment in the Warehouse Management module.
Depending on the status of the shipment, the button "Send to Transsmart" is enabled. When clicking this button, a page with the details of the shipment is shown. In this screen, the user can create the specification of the shipment booking. If a preliminary shipment is created on the sales order, this information will be already filled in automatically and can be adjusted if required.
After the specification is completed, the shipment booking can be sent to the Transsmart-platform. Before sending over this specification, the user has the option to switch carrier. To view all available carriers for the shipment specification, click the button "Carrier selection".
A dialog appears with all valid options for the created shipping specification.
By clicking the "Ok" button, the shipment is sent to the Transsmart-platform, and the labels and/or documents are returned to Dynamics 365 for Finance & Supply Chain Management.
Create shipment booking from Pack functionality
Depending on the configuration, the shipment booking is created, and the labels are returned when closing each or the last container.
- Single colli shipments: each closed container creates a shipment booking in the Transsmart-platform and for each closed container the label is printed instantly. Note that this option results in a separate shipment for each box.
- Multi colli shipments: when closing the last container, all labels are for the shipment are printed and the shipment booking is created in the Transsmart-platform.
Purchase orders
When using Axtension Shipping Connect for creating pickup orders for purchase orders, the Shipping Connect buttons will be available on the purchase tab in the ribbon menu.

The "Send to Transsmart" button will become available after confirming the purchase order and setting a mode of delivery on the header. The mode of delivery can be defaulted from the vendor. After the "Send to Transsmart" button is clocked, the shipment booking is created, and the labels and/or documents will be printed.
Purchase returns
When the "Enable purchase order shipments" parameter is set to "Yes" under the General tab of the Shipping Connect parameters, this enables the usage of the purchase order return shipments.
The process for purchase order return is the same as a normal purchase order pickup, only the purchase order will be marked as a returned order.
Sales return orders (RMA)
When the "Enable return order shipments" parameter is set to "Yes" under the General tab of the Shipping Connect parameters, this enables the usage of the sales order return (RMA) shipments.
The process for creating shipment bookings for return order works in the same way as creating shipment booking for pickups of the purchase orders.
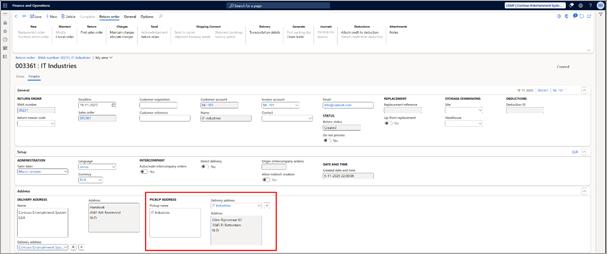
Set pickup address for return orders
A pickup address can be added to a return order. The defaulted pickup address is the delivery address of the customer and can optionally be adjusted when setting up the return order.
Transfer order
To use the Shipping Connect functionality for transfer orders, the "Enable Shipping Connect for transfer orders" checkbox needs to be set to "Yes".
After ensuring the setting is enabled, the "Ship transfer order" button located on the transfer order will ship the transfer order in Dynamics 365 Finance & Supply Chain management and the create shipment booking at the carrier will be created and the labels will be returned.
Logging
Shipping Connect can keep track of all requests and responses that are sent to or received from Transsmart. This functionality logs all request that are send and received from the Transsmart platform, making it easier to determine the cause of error in case of unexpected behavior.
By default, this logging is disabled. The logging can be enabled and viewed in the module Inventory Management" under the sub-menu "Inquiries and reports.
When selecting the menu option "Shipping Connect request logging", the following screen appears:
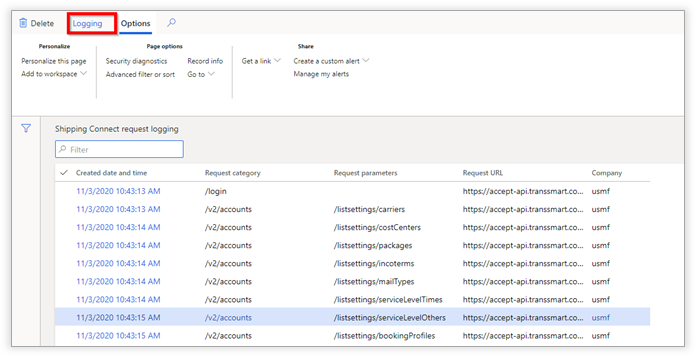
To enable or disable the logging, click the "Logging" button. When the logging is enabled, all requests to and responses from the Transsmart-platform will be logged. To view more detailed information, the details of each request can be viewed by clicking on the field "Created date and time" in the list page.
Workspace and Analytics
The Axtension Shipping Connect workspace can be utilized to get an overview of shipment bookings and shipment statistics. The Shipping Connect workspace can be found in the module "Inventory management" or directly under the workspace section of Dynamics 365 Finance & Supply Chain Management.
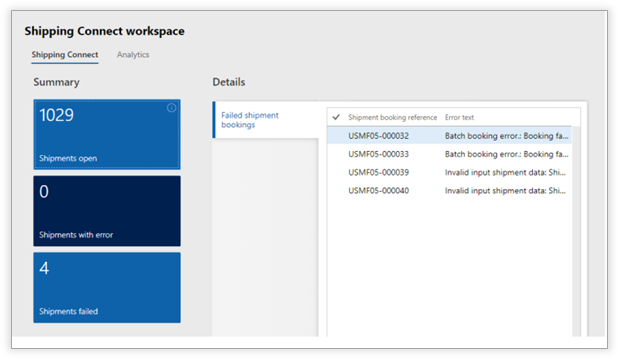
Shipping Connect Workspace
The first page (the tab "Shipping Connect") consists of a tiles section and a details section. There are 3 default tiles which can be used:
Shipments open
This tile shows the number of shipments which do not have status "Done" yet. Clicking this tile opens the shipment booking screen filtered to show all shipment bookings except those with the status "Done".
Shipments with error
This tile shows the number of shipments which have an error state. Clicking this tile opens the Shipment bookings screen filtered to show all shipments with an error state.
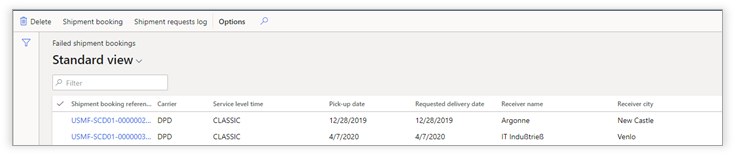
Shipments failed
This tile shows the number of failed shipments (also shown in the details section). Clicking the tile opens the failed shipments screen.
The details section shows failed shipment bookings with the corresponding error text.
Analytics
The "Analytics" tab will open the Axtension Shipping Connect Power BI report. This report consists of four sections:
- Dashboard
- Estimated costs
- Shipment delays
- Package details
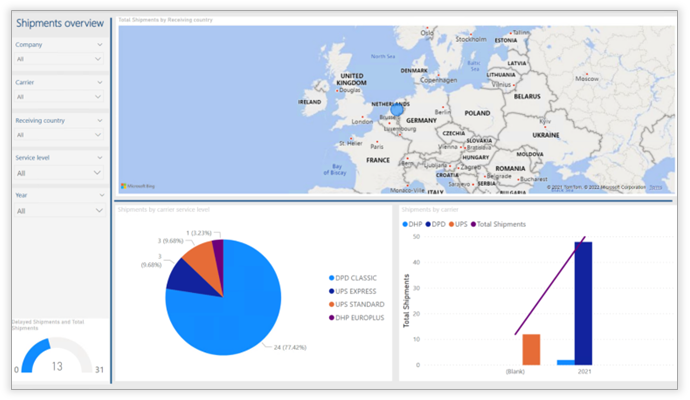
For each of the mentioned pages it is possible to filter de data based on legal entity, carrier, receiver country, service level and year, and possible to modifying to the needs of the organization.